White Pizza with Sausage, Spinach and Ricotta

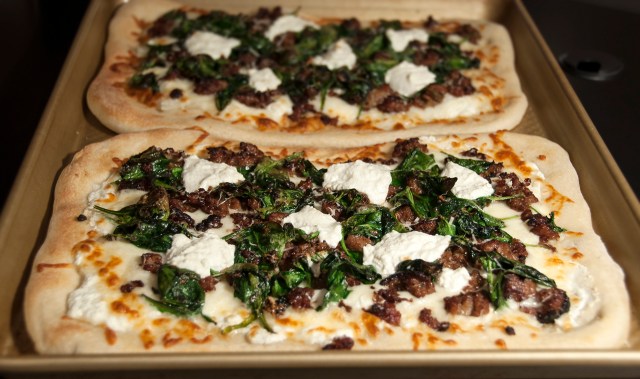
Crumbled Sausage, Spinach and Ricotta Cheese… yes! When Matt suggested that we try these toppings on our latest batch of Trader Joe’s pizza crust I enthusiastically agreed and, after enjoying the end result last night, I don’t know why we never tried this delicious combination before!

White Pizza with Sausage, Spinach and Ricotta_c

For Christmas Matt gave me My Pizza by Jim Lahey and, although I haven’t actually made any of the recipes yet (I’m holding out for a pizza stone and peel first!), the cooking method that we used for this recipe was definitely inspired by the book. I usually cook pizza at 425°F but, after reading Jim Lahey’s chapter on cooking dough, we decided to try something radically different and instead broiled the pizzas in a preheated 500°F oven. The resulting pies had a whole new level of caramelization and wonderful crispiness that I’ve never before experienced in a home-cooked pizza. Yum!

White Pizza with Sausage, Spinach and Ricotta

You will need…
2 Sweet Italian Sausages
Olive Oil
2-3 cloves Garlic, minced
2-3 handfuls Baby Spinach
1 package fresh Pizza Dough (as usual, I used Trader Joe’s dough)
Flour, for dusting pizza dough
Approx. 1/4 cup coarsely chopped Yellow Onion (optional)
12 oz. Ricotta Cheese
3-4 cups Shredded Part Skim Mozzarella Cheese
Freshly Grated Parmesan Cheese

Ready to go in the oven!

Ready to go in the oven!

Directions:
Preheat your oven to 500°F. Remove the sausage from the casings and press into the bottom of a preheated skillet over medium-high heat. Allow it to cook undisturbed for 2-3 minutes and then use a metal spatula to stir the sausage and separate it into crumbled bits. When the sausage is completely cooked through (and, ideally, getting a little crispy on the edges!), transfer to a paper towel lined plate and set aside.

Return the skillet to the stove over medium heat and, if needed, add about a tablespoon of olive oil (there might already be enough fat in the skillet from the sausages). Add the minced garlic and allow it to cook in the oil until it is fragrant and just turning golden brown. Reduce heat to medium-low and add the spinach. Use tongs to toss and stir the spinach until it is wilted then remove from heat.

On a flour-dusted surface, halve the pizza dough and stretch each piece into a generous individual-sized pie. (Mine usually each end up being about 6” by 10” which fits well on my rectangular pan.) Place the crusts on a non-stick or lightly oiled pan (or use a pizza stone, if you have one!).

White Pizza broiling in the oven.

White Pizza broiling in the oven.

Spread about half of the ricotta cheese onto the two pizza crusts with the back of a spoon, leaving a 1” margin around the edges. Sprinkle on some chopped onions if you want (Matt didn’t want any but I tried them and they were great!) and top with the shredded Mozzarella. Next, evenly distribute the cooked sausage over the pizzas and add the wilted spinach and garlic. Drop the remaining ricotta onto the pizza in spoonfuls and finish off the pizzas with freshly grated Parmesan.

Just before putting the pizzas in the preheated oven, switch the oven to “Broil” and cook the pizzas on the top rack for approximately 10 minutes. Check on the pizzas frequently (it’s OK to open the door) to make sure that they are not burning. The pizzas are done when the cheese is turning golden brown and the crust is just starting to brown on the edges.

White Pizza with Sausage, Spinach and Ricotta 2_c

Tasty Treats for the Big Game

Have you ever noticed that everyone always refers to this weekend’s championship sporting event as The Big Game rather than just saying the Superbowl?  I guess it’s a legal thing – am I even allowed to type “The Superbowl” here without the NFL’s permission?? – but I digress.

For this weekend’s ‘big game’ we’re going bowling at the awesome, tater-tot-filled North Bowl in Philadelphia right before the game and then we’ll head over to Matt’s sister’s house for pizza, beer and commercial football watching.  Even though I won’t be doing any cooking of my own, I still wanted to share a few recipes that I know would be delicious to snack on during the Superbowl.  Enjoy!

BBQ Chicken Quesadillas

BBQ Chicken Quesadillas – A delightful combination of shredded chicken, cilantro and barbecue sauce, all held together with plenty of melted Monterey Jack cheese!

Jalapeno Poppers

Jalapeño Poppers – A baked, spicy treat filled with low fat cream cheese and part skim mozzarella (they’re practically healthy!)

Tomatillo Salsa

Tomatillo Salsa This bright green dip is packed with roasted tomatillos, cilantro, garlic, onion and jalapeños.  Make the day before and serve cold!

Caprese Skewers

Bite-Sized Caprese Skewers – Tomato, basil and mozzarella on a stick!  Perfect for healthier eaters.

Spaghetti Squash with Italian Sausage

Shortly after Thanksgiving I bought a big yellow spaghetti squash at the grocery store with absolutely no plan or recipe in mind. Luckily squash keeps well so I had a few weeks to figure out what to do with it. By Christmas I decided that it needed to get eaten so I searched around online and found this beautiful, simple and delicious baked spaghetti squash recipe from Todd at White On Rice Couple.

This dish is basically a fun twist on spaghetti and meatballs that uses squash and sausage instead of pasta and ground beef. The result is a tasty one-skillet dish that allowed me feel like I was eating a relatively healthy meal… it’s mostly squash, after all! 🙂 Add some freshly grated cheese and oregano and you can’t go wrong!

Sausage and Spaghetti Squash

Before you read my version of the recipe, I strongly recommend that you check out the original recipe at WhiteOnRiceCouple.com. Todd’s photos are amazing!!

Spaghetti Squash with Italian Sausage, Parmesan and Oregano

You will need…
1 Spaghetti Squash, halved lengthwise with seeds removed
Olive Oil
5-6 Shallots, thickly sliced
3 cloves Garlic, crushed
3/4 lb. Italian Sausage, uncooked
1 cup Grated Parmigiana Reggiano cheese
1 tablespoon finely chopped fresh Oregano
Salt and Pepper to taste

Directions:
Drizzle approximately 1 tablespoon of olive oil onto a large baking sheet. Place the squash halves face-down on the olive oil and bake in a preheated 375° oven for about 45 minutes until the squash flesh easily separates into strands. Allow the squash to cool slightly, then use two forks to separate all of the flesh into spaghetti-like strands.

Making the Sausage Balls

While the squash cools slice open the casing on one end of a sausage and use your fingers to pinch about an inch of the sausage meat out of the casing. This will give you a small sausage “ball.” Repeat this process with the rest of the sausage and discard the casing.

Add a tablespoon of olive oil to a large skillet over medium heat. Add the shallots and garlic and saute until soft, about 30 seconds, then carefully add the sausage in a single layer. Allow the sausage balls to cook, undisturbed, until the bottoms are browned and then continue cooking, stirring occasionally, until the sausage is cooked through. Add the squash into the sausage mixture and stir well to combine. When the squash is reheated remove the skillet from heat and toss in the grated Parmigiana Reggiano, oregano, and salt and pepper to taste. Garnish with a spring of oregano and some extra grated cheese and enjoy!

Sausage with Spaghetti Squash

Whoopie Pies!

We’re home from Las Vegas so it’s time for more holiday recipe catch-up.  Next up on the list: homemade whoopie pies!

Whoopie Pies

We spent the last hours of 2012 at a New Year’s Eve Extravaganza and Celebrity-Themed Potluck hosted by Kristen from Swig O Sunshine.  The rules of the potluck were simple: bring a dish with a celebrity-named twist.  Matt and I were determined to come up with a fun contribution and, after weeks of bouncing around ideas we chose Whoopi Goldberg Pies with Leonardo diCappucino Filling.  (We previously wanted to make Twice-Baked Channing Taters but the logistics of keeping cheesy ‘taters warm until midnight ultimately pushed us in the dessert direction instead!)  Other cleverly-named treats at the party included Guacy Balboa guacamole, Honey Brie-Brie baked brie, Brad Pittzelle cookies (with and without Jennifer Anise-ton!), Bernie Mac and Cheese, and several Kevin Bacon-themed goodies.

This was our first attempt at making whoopie pies but, thanks to the classic recipes in this whoopie-filled cookbook they turned out great!  We followed the recipe exactly (right down to using vegetable shortening instead of butter in the filling) and then we added the necessary diCappucino flair with some powered instant cappucino.  The instant cappucino didn’t have a super strong flavor so if we were going to make the coffee-flavored filling again we might try instant espresso instead for a little more kick.

I made this sign to go along with our 'whoopi' pies at the potluck dinner.

I used cartoon faces and photoshop to make a sign that illustrated the celebrities that inspired this dessert at the potluck dinner.

Whoopi Goldberg Pies with Leonardo diCappucino Filling (from Whoopie Pies)

Ingredients for the Classic Chocolate Whoopie Pie…
1 2/3 cups All-Purpose Flour
2/3 cup Unsweetened Cocoa Powder
1 1/2 teaspoons Baking Soda
1/2 teaspoon Salt
4 tablespoons Unsalted Butter, at room temperature
4 tablespoons Vegetable Shortening
1 cup packed Dark Brown Sugar (we used Dark Muscovado Sugar)
1 Egg
1 teaspoon Vanilla Extract
1 cup Milk

Ingredients for the Classic Marshmallow Filling…
1 1/2 cup Marshmallow Fluff
1 1/4 cup Vegetable Shortening
1 cup Confectioner’s Sugar
1 tablespoon Vanilla Extract (to turn this into “diCappuncino” filling, substitute in 1 tablespoon Instant Espresso that’s been dissolved into 1 tablespoon warm water instead of the vanilla)

Directions:
To make the pies, sift together the flour, cocoa powder, baking soda and salt.  In a stand mixer, combine the butter, shortening, and brown sugar on low speed, then increase the speed to medium and beat until the mixture is smooth and fluffy, about 3 minutes.  Add the egg and vanilla and beat for another 2 minutes.

Slowly add the flour mixture and the milk and and mix on low to thoroughly combine.  Scrap a spatula down the sides of the bowl to loosen any dry ingredients and then beat until completely combined.  Use a spoon to drop batter in 1 or 2 tablespoon increments 2 or 3 inches apart onto a parchment-lined baking sheet.  (We used 2-tbsp scoops which resulted in about 26 3.5″ pie halves; go smaller for more but just be consistent since they’ll need to fit together later!)  Bake the pies on the center rack of a preheated 375° oven for about 10 minutes for 1 tbsp pies or 12-13 minutes for 2 tbsp pies.  Remove from oven and allow to cool on the sheet for 5 minutes before transferring to racks to cool.

Whoopie Pies ready for filling

To make the filling, beat together the marshmallow fluff and vegetable shortening for approximately 3 minutes.  Start on low speed and increase to medium until the mixture is smooth and fluffy.  Reduce the speed to low and slowly add the confectioner’s sugar and vanilla (or espresso!) and mix until incorporated.  Increase mixer speed to medium and beat for about 3 minutes until the mixture is fluffy.

Once the pies are completely cooled arrange them in pairs with one flat side facing up as shown in the above photo.  Place a generous amount of filling to the flat side of the pie by either spooning the filling on or using a pastry bag for a more polished look.  Top the filled pies with the other pie halves and enjoy!

Whoopie Pies 2

Weekly Photo Challenge: Illumination

OK, I know that I skipped last week’s “Resolved” photo challenge, but, photo or no photo, I am proud to share that I am going strong on Day 53 of my “Streaking” resolution.  “Streaking” was my December challenge to run/elliptical at least a mile a day between Thanksgiving and New Year’s but when January 1st came around I decided to keep the streak going until June 8, 2013 (which happens to be our wedding day).  We actually kicked off 2013 with a 2.4 mile RUN — the farthest I’ve run since college — but that’s a story for a different post.  🙂

This week’s Weekly Photo Challenge is Illumination:

Illumination

Illumination is a topic near and dear to me because Matt and I actually manufacture and sell these lights for a living!

Also related to the week’s challenge topic is the city that we’re traveling to this week:

Illumination

Nope, not Paris… we’re going to Vegas!  We go once a year for a big trade show so we’ll be working hard but I’m pretty sure that we’ll be able to find time to eat plenty of yummy food and take lots of photos.  🙂  Have a good week everyone!

Buffalo Chicken Sausage Quesadillas

This is my first post in more than 10 days.  I think that’s the longest I’ve gone since starting my blog but hey, sometimes life gets in the way of blogging!  🙂  Luckily I had lots of good things going on at the beginning of the year which means that I’m just now getting around to posting about some of the foods and activities that we’ve enjoyed in 2013 thus far.  First up: Buffalo Chicken Sausage Quesadillas!

Buffalo Chicken Sausage Quesadillas

The quesadillas were super-easy to make and they were cheesy, crispy and had just the right amount of heat thanks to the Frank’s Red Hot Buffalo Wings Sauce that we found at the grocery store.  To temper the heat and acheive that classic “buffalo” experience, we dipped the quesadillas in low-fat blue cheese dressing and had a few celery sticks on hand when we wanted some crunch.  For the filling we used a pound of Maiale’s buffalo chicken sausage that we had been saving in the freezer from the Farmer’s Market last summer, but if you don’t have access to actual “buffalo” sausage you could easily substitute regular sausage or even shredded chicken in — just use some of the Frank’s Red Hot inside of the quesadilla to get that extra kick!

Buffalo Chicken Sausage Quesadillas (makes 4 large quesadillas)

You will need…
1 pound Buffalo Chicken Sausage, fully cooked and chopped into small pieces
Peanut Oil, for coating pan between quesadillas
4 large “burrito” sized Flour Tortillas (12-13″ diameter)
Approx. 2 cups shredded Monterey Jack Cheese (or Colby/Monterey mix)
1/2 cup Frank’s Red Hot Buffalo Wings Sauce, for dipping
1/2 cup Low-Fat Blue Cheese Dressing, for dipping
4-5 stalks Celery, cut into 4″ sticks

Assembling the Quesadillas on the stove

Directions:
Heat a large heavy-bottomed skillet over medium heat.  Pour a small amount of peanut oil into the bottom of the pan (just enough to thinly coat it) and allow it to heat up.  Carefully place one tortilla in the bottom of the pan and evenly spread about a quarter of the shredded cheese over the entire tortilla.  When the cheese starts to melt arrange a quarter of the chopped sausage onto one half of the tortilla.

When the cheese has melted completely use a spatula to carefully flip the cheese-only half of the tortilla over top of the sausage.  Press down lightly on the top of the quesadilla to help hold everything together.  At this point the quesadilla is basically done but you may want to flip the finished quesadilla over in the pan until both sides are golden brown and crispy.  Remove the finished quesadilla from the pan and repeat the entire process (starting with the thin layer of oil) for your other 3 tortillas.

Cut the quesadillas into wedges and serve with buffalo sauce, blue cheese dip, celery, and a cold beer.  Enjoy!

Cheesy and delicious!

Weekly Photo Challenge: Bailey’s 2012 in Pictures

This week’s WordPress Weekly Photo Challenge is “My 2012 in Pictures” but I renamed it “Bailey’s 2012 in Pictures” because that’s what it is! Here are photos of Bailey the Little GSP from every month this year:

January
Just an iPhone photo of Bailey looking cute!

February
Bailey in Ridley Creek State Park on an unseasonably warm winter day

March
Out for a walk on The Darlington Trail

April
Playing fetch on a beautiful Spring day

May
It’s a bird, it’s a plane, it’s SUPER BAILEY! (Dock Daze Dockdogs Event)

June
Bailey shows off her World Qualifier ribbon at Eastern Regional Championships

July
Showing off for the crowds at the Monmouth County Fair

August
Mid-air contortion at the Dover Summer Splash

September
Modeling with her ribbons from the Ocean County Decoy and Gunning Show

October
Staying warm and safe during Hurricane Sandy

November
Posing at DockDogs World Championships in Dubuque, Iowa

December
Racing around roadrunner-style in the snow

Favorite Recipes of 2012

This post from Savory Simple inspired me to gather my favorite recipes of 2012 into one post. Enjoy and Happy New Year!

Bucatini with Sausage and Asparagus in a White WIne SauceEggplant ParmesanPeanut Butter Cream Pie

Veggie Wraps with Hummus, Feta and BasilCupcakes with Chocolate Buttercream IcingSmoky Pork Tinga Tacos

Frozen Strawberry MargaritasBBQ Chicken QuesadillasTortellini with Pesto, Asparagus and Tomatoes

Poblano Sausage Tacos with Avocado CremaChocolate-Dipped Coconut CookiesPozole Verde

……………………………………..

Bucatini with Sausage, Asparagus & Tomato in White Wine Sauce | Eggplant Parmesan | Peanut Butter Cream Pie

Veggie Wraps with Feta, Hummus & Basil | Cupcakes with Chocolate Buttercream Frosting | Smoky Pork Tinga Tacos

Frozen Strawberry Margaritas | BBQ Chicken Quesadillas | Pesto Tortellini with Asparagus

Poblano Sausage Tacos with Lime-Cilantro Slaw & Avocado Crema | Chocolate-Dipped Coconut Cookies | Pozole Verde

Easy Tomato-Basil Bruschetta

In addition to our Shrimp with Penne and Herbed Cream Sauce Matt and I made a double batch of traditional Tomato-Basil Bruschetta for Christmas Eve dinner.  The bruschetta was surprisingly easy to make and everyone loved it!

Super Easy Bruschetta!

Super-Easy Tomato-Basil Bruschetta (from The New Best Recipe)

You will need…
8-9 medium Tomatoes, cored and cut into 1/2 inch pieces
2/3 cup Basil, shredded
Salt and Pepper, to taste
1 loaf of crusty Bread – we used Ciabatta
3 tablespoons Olive Oil
1-2 cloves Garlic, cut in half lengthwise

Directions:
Combine the tomatoes, basil and salt and pepper.  Cut the loaf into 3/4 inch thick slices and place on a baking sheet.  Toast the bread under a broiler, flipping once, until both sides are golden brown.  Rub the cut sides of the garlic clove over the top side of each slice of bread and then brush on a small amount of olive oil.  Top the slices with a generous helping of the tomato-basil mixture and serve immediately.

Shrimp with Penne in Herbed Cream Sauce

For some reason our families make nearly identical holiday meals, usually featuring a juicy filet roast, twice-baked potatoes and green beans.  Matt and I love this dinner (and in fact got to enjoy it twice this month – once at my mom’s and again with Matt’s family!) but when it came time for us to host Christmas Eve dinner at our house we decided to do something completely different.

After an online search we settled on Shrimp and Penne in Herbed Cream Sauce and it was perfect!  The shrimp were tender and the combination of white wine, garlic, parsley and basil made the whole kitchen smell wonderful.  The pasta was nicely coated in a light cream sauce and the red pepper flakes provided just the right amount of heat.  To streamline the cooking process I prepped the herbs, tomatoes and cheese ahead of time so assembling this dish was actually pretty easy once our guests arrived.

In addition to the shrimp and penne we served fresh bruschetta, a tossed salad with Matt’s mom’s balsamic vinaigrette, and wedges of rosemary-studded Italian bread with butter.  We finished off the meal with a tray of Christmas cookies, chocolate-dipped coconut sticks, and white chocolate holiday bark.  Yum!

Shrimp and Penne in Herbed Cream Sauce (iPhone photo)

Shrimp with Penne in Herbed Cream Sauce  (from Giada De Laurentiis)
serves 4-5; we doubled this to serve 7 and had enough leftovers for dinner a few days later

You will need…
1 pound Penne Pasta
1/4 cup Extra Virgin Olive Oil
1 pound medium Shrimp, peeled and deveined
4 cloves Garlic, pressed through a garlic press
1/2 teaspoon Salt
1/2 teaspoon Pepper
1 – 15 oz. can Whole Tomatoes, drained and roughly chopped
1/2 cup Basil Leaves, chopped
1/2 cup Flat-Leaf Parsley, chopped
1/4 teaspoon Red Pepper Flakes
1 cup White Wine (we used a Chardonnay)
1/3 cup Clam Juice
3/4 cup Heavy Whipping Cream
1/2 cup Parmesan, freshly grated

Directions:
Cook the pasta in a large pot of boiling water then drain and set aside.  Meanwhile, heat the olive oil in a large skillet over medium-high heat.  Add the shrimp, garlic, 1/2 teaspoon of the salt and 1/2 teaspoon of the pepper.  Cook the shrimp for about 3 minutes until they are pink and cooked through.  Remove the shrimp with a slotted spoon and set aside.

Add the tomatoes, 1/4 cup basil, 1/4 cup parsley and the red pepper flakes to the skillet.  Cook for 2 minutes while stirring constantly, then add the wine, clam juice and cream.  Bring to a boil then reduce the heat and simmer for 7-8 minutes until the sauce thickens.  Add about half of the Parmesan along with the shrimp, pasta and remaining basil and parsley.  Mix well until the pasta is coated and season to taste with salt and pepper.

Transfer the pasta to a serving dish and top with the remaining freshly grated Parmesan.  Serve with a wedge of Italian bread and a glass of white wine.

Shrimp with Penne in Herbed Cream Sauce