Grilled Shrimp Salad with Mediterranean Lemon Dressing

Matt and I are getting married in 2 days! All of our wedding prep is pretty much done and now we’re just relaxing and waiting for the weekend to get here. (Oh, and also checking the weather about a million times a day… Tropical Storm Andrea better hurry up and get out of here in time for our outdoor ceremony on Saturday afternoon!) 🙂

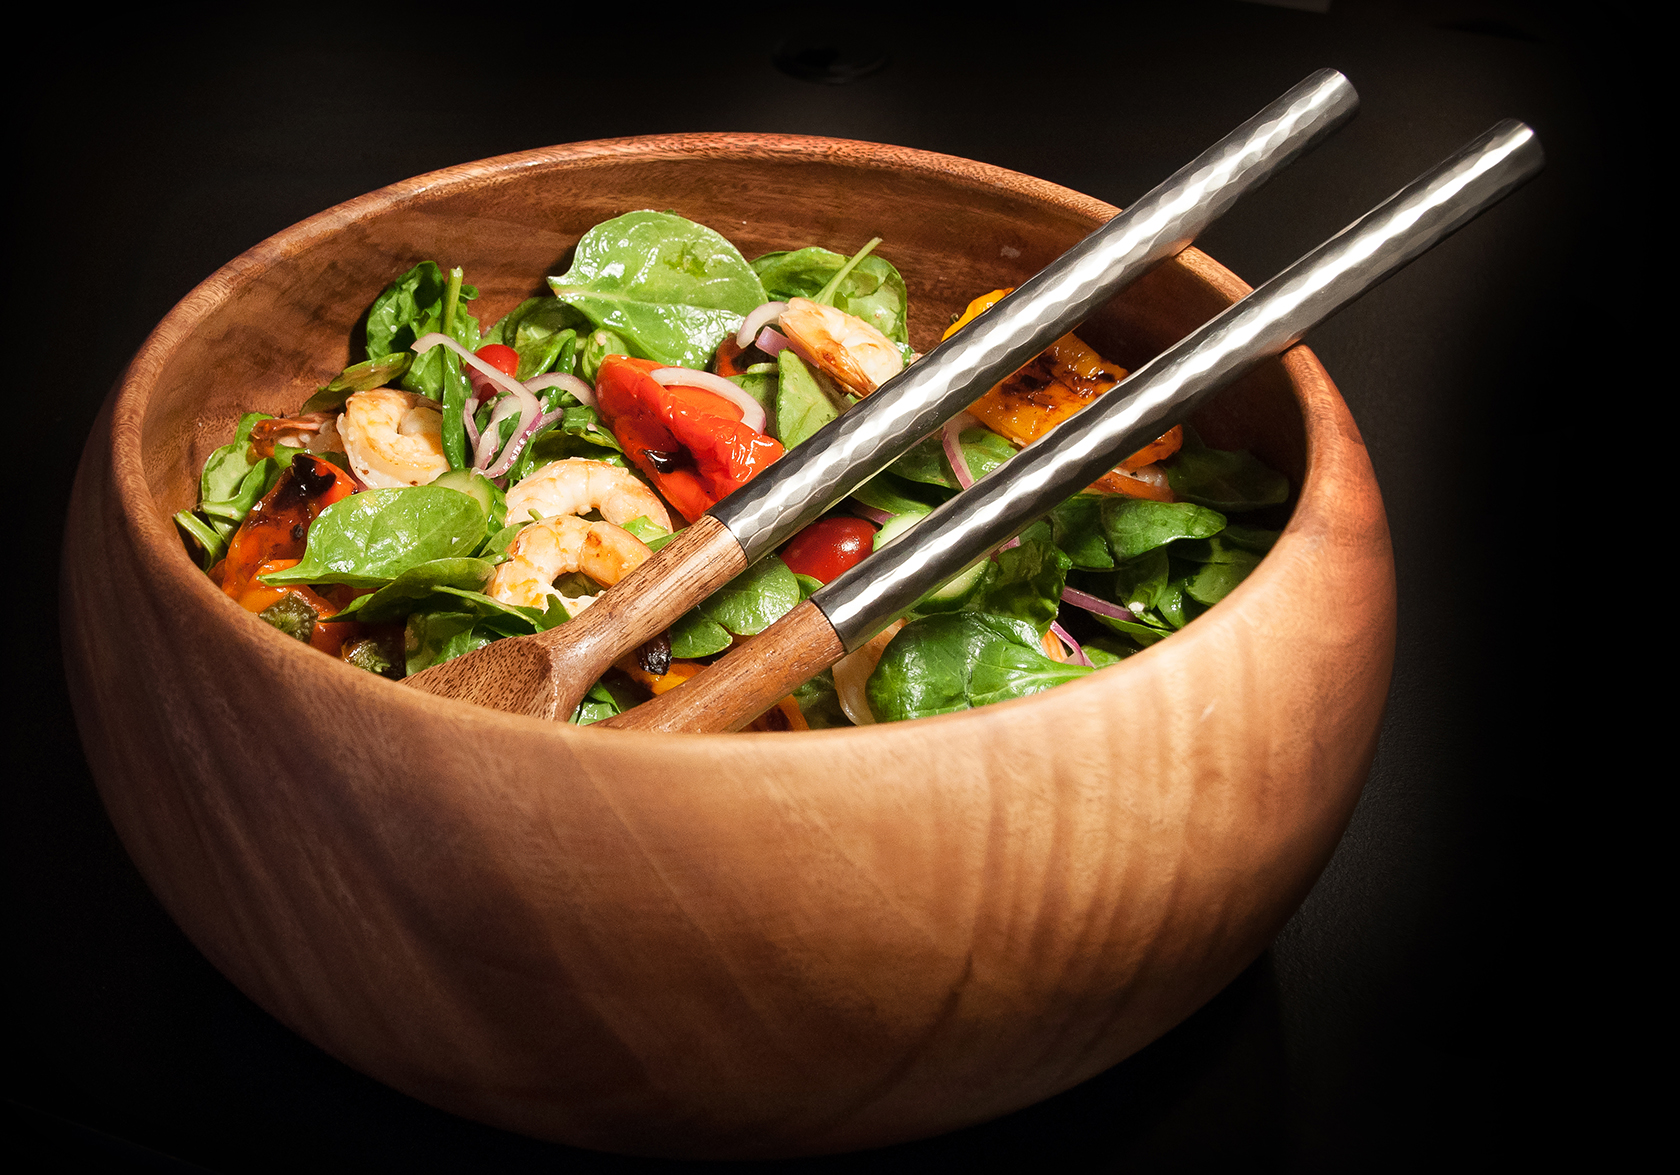
We’ve been going out to eat a lot lately but we did make one planned meal this week using a new cookbook that my mom got us as a wedding present. The book is entitled Salad for Dinner so, as you might guess, our meal was a nice and hearty entree salad! This was a fresh, summery meal that was perfect for the warm weather we had earlier this week. Doesn’t it look yummy?

Grilled Shrimp Salad with Lemon Mediterranean Dressing

Grilled Shrimp Salad with Mediterranean Lemon Dressing (from Salad for Dinner)

For the Mediterranean Lemon Dressing…
1 tablespoon Tahini (ground sesame seed paste)
2 cloves Garlic, pressed through a garlic press
1/2 teaspoon Salt
1/4 cup freshly squeezed Lemon Juice
1/3 cup Extra Virgin Olive Oil

For the salad…
1 lb. large Shrimp, peeled and deveined
2 tablespoons Olive Oil
1-2 cloves Garlic, pressed through a garlic press
8 oz. Mini Bell Peppers
8 cups Baby Spinach
1 pint Cherry Tomatoes, sliced in half
2-3 Persian Cucumbers, sliced into 1/4″ rounds
1/4 – 1/2 Red Onion, very thinly sliced
Feta Cheese, crumbled
Fresh Oregano Leaves
Lemon Wedges
Pita Bread Crisps*

Directions:
Combine all of the dressing ingredients in a jar. Close the lid and shake vigorously to combine. (You could also use a bowl and whisk the ingredients together if you don’t feel like shaking.) Refrigerate the dressing until you are ready to use it.

Mix together the shrimp, garlic and olive oil in a large bowl. Cover and refrigerate for at least 1 hour. After the shrimp has marinaded, remove from the fridge and stir in the mini bell peppers. Grill the shrimp and bell peppers over medium-high heat. When the shrimp turn pink (3-5 minutes), remove them from the grill and set aside. Continue cooking the bell peppers until they are soft and blackened in spots.

In a large salad bowl, combine the spinach, tomatoes, cucumbers and onion. Dress with the Mediterranean Dressing and mix well. (I used about half of what the recipe made.) Toss in the warm shrimp and bell peppers. Serve the salad in shallow bowls with pita crisps and garnish with feta, oregano, and lemon.

Grilled Shrimp Salad

Grilled Shrimp and Bell Pepper Salad Close Up

*To make pita bread crisps, slice pita bread into 1 – 1 1/2″ strips. Place on a cookie sheet, brush lightly with olive oil and season with salt. Bake in a preheated 425°F oven for approx. 10 minutes, turning once, until golden brown.

White Pizza with Sausage, Spinach and Ricotta

Crumbled Sausage, Spinach and Ricotta Cheese… yes! When Matt suggested that we try these toppings on our latest batch of Trader Joe’s pizza crust I enthusiastically agreed and, after enjoying the end result last night, I don’t know why we never tried this delicious combination before!

White Pizza with Sausage, Spinach and Ricotta_c

For Christmas Matt gave me My Pizza by Jim Lahey and, although I haven’t actually made any of the recipes yet (I’m holding out for a pizza stone and peel first!), the cooking method that we used for this recipe was definitely inspired by the book. I usually cook pizza at 425°F but, after reading Jim Lahey’s chapter on cooking dough, we decided to try something radically different and instead broiled the pizzas in a preheated 500°F oven. The resulting pies had a whole new level of caramelization and wonderful crispiness that I’ve never before experienced in a home-cooked pizza. Yum!

White Pizza with Sausage, Spinach and Ricotta

You will need…
2 Sweet Italian Sausages
Olive Oil
2-3 cloves Garlic, minced
2-3 handfuls Baby Spinach
1 package fresh Pizza Dough (as usual, I used Trader Joe’s dough)
Flour, for dusting pizza dough
Approx. 1/4 cup coarsely chopped Yellow Onion (optional)
12 oz. Ricotta Cheese
3-4 cups Shredded Part Skim Mozzarella Cheese
Freshly Grated Parmesan Cheese

Ready to go in the oven!

Ready to go in the oven!

Directions:
Preheat your oven to 500°F. Remove the sausage from the casings and press into the bottom of a preheated skillet over medium-high heat. Allow it to cook undisturbed for 2-3 minutes and then use a metal spatula to stir the sausage and separate it into crumbled bits. When the sausage is completely cooked through (and, ideally, getting a little crispy on the edges!), transfer to a paper towel lined plate and set aside.

Return the skillet to the stove over medium heat and, if needed, add about a tablespoon of olive oil (there might already be enough fat in the skillet from the sausages). Add the minced garlic and allow it to cook in the oil until it is fragrant and just turning golden brown. Reduce heat to medium-low and add the spinach. Use tongs to toss and stir the spinach until it is wilted then remove from heat.

On a flour-dusted surface, halve the pizza dough and stretch each piece into a generous individual-sized pie. (Mine usually each end up being about 6” by 10” which fits well on my rectangular pan.) Place the crusts on a non-stick or lightly oiled pan (or use a pizza stone, if you have one!).

White Pizza broiling in the oven.

White Pizza broiling in the oven.

Spread about half of the ricotta cheese onto the two pizza crusts with the back of a spoon, leaving a 1” margin around the edges. Sprinkle on some chopped onions if you want (Matt didn’t want any but I tried them and they were great!) and top with the shredded Mozzarella. Next, evenly distribute the cooked sausage over the pizzas and add the wilted spinach and garlic. Drop the remaining ricotta onto the pizza in spoonfuls and finish off the pizzas with freshly grated Parmesan.

Just before putting the pizzas in the preheated oven, switch the oven to “Broil” and cook the pizzas on the top rack for approximately 10 minutes. Check on the pizzas frequently (it’s OK to open the door) to make sure that they are not burning. The pizzas are done when the cheese is turning golden brown and the crust is just starting to brown on the edges.

White Pizza with Sausage, Spinach and Ricotta 2_c

Herbed Pizza with Spinach and Feta

We made these delicious pizzas for dinner a few weeks ago just when the spinach in our garden was at its peak.  I picked about 3 cups of baby spinach leaves (almost wiping out the whole crop but that’s ok… I was making room for pepper plants and basil!) and rinsed and dried them well before using them in this recipe.  Fresh spinach leaves from the garden are juicy and bright green – very different from the bagged stuff you buy in the store!  I’ll definitely be planting more spinach when the weather cools off in the Fall so we can continue to enjoy this delicious leafy green.

Herbed Pizza with Spinach and Feta

View the recipe

Vegetable Gardening Season has Arrived!

For those of you who follow my blog, you may remember that I got the gardening “itch” way back in March and as a result I planted spinach and beans in my tiny vegetable garden on St. Patrick’s Day.  The spinach (a veggie that actually likes to grow in cold weather) has done great and I have been able to use it in several recipes including my Trader Joe’s style Eggplant Parmesan and my Herbed Spinach and Feta Pizza (coming soon!).  The beans were less thrilled about being planted in the winter and have taken their sweet old time coming up, but now that May has arrived they have suddenly taken off and are starting to look like real bean plants.

It’s amazing what can grow in 10 days! Garden on April 15th (left) and April 25th (right).  You can see the spinach in the front and the beans in the back.

Matt and I enjoy listening to Mike McGrath’s organic gardening show “You Bet Your Garden” on NPR (the archived podcasts are great entertainment for long car rides) and we’re trying to take some of Mike’s advice to improve our garden this year.  According to Mike, a good “yard waste compost” (a mixture of shredded fall leaves and nitrogen-rich green matter that has had time to break down to a soil-like consistency) makes the best mulch and also provides great nutrition and disease control in the garden.  We’ve been religiously composting our kitchen scraps all winter and now that it’s getting warmer out we’re hoping to start seeing some fresh compost in our spin bin composter soon!

Potted cherry tomato plant that has been “mulched” with partially composted shredded leaves to retain moisture.

I have several plants around the patio in containers, including two cherry tomatoes from my neighbor, a planter with chives, marjoram, marigolds, and a day lily, a combo of sweet and chocolate mint, and a serrano pepper plant.  I’ve been really impressed with the brightly colored orange, red, and yellow marigolds so far — they’ve been blooming continuously for a few weeks and have a lovely fragrance.  Apparently they repel insects so they’ll come in handy when our summer mosquitoes arrive!

Chives, Day Lily, Marjoram, and Marigolds on the patio

Now, back to those beans…  When I planted them in March I imagined having fully matured bean plants by now so I planted them across the entire back half of my garden.  Since the bean plants are clearly not ready to sprout beans anytime soon and I want to plant my basil in that same exact spot, I decided to transplant the strongest beans to my new strawberry patch.  Apparently beans and strawberries are “companion plants” so I figure that they will enjoy cohabitating the same small strip of my ever-expanding garden.

The transplanted bean plants are now scattered throughout my new strawberry patch.

Perhaps the most exciting additions to our garden this year are our two upside-down tomato plants.  I know that the whole upside-down growing gimmic is a bit of a fad and I’ve read lots of criticism about it on the internet, but after having a giant tomato plant take over my garden last year with its long, snarled branches and watching its tomatoes sit on the ground and get eaten by bugs, I decided that hanging plants sound pretty promising!

Hanging tomato plants with thyme and parsley.

Rather than purchasing the tupsy-turvy type of hanging tomato bags, we selected two large galvanized buckets from Home Depot and Matt drilled holes in the bottoms for the tomato plants to feed through.  When it came time to actually plant the tomatoes, we lowered the buckets to below eye level and Matt held each plant at the proper height (burying the stem up to the first true leaves) while I carefully added soil-less potting mix.  We topped off each bucket with herbs (thyme and parsley) and then covered the surface with partially composted leaves from our compost bin.  I’ll be interested to see how these plants do over the next few months!

Close up of the bottom of one of our hanging tomato plants: We threaded pieces of an old t-shirt around the base of each plant to hold the dirt in and drilled holes around the perimeter of the buckets for drainage.

Overall, I think I spent about 12 hours working in the garden last weekend and I enjoyed every minute of it.  I had been eagerly awaiting the arrival of vegetable gardening season all winter and I am so excited that it’s finally time to start planting!  What are you planting in your garden this Spring?

Mint plants on April 15th (left) and May 5th (right).

Related posts:
Gardening Update – One Month Later 4.17.12
Gardening… On St. Patrick’s Day! 3.17.12