White Bean Chili with Sausage and Chicken

It has been bitterly cold here in southeastern PA.  We haven’t seen above-freezing temperatures in a week and the 14 inches of snow that fell last Tuesday still look fresh and powdery… no melting whatsoever!  I’m not complaining, though.  I’ll take extreme winter weather with lots of snow and cold over a mediocre, unexciting winter any year!

The cold weather means that Matt and I have been making soups, stews, and chilis almost every week.  Right now we have a beef chili simmering on the stove that’s made with “real” dried beans that we had to soak overnight… first time I’ve ever done that!  Tonight’s chili still has another hour or so to cook before it will be ready so I thought I’d use that time to post about another stew that we made a few weeks ago… white bean chili with hot sausage, chicken, bacon, and five types of peppers… yum!!

White Bean Chili with Sausage, Bacon and Chicken

This white bean chili comes together really quickly… just under an hour from start to finish.  That’s much faster than tonight’s beef chili which has been simmering for nearly 7 hours! (Can you tell that I am impatiently waiting for it to be done?  I’m starving!!)  Getting back to the white bean chili, I found that the “white” cannellini beans and navy beans were a nice change from the basic kidney beans and black beans that my chilis usually include and I definitely liked the combination of bell peppers, jalapeño, green chiles, and chipotles en adobo.  Oh, and of course I thoroughly enjoyed the bacon and hot sausage… how could you not like that winning combination?  🙂

White Bean Chili with Sausage and Chicken (adapted from this recipe at Food52)

Chili Ingredients:
Olive Oil
5 slices Bacon, chopped
1 lb. Chicken Breast, cut into 1″ cubes
1 lb. Hot Italian Sausage, ground (or removed from casing)
2 Yellow Onions, diced
1 Green Bell Pepper, diced
1 Red Bell Pepper, diced
1 Jalapeño Pepper, minced
2 – 4 oz. cans Diced Green Chiles
2 Chipotles en Adobo, minced
3 cloves Garlic, minced
1 teaspoon Black Pepper
1 teaspoon Ground Coriander
3 tablespoons Cumin
1 1/2 tablespoons Chili Powder
3 tablespoons Mexican Oregano
3 tablespoons All-Purpose Flour
6 cups Chicken Stock
1 – 15 oz. can Cannellinni Beans, partially drained
1 – 15 oz. can Navy Beans, partially drained

Garnishes:
Your choice of Sour Cream, Grated Cheddar Cheese, Fresh Cilantro, Lime Wedges, Avocado, and/or Tortilla Strips

White Bean Chili In Process

Directions:
Heat a large (7-8 qt) stock pot over medium-high heat.  Add a few tablespoons of olive oil and brown the chopped bacon until it is just starting to get crispy.  Add in the chicken and sausage.  Brown the meat, stirring frequently, for approx. 12 minutes until the chicken is cooked through and the sausage is well crumbled.

Stir in the next seven ingredients (onion thru garlic) and saute until the onions are tender, about 5 minutes.  Add the spices (black pepper thru Mexican oregano), stir well, and continue to cook for another 3 minutes.  Sprinkle the flour over the mixture, stir, and cook for 3 more minutes.  Next, add the chicken stock 1 cup at a time, stirring and scraping the browned bits off of bottom of the pot between each cup.  Bring the chili to a boil then add the beans and stir well to combine.  Reduce the heat and simmer the chili for 20 minutes, stirring occasionally.

Serve the white bean chili in large bowls and top with your choice of garnish.  We enjoyed our chili with sour cream, cheddar cheese, and cilantro and it was delicious!

White Bean Chili 4

Here are some of the other Chilis and Stews that we’ve been making lately.  Enjoy and stay warm!
•  Pozole Verde
•  Pork and Green Chile Stew
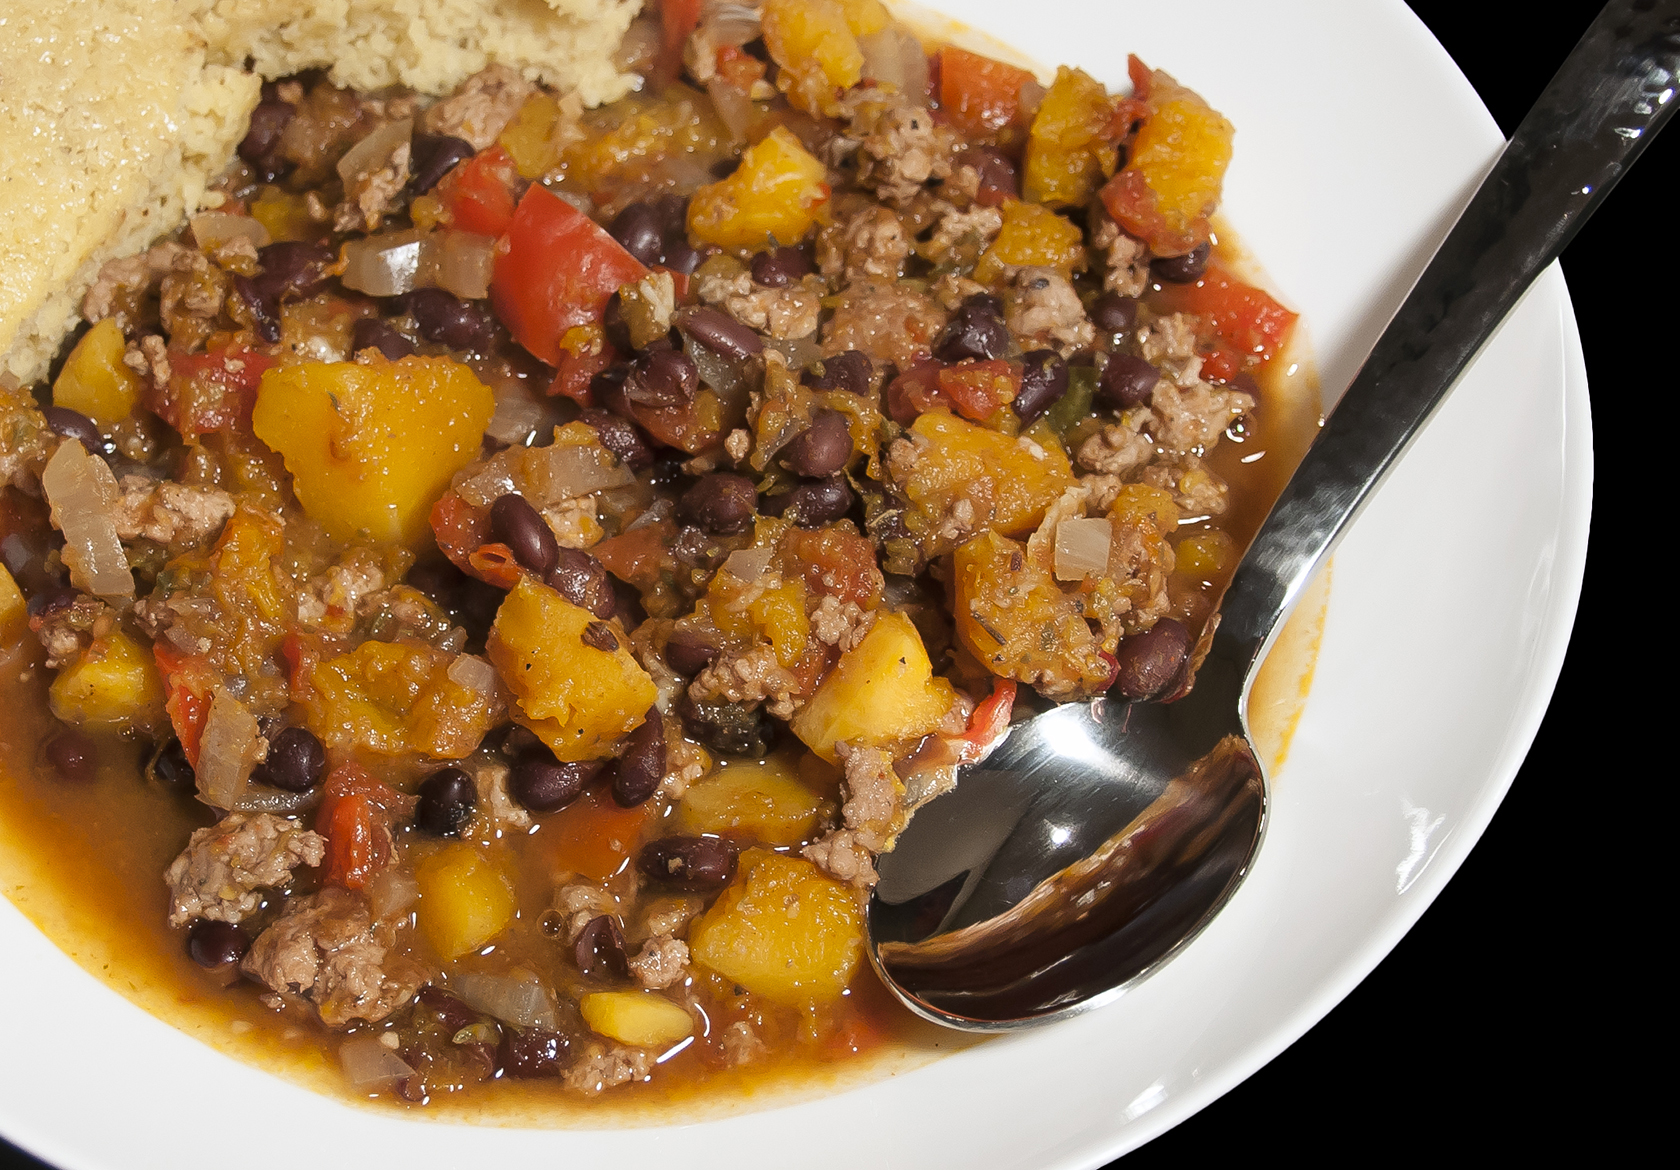
•  Butternut Squash and Turkey Chili

Butternut Squash and Turkey Chili

It’s snowing out!  We were supposed to get a mere inch of snow today but it appears that the weather guys were WAY off… there’s already over 4 inches of snow out there!!  Here’s the view outside and the radar map… the snow doesn’t show signs of stopping anytime soon!

December 8th Snow

Cold and snowy weather is the perfect time to enjoy a batch of warm, hearty stew.  I have this pork and green chile stew from Skinny Taste cooking in my crock pot right now and I want to share another yummy concoction that I made a few weeks ago: Butternut Squash and Turkey Chili.  The original, vegetarian version of this recipe came from Pami over at Omnomalicious.  I would have been happy with a meatless stew but Matt likes his meat so I took some liberties with the recipe and added in some ground turkey just for him. 🙂

281 Butternut Squash and Turkey Chili

This chili was seriously awesome.  The butternut squash was soft and just the tiniest bit sweet, and it blended really nicely with the black beans, peppers, and onions in a tex-mex-style broth that had just the right amount of kick.  YUM!  I will definitely be making this again soon!!

Butternut Squash and Turkey Chili (adapted from Omnomalicious)

You will need…
1 Butternut Squash, peeled and cut into 1″ pieces
1 Onion, diced
2 Red Bell Peppers, diced
1 Jalapeño Pepper, diced
4 cloves Garlic, minced
2 Chipotles in Adobo Sauce, minced
1 can Diced Tomatoes
2 cans Black Beans, drained
1 cup Chicken Broth
1 tablespoon Cumin
1 tablespoon Chile Powder
1 tablespoon Mexican Oregano
1 lb. ground Turkey, browned
Salt and Pepper, to taste

272 Butternut Turkey Chili before and after

Directions:
Oh yeah, did I mention that this stew is amazingly easy to make?  Simply combine all of the ingredients in a crock pot then cover and cook on high for 5-6 hours or until the squash has reached your desired consistency.  Season to taste and serve with a slice of freshly baked cornbread!

284 Butternut Squash and Turkey Chili

Rotisserie Chicken Taquitos

Believe it or not, one of the most popular recipes on this blog is my take on Rotisserie Chicken Burritos.  I’m guessing it must be the combination of cheesy deliciousness and the ease of using precooked rotisserie chicken that makes the burritos so popular. (And did I mention the melted cheese? YUM!)  With that in mind, Matt and I set out to see what other easy weeknight meal we could make with rotisserie chicken.  These baked chicken and poblano chile taquitos are the satisfying result!

Rotisserie Chicken Taquitos

Taquitos are basically little burritos that are bite-sized and perfect for dipping.  Just like burritos, taquitos are created by wrapping a tortilla around tasty filling, but unlike burritos the taquitos are baked in the oven (or fried) to give them a nice crispy texture.  The firm outer shell of the tortilla helps each little taquito hold its shape as you dip it into your choice of salsa, sour cream or guacamole.

We made our taquitos rather plump which worked out well since they were our main dinner entree.  If you wanted to serve these as an appetizer you could make them a little thinner.  Also, we made up our filling as we went along and we’ll probably continue to tweak it when we make these in the future, so have fun and play around with your own combination of shredded meat, veggies, and seasonings.  Just don’t forget the cheese!  🙂

Homemade Taquitos Montage

Baked Rotisserie Chicken Taquitos with Poblano Chiles

You will need…
3 small Poblano Peppers
1/2 Yellow Onion, finely diced
1 clove Garlic, minced
1 large Rotisserie Chicken Breast, meat removed from bone and chopped
1 teaspoon Chile Powder
1/2 teaspoon Cumin
1/2 teaspoon Paprika
1/2 teaspoon Mexican Oregano
Salt and Pepper, to taste
Approx. 1 cup Shredded Mexican Blend Cheese
Handful Cilantro Leaves, roughly chopped
1/4 cup Peanut Oil
12-18 Small Corn Tortillas
Sour Cream and Salsa, for serving

Directions:
Place the poblano peppers on a rimmed baking sheet and broil on the top rack of an oven for 10-15 minutes, turning occasionally, until the pepper skin is blistered and starting to blackened.  Remove from the oven and transfer the peppers to a glass bowl.  Cover the bowl for 5-10 minutes with a dish towel to hold in the moisture.  Then, carefully peel the skin off of the poblanos (it should come off pretty easily), remove the seeds and finely chop.

Saute the diced onions and garlic in a non-stick pan over medium-high heat until translucent.  Add in the chopped poblanos, chicken and seasonings (chile powder through salt and pepper) and stir well.  Saute until ingredients are heated through then transfer to a large bowl.  Stir in the shredded cheese and cilantro to complete your taquito filling.

Heat the peanut oil in a small pan over medium heat.  Use tongs to place a tortilla in the oil.  The oil is hot enough when small bubbles appear around the outer edge of the tortilla.  (It’s too hot if the oil is bubbling wildly and/or causing the tortilla to lift up out of the oil.)  Allow the tortilla to heat in the oil for 20-30 seconds, then use the tongs to flip it over and cook for another 15 seconds.  Lift the tortilla out of the oil, allow the excess oil to drip off, then transfer to a cutting board.  Fill the tortilla with a small amount of the filling (approx. 2-3 tablespoons), roll it up, and place it seam-side down on a baking sheet.  Repeat this process with the remaining tortillas.

Bake the taquitos in a preheatead 350°F oven for 20-30 minutes or until the tops are golden brown.  Serve with sour cream and salsa.

Taquitos!

Stuffed Poblano Peppers

On Sunday we didn’t feel like going grocery shopping so we decided to improvise a dinner using the ingredients that we had in the fridge.  It just so happened that we had poblano peppers and turkey chorizo sausage, so we created this yummy Tex-Mex style recipe for peppers stuffed with sausage, beans and rice!

Stuffed Poblano Peppers

Poblano Peppers Stuffed with Chorizo, Beans, and Rice

You will need…
1 tablespoon Olive Oil
1/2 Yellow Onion, finely chopped
1/2 Jalapeño Pepper, seeds discarded and finely chopped
2 fresh Chorizo Sausages, casings removed
10 oz. cooked White Rice
10 oz. (about 2/3 can) Black Beans, rinsed and drained
3/4 cup Frozen Corn
1/2 teaspoon Chile Powder
1/4 teaspoon Cayenne Pepper
1 1/2 teaspoon Cumin
1 teaspoon Mexican Oregano
Salt and Pepper to Taste
3-4 Poblano Peppers, halved lengthwise with seeds and ribs removed
Shredded Cheese (we used a mixture of Mexican blend and Mozzarella)
Sliced Green Onion, for garnish
Chopped Cilantro, for garnish (we didn’t have any but it would be a nice addition!)

Directions:
Heat the Olive Oil in a large skillet or wok over medium-high heat.  Add in the onion and jalapeño and saute until the onion softens slightly, about 2 minutes.  Use a spatula to push the onion mixture to the sides of the pan, then add the sausage and saute until browned and cooked through, about 8 minutes.  Stir the sausage while it cooks to break it up into crumbled bits.

Reduce the heat to medium and stir in the rice, beans, and corn.  Sprinkle in the seasonings (chile powder thru salt and pepper) and stir well to combine.  Taste the mixture and adjust the seasoning to taste if desired.

Meanwhile, cook the poblano pepper halves in the oven or on a grill. (Although we did not do this when we made the recipe, we later concluded that softening the peppers slightly before stuffing them would improve their taste and texture in the final dish.)  To do this in the oven, place the peppers on a baking sheet and broil until the flesh softens but still holds its shape (it’s OK if black spots appear).  To do this on a grill, place the peppers over direct medium heat and grill until the flesh softens but still holds its shape  Place the cooked peppers on a baking sheet and spoon the rice and sausage mixture into each pepper.  Top liberally with shredded cheese, then bake in a 375°F oven for 20 minutes or until the cheese begins to brown.

Stuffed Poblano Peppers before melting

Transfer the baked peppers to a serving dish and garnish with green onion and cilantro.  Enjoy!

Stuffed Poblano Peppers

Rotisserie Chicken Burritos

Pan-fried burritos stuffed with rotisserie chicken, beans, salsa, and cheese… does it get any better that that?  Not in my book!

We used to make these delicious burritos before TheLittleGSP.com existed (in fact, recipes like this inspired me to create a blog so I’d have a place to share them!), but after starting the blog we found ourselves constantly looking for new and exciting recipes to try and we somehow left this one behind.  Well, we’ve corrected that now.  We made these burritos two nights ago for dinner and gobbled up the leftovers today for lunch and I can now confidently say that this recipe is as tasty and satisfying as any of the recipes you’ll find in this blog.  It’s also incredibly easy and uses readily available ingredients… perfect!

Rotisserie Chicken Burrito

Rotisserie Chicken Burritos (from MyRecipes.com)

You will need…
1/4 cup Water
2 tablespoons Lime Juice
1/4 teaspoon Cumin
1/4 teaspoon Ground Black Pepper
1/2 teaspoon Chile Powder
1/8 teaspoon Red Pepper Flakes
2 Split Rotisserie Chicken Breasts, meat pulled from the bone and shredded
1/4 cup Green Onions, finely chopped
1/2 cup Salsa
1-15oz can Black Beans, drained
1/4 cup chopped Cilantro
1-2 tablespoons Olive Oil
4 “Burrito-sized” Flour Tortillas
1/2 cup Shredded Monterey Jack Cheese (or Mexican Blend)

Pan-Frying the Burritos

Directions:
In a small sauce pan, combine the first 6 ingredients (water thru red pepper flakes) and bring to a boil.  Remove from heat, then add in the chicken and green onions and stir well to coat.  Set aside.  Meanwhile, stir together the salsa, beans, and cilantro in a microwaveable bowl and heat on high in a microwave for 1-2 minutes (just to warm it up slightly, especially if the salsa has been in the fridge).

Pour about 1 tablespoon of olive oil into a skillet and allow it to heat up over medium heat.  Assemble your burritos two at a time by layering the bean/salsa mixture, chicken, and cheese in a narrow strip along the center of the tortillas.  Fold the edges of each tortilla in towards the center and place them side by side in the skillet, seam side “up.”  Use a small pot lid to press down slightly on the tortillas while you pan-fry them for approximately three minutes, then carefully flip them over and, using the lid once again, continue to cook the burritos for another 3 minutes or until the tortillas are golden brown and the cheese is thoroughly melted.  Enjoy with salsa, sour cream and guacamole!

Rotisserie Chicken Burrito (cut)

Buffalo Chicken Sausage Quesadillas

This is my first post in more than 10 days.  I think that’s the longest I’ve gone since starting my blog but hey, sometimes life gets in the way of blogging!  🙂  Luckily I had lots of good things going on at the beginning of the year which means that I’m just now getting around to posting about some of the foods and activities that we’ve enjoyed in 2013 thus far.  First up: Buffalo Chicken Sausage Quesadillas!

Buffalo Chicken Sausage Quesadillas

The quesadillas were super-easy to make and they were cheesy, crispy and had just the right amount of heat thanks to the Frank’s Red Hot Buffalo Wings Sauce that we found at the grocery store.  To temper the heat and acheive that classic “buffalo” experience, we dipped the quesadillas in low-fat blue cheese dressing and had a few celery sticks on hand when we wanted some crunch.  For the filling we used a pound of Maiale’s buffalo chicken sausage that we had been saving in the freezer from the Farmer’s Market last summer, but if you don’t have access to actual “buffalo” sausage you could easily substitute regular sausage or even shredded chicken in — just use some of the Frank’s Red Hot inside of the quesadilla to get that extra kick!

Buffalo Chicken Sausage Quesadillas (makes 4 large quesadillas)

You will need…
1 pound Buffalo Chicken Sausage, fully cooked and chopped into small pieces
Peanut Oil, for coating pan between quesadillas
4 large “burrito” sized Flour Tortillas (12-13″ diameter)
Approx. 2 cups shredded Monterey Jack Cheese (or Colby/Monterey mix)
1/2 cup Frank’s Red Hot Buffalo Wings Sauce, for dipping
1/2 cup Low-Fat Blue Cheese Dressing, for dipping
4-5 stalks Celery, cut into 4″ sticks

Assembling the Quesadillas on the stove

Directions:
Heat a large heavy-bottomed skillet over medium heat.  Pour a small amount of peanut oil into the bottom of the pan (just enough to thinly coat it) and allow it to heat up.  Carefully place one tortilla in the bottom of the pan and evenly spread about a quarter of the shredded cheese over the entire tortilla.  When the cheese starts to melt arrange a quarter of the chopped sausage onto one half of the tortilla.

When the cheese has melted completely use a spatula to carefully flip the cheese-only half of the tortilla over top of the sausage.  Press down lightly on the top of the quesadilla to help hold everything together.  At this point the quesadilla is basically done but you may want to flip the finished quesadilla over in the pan until both sides are golden brown and crispy.  Remove the finished quesadilla from the pan and repeat the entire process (starting with the thin layer of oil) for your other 3 tortillas.

Cut the quesadillas into wedges and serve with buffalo sauce, blue cheese dip, celery, and a cold beer.  Enjoy!

Cheesy and delicious!