Southwestern Burgers with Chipotle Mayo

Southwestern Burgers with Chipotle Mayo 2

I am absolutely addicted to these southwestern burgers with chipotle mayo and green chiles. They meet all of my major requirements for a “staple” summer meal… the ingredients are readily available, prep time is under a half hour, the meat is grilled and, most importantly, the end result is DELICIOUS! The green chiles, chipotle and pepper jack are one of my favorite flavor combinations and Matt somehow grills the burgers to a juicy perfection every single time. I would seriously take one (or two) of these burgers over a restaurant burger any day.

We have been enjoying these burgers almost weekly this summer. In fact, we’re going to have them for dinner tonight (YUM!!) so I thought now would be an appropriate time to share the recipe and a few pics from the last time we made them.

Southwestern Burgers with Chipotle Mayo close up

The recipe comes from our trusty Williams Sonoma Grill Master, the same book that includes BBQ Baby Back Ribs, Paella, AND the beef kebabs that I’ll share in a future post. I highly recommend this cook book!! The original burger recipe is a bit fancier than our adaptation, calling for buffalo meat, homemade mayo and fresh-roasted chiles. Those ingredients sound exciting, but aren’t very practical for a weeknight meal, so we subbed in regular ground beef, jarred mayo and canned diced green chiles and the burgers turned out great.

Southwestern Burgers with Chipotle Mayo and Green Chiles
(adapted from Williams Sonoma Grill Master; makes 4 burgers)

Ingredients:
3/4 cup Mayonnaise
1-2 Chipotle Chiles in Adobo, minced; plus a teaspoon or two of adobo sauce, to taste
2 tablespoons chopped Cilantro
Juice from 1/4 Lime
Salt and Pepper
1 1/3 lb. Ground Beef, 85/15
4 Slices Pepper Jack Cheese
4 Burger Buns
1 – 4 oz. can Chopped Green Chiles

Directions:
Preheat your grill to high heat. Combine the mayo, chipotle, cilantro, lime, and salt and pepper to taste in a small bowl to make the chipotle mayo. Stir well, then cover and refrigerate until ready to use.

To make the burger patties, divide the meat into four equal sections, then form each quarter into a patty about 3/4″ thick by 4-5 inches in diameter. The key to a good burger is not to over-mix or over-compress the ground beef so be gentle with this step!

Place the burger patties on a plate and create a small depression in the center of of each patty. Season both sides of the burgers with freshly ground salt and pepper.

Place the burgers on the grill over direct high heat. Leave the grill lid open and cook for 5 minutes, then flip the burgers and continue to cook for another 4 minutes. Add a slice of pepper jack cheese to each burger and allow to cook with the lid closed for another minute or until the cheese is melted. On our gas grill these cooking times yield a juicy medium burger; adjust your cooking times to reach your preferred doneness.

During the last few minutes of the burger cooking, place the buns face-down on the grill grates and grill for 1-2 minutes or until golden brown. Transfer the buns to a plate and spread a generous amount of the chipotle mayo over the bottom half of each bun.

When the burgers are done cooking, transfer them directly onto the mayo-ed buns. Top the burgers with a few spoonfulls of green chiles and serve immediately.  Enjoy!

Make sure your puppy doesn't eat your burger!

These burgers are good… even Piper thinks so!!

Grilled Paella with Chicken, Shrimp and Sausage

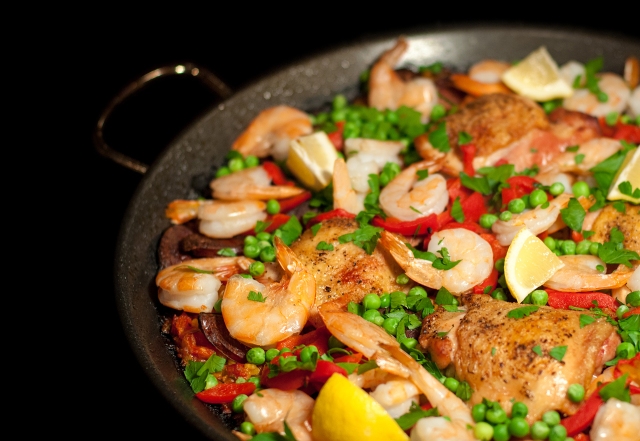
What’s better than serving a one-pot meal to dinner guests? Serving a grilled one-pot meal that’s made entirely outside while your guests relax and drink craft beer on the patio! That’s pretty much how Matt and I spent the Sunday of Memorial Day weekend when we hosted my mom’s birthday dinner. We made grilled Paella with chicken, shrimp and sausage and it was definitely a hit. My mom actually asked for seconds (or maybe that was thirds?) during dinner… that NEVER happens!! 🙂

Dinner Tonight- Paella on the Grill!

This paella looks really fancy, but in reality it’s not too complicated. The entire dish is assembled in a shallow paella pan (like these on Amazon) which is placed directly on a grill, giving you the combination of direct and indirect heat that you would otherwise need both a stovetop and oven to achieve. You do need a few special ingredients like saffron, smoked paprika and Spanish (dry) chorizo, but once you have those on hand the other elements of the dish are very easy to find and prep.

Here are a few pictures from the first time we made Paella a few weeks ago.  For Sunday’s family dinner, we increased the recipe by half and it easily served 6 hungry guests.

Sauting the Tomato Mixture

Sear the chicken thighs and chorizo, then cook the tomato and aromatics over direct heat.

Toasting the Rice

Stir the rice into the tomato mixture to toast it before adding saffron and broth.

Adding the chorizo back into the rice

Add back in the browned chorizo sausage…

Nestle the chicken into the rice

…and “nestle” the chicken thighs into the rice, being careful not to stir the rice mixture.

Adding the shrimp to the pan

To finish the dish, top with shrimp, peas, and peppers and cook until the shrimp are just opaque.

Chicken, Shrimp and Sausage Paella (serves 4; from Williams Sonoma Grill Master)

You will need…
1/4 teaspoon Saffron Threads
4 Bone-In, Skin-On Chicken Thighs
Salt and Pepper
4 tablespoons Extra Virgin Olive Oil
7-10 oz. Spanish Chorizo Sausage, sliced (we used Goya Chorizo)
3 Tomatoes, finely chopped
1 Yellow Onion, finely chopped
4-5 cloves Garlic, minced
1 tablespoon Fresh Thyme, chopped
1/2 teaspoon Smoked Paprika
1 cup uncooked short-grain Paella Rice, such as Calasparra
4 cups Low Sodium Chicken Broth
7 oz. jarred Roasted Red Peppers, drained and cut into strips
1/2 cup Frozen Peas
1 lb. 21-25 ct Shrimp, peeled and deveined
Fresh Parsley, chopped, for garnish
4-6 Lemon Wedges, for garnish

Directions:
Place the saffron threads in a small bowl with 2 ounces of hot water and set aside. Liberally salt and pepper both sides of the chicken thighs. Preheat a 15-inch Paella pan on the grill over high heat, then add the oil and place the chicken thighs in the pan skin-side down. Sear the thighs, turning once, until browned on both sides, about 5 minutes per side. Transfer the chicken to a platter and add the sliced chorizo to the pan. Saute the chorizo until it starts to brown, about 2-3 minutes, then transfer the chorizo to the platter with the chicken.

Add the tomatoes, onion, garlic, thyme and paprika to the pan and cook, stirring often, for 5 minutes. Add in the rice and stir for 2-3 minutes until slightly toasted. Add the saffron thread mixture and 2 cups of chicken broth and bring to a boil. Reduce the heat to medium, close the grill, and cook for 10 minutes.

Open the grill and add the reserved chicken thighs and chorizo back in into the rice mixture. Important: do not stir the rice! Use tongs to nestle the chicken thighs into the rice. Add an additional 1 cup of chicken broth, then close the grill again and cook for another 20 minutes.

Open the grill and again, resist the urge to stir! Distribute the shrimp, peas and red peppers over the top of the rice mixture and pour in approximately 1/2 to 1 cup more chicken broth (go with more if the rice looks dry). Close the grill and cook for another 5-7 minutes or just until the shrimp are cooked through.

Remove the paella pan from the grill and garnish with parsley. Arrange the lemon wedges over the dish and serve directly from the pan. Enjoy!!

Grilled Paella

Roasted Corn Salsa

Last night I made my third batch of Roasted Corn Salsa in less than a month which can only mean two things…  One, this salsa is awesome and two, it’s high time it makes an appearance on the blog!!

Roasted Corn Relish 1

This bright, flavorful salsa features grilled corn, roasted peppers, fresh tomatoes, cilantro, and lime juice.  It pairs perfectly with grilled fish and grilled avocado (<– my new favorite way to eat avocados).  We’ve also tried the salsa on shrimp tacos and, although Matt thinks it’s a bit too lime-y for eating straight, I personally really enjoy eating it with tortilla chips.

Last night’s batch of salsa is being refrigerated until we have Matt’s parents over for dinner tomorrow night.  Making it ahead of time will save me prep time on Saturday and the extra hours in the fridge will allow the salsa flavors to fully combine.  I’ll post pictures of the final meal (grilled salmon!) next week.

Roasted Corn Relish 2

Roasted Corn Salsa  (adapted from MyRecipes.com; makes 6-8 servings) 

You will need…
Cooking Spray
4 ears Corn, husked
4 Anaheim Peppers or 4 Cubanelle Peppers (for less heat), or a combination of the 2 types
1 cup diced Tomatoes (from approx. 2-3 Roma Tomatoes)
6 tablespoons freshly squeezed Lime Juice (from approx. 3-4 limes)
1/4 cup chopped Cilantro
1/2 teaspoon Salt
1/4 teaspoon Ground Pepper

Directions:

Lightly coat the grates of a grill* set to medium heat with cooking spray.   Place the corn and peppers directly on the grill.  Allow the corn and peppers to cook, turning occasionally, until the corn kernels start to brown slightly and the peppers become soft and dark splotches start to form on the green skins.  Transfer the roasted corn to a plate to cool.  Place the roasted peppers in a large bowl and cover for 10-15 minutes.

Cut each corn ear in half, then place the flat end down on a cutting board and slice the kernels off of the cobs.  When the peppers are cool enough to handle, peel and discard the skins and remove the stems, seeds, and membranes.  Slice the peppers into 1/4″ pieces.

Combine the corn, peppers, tomatoes, lime juice, cilantro, salt and pepper in a large bowl.  Serve immediately or cover tightly and refrigerate up to 3 days to allow the flavors to intensify before serving.

Serving suggestions:

  • Serve over grilled salmon or another grilled fish (salmon recipe coming soon!)
  • Spoon over grilled avocado (slice avocado lengthwise & remove pit; brush grill with oil and place avocado halves directly on grates for 2-3 minutes until grill marks appear)
  • Serve as a fresh, citrus-y salsa with tortilla chips

Roasted Corn Relish 3

*If you don’t have a grill, use boiled corn on the cob or thawed frozen corn kernels.  The peppers can be roasted in an oven… here are some basic instructions on how to do this from Ina Garten.

Skirt Steak Tacos

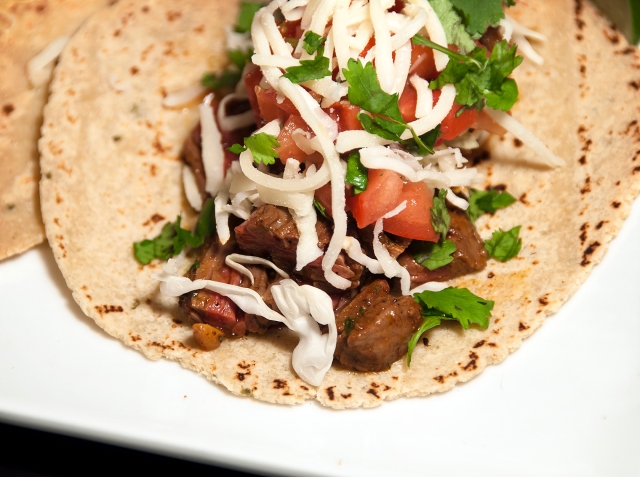
Back in early July Matt and I made some yummy grilled steak tacos with a spicy, red chile pepper marinade. We’re going to make these tasty tacos again this weekend so I thought that now would be the perfect time to post the recipe… mostly so I can remind myself of how to make them! 🙂

Zacatecas Skirt Steak Taco

Don’t be intimidated by the red chile sauce. It has a lot of ingredients and took some time to make, but it also keeps well (just freeze any extra in an ice cube tray and bag the frozen cubes for storage) so you can definitely make it ahead of time. Also, keep in mind that the skirt steak needs to marinade overnight so plan accordingly.

~ ~ ~

Skirt Steak Tacos from Zacatecas
(from Tacos by Mark Miller; tweaked slightly for ingredients we had on hand)

Ingredients for the Red Chile Sauce:
1 tablespoon Olive Oil
1 White Onion, chopped
8 Roma Tomatoes, blackened (to blacken remove stems and broil in the oven for 5 minutes until blistered)
8 oz. (25-ish) dried New Mexico Red Chiles, dry roasted and re-hydrated, soaking water reserved
2 cloves Garlic, roasted and finely chopped (to roast place unpeeled cloves in a 350°F oven for 20-30 minutes until soft)
1 teaspoon Cumin
1/2 tablespoon Dried Mexican Oregano
1 teaspoon Salt
2 tablespoons Peanut Oil

Ingredients for the Skirt Steak:
1 pound Skirt Steak, excess fat trimmed away
8-10 cloves Garlic, dry-roasted and chopped (see above)
2 tablespoons Worcestershire Sauce
2 tablespoons Red Wine Vinegar
1 tablespoon Chile Powder
1 tablespoon Salt
2 teaspoons Black Pepper
1 teaspoon Cumin
2 teaspoons Onion Powder
1 tablespoon chopped Cilantro
1/4 cup Vegetable Oil (we used canola)
2 tablespoons Red Chile Sauce
1 teaspoon Chipotle Puree (simply puree a can of Chipotles en Adobo in blender; refrigerate any extra for up to a month)

Other Taco Ingredients:
Corn Tortillas
Garnishes, including: shredded Cabbage, thinly sliced Radishes, Chopped Onions, Chopped Tomatoes, Fresh Cilantro, Lime Wedges, and Shredded Cheese

309 Zacatecas Skirt Steak Taco

Directions:

Start by making your Red Chile Sauce in advance. Heat the olive oil in a skillet over medium-high heat and saute the onion for 6-8 minutes or until browned. Transfer the onion, tomatoes, rehydrated chiles, garlic, cumin, oregano, and salt to a blender. If the reserved chile water is not bitter, add one cup to the blender mixture. If it is bitter, add a cup of normal water instead.

Blend the mixture thoroughly until a fine paste forms. Then, heat the peanut oil in a (clean) skillet over high heat and refry the blender mixture “at a sizzle” for 3-5 minutes while stirring constantly. The refried sauce should be thick enough to coat the back of a spoon. If too thick, stir in more water.

A day before you want to eat your tacos, prepare the Skirt Steak. Use a butcher’s mallet to pound the steak until it is about 1/4 inch thick. Combine all of the remaining ingredients (chopped roasted garlic thru chipotle puree) in a large bowl or dish and stir well to create a marinade. Rub the marinade over the meat, cover, and allow to marinate overnight in the refrigerator.

Marinating and Grilled Zacatecas Skirt Steak

Marinating steak (left) and grilled steak (right).

When you are ready to make your tacos, season the steak with more salt and pepper and grill it over direct medium-high heat for approximately 6 minutes total, flipping once halfway through. Remove the cooked steak from the grill, allow it to rest for a few minutes, and then slice it against the grain into 1/4″ thick strips.

Build your tacos by arranging strips of steak on warm corn tortillas and topping with shredded cabbage, chopped onion, and any other garnishes that you like. Enjoy!

Zacatecas Skirt Steak Taco

Grilled Shrimp Salad with Mediterranean Lemon Dressing

Matt and I are getting married in 2 days! All of our wedding prep is pretty much done and now we’re just relaxing and waiting for the weekend to get here. (Oh, and also checking the weather about a million times a day… Tropical Storm Andrea better hurry up and get out of here in time for our outdoor ceremony on Saturday afternoon!) 🙂

We’ve been going out to eat a lot lately but we did make one planned meal this week using a new cookbook that my mom got us as a wedding present. The book is entitled Salad for Dinner so, as you might guess, our meal was a nice and hearty entree salad! This was a fresh, summery meal that was perfect for the warm weather we had earlier this week. Doesn’t it look yummy?

Grilled Shrimp Salad with Lemon Mediterranean Dressing

Grilled Shrimp Salad with Mediterranean Lemon Dressing (from Salad for Dinner)

For the Mediterranean Lemon Dressing…
1 tablespoon Tahini (ground sesame seed paste)
2 cloves Garlic, pressed through a garlic press
1/2 teaspoon Salt
1/4 cup freshly squeezed Lemon Juice
1/3 cup Extra Virgin Olive Oil

For the salad…
1 lb. large Shrimp, peeled and deveined
2 tablespoons Olive Oil
1-2 cloves Garlic, pressed through a garlic press
8 oz. Mini Bell Peppers
8 cups Baby Spinach
1 pint Cherry Tomatoes, sliced in half
2-3 Persian Cucumbers, sliced into 1/4″ rounds
1/4 – 1/2 Red Onion, very thinly sliced
Feta Cheese, crumbled
Fresh Oregano Leaves
Lemon Wedges
Pita Bread Crisps*

Directions:
Combine all of the dressing ingredients in a jar. Close the lid and shake vigorously to combine. (You could also use a bowl and whisk the ingredients together if you don’t feel like shaking.) Refrigerate the dressing until you are ready to use it.

Mix together the shrimp, garlic and olive oil in a large bowl. Cover and refrigerate for at least 1 hour. After the shrimp has marinaded, remove from the fridge and stir in the mini bell peppers. Grill the shrimp and bell peppers over medium-high heat. When the shrimp turn pink (3-5 minutes), remove them from the grill and set aside. Continue cooking the bell peppers until they are soft and blackened in spots.

In a large salad bowl, combine the spinach, tomatoes, cucumbers and onion. Dress with the Mediterranean Dressing and mix well. (I used about half of what the recipe made.) Toss in the warm shrimp and bell peppers. Serve the salad in shallow bowls with pita crisps and garnish with feta, oregano, and lemon.

Grilled Shrimp Salad

Grilled Shrimp and Bell Pepper Salad Close Up

*To make pita bread crisps, slice pita bread into 1 – 1 1/2″ strips. Place on a cookie sheet, brush lightly with olive oil and season with salt. Bake in a preheated 425°F oven for approx. 10 minutes, turning once, until golden brown.

Roasted Fresh Chile Salsa

Our pepper plants are on a roll! They’ve yielded over a dozen peppers so far and there are new peppers growing and ripening in the garden right now. After harvesting 2 “big boy” green jalapeños, 5 small red jalapeños and 4 small serranos all in one afternoon I realized that we needed to find a good recipe to take advantage of all of this spicy goodness. We turned to the pages of our trusty Mexican Everyday cookbook and found this recipe for Roasted Fresh Chile Salsa.

Our mid-July bounty: green beans, tomatoes, jalapeños and serranos!

Salsa de Chile Fresco Asado (from Mexican Everyday by Rick Bayless)

You will need…
4-5 fresh Jalapeños (the recipe calls for green chiles but ours were red)
4 fresh Serranos (omit if you want a milder salsa)
4 cloves Garlic, peeled
2 tablespoons Lime Juice
1/4 cup water
1/2 teaspoon Salt

Directions:
Trim the stems off of the chiles and slice in half lengthwise, then place face down in a glass baking pan. Arrange the garlic cloves between the peppers. Broil in the oven for 4-5 minutes or until the chile peppers are soft and starting to form blotchy black spots. Remove from broiler and carefully transfer the roasted chiles and garlic to a blender. Add the lime juice and water and blend until smooth. Transfer mixture to a bowl and, if necessary, stir in more water to reach your desired consistency. Taste the salsa (watch out though, it might be super hot!) and add salt if needed.

OK… so now you have a bowl of freshly roasted liquid fire. What the heck are you supposed to do with it?

Our chile peppers must have been extra potent because our “salsa” was so hot that we could barely inhale near it. (I say “salsa” in quotes because I could never, ever handle a serving of this stuff on a chip… I’d die!) Luckily there are plenty of things that you can do with hot salsa that don’t involve burning your mouth and sweating profusely. Here are some ideas:

  • Use it anywhere that you’d normally add hot sauce. We used a few drops on our Jalapeño Garlic Chicken Quesadillas and it brought a great amount of heat to the dish. It would also be good (in moderation!) on Tortas with Chorizo and Black Beans and Chicken Fajitas.
  • Use it as a steak marinade. (This is Rick Bayless’s suggestion.) Mix 2 tablespoons of olive oil into the salsa and brush it onto all sides of a nice steak (we shared a NY strip, yum!). Sear both sides of the steak over high heat and then grill over indirect medium heat until cooked to your desired temperature.
  • Use it to season potatoes. (Also Rick’s idea.) Quarter two yukon gold potatoes, sprinkle with salt, and microwave on high in a covered bowl for 4 minutes to soften. Brush some of the salsa onto the potatoes and finish cooking them on a grill in a grill basket over direct medium-high heat.

What is your favorite way to use a surplus of chile peppers? Please share!

Southwestern Turkey Burgers

After making our delicious Guacamole-Chipotle Burgers on Wednesday, we had a few leftovers, namely chipotle mayonnaise, guacamole, poblano pepper, cheese, and buns (everything but the burger!).  We decided to put our toppings to good use and try out the Guacamole-Chipotle Burger recipe using ground turkey instead.

We followed the same basic recipe as the beef burgers with a few exceptions.  We were worried that the lower fat content of the turkey would produce dense, dry burgers so we chopped up the pepper jack cheese and mixed it plus a little shredded Monterey Jack directly into the turkey mixture.  We also added slightly less pepper (just under 1/2 teaspoon per pound of meat) and Matt grilled the burgers longer — approximately 5 minutes per side over direct high heat — to make sure they were cooked through.

The turkey burgers turned out nice and juicy thanks to all of the cheese and the overall combination of turkey, chipotle mayo, poblano, cilantro, and guacamole was delicious!  Next time we make fancy beef burgers we’ll definitely plan to make the healthier turkey equivalent with the leftovers.  🙂

Homemade Guacamole-Chipotle Burgers

Every January we go to Las Vegas for a week to exhibit at a big trade show.  Although this sounds like a great opportunity to let loose and go wild in Vegas, the reality is that after 9 1/2 hours of standing in a booth on a concrete floor (and with another 9 1/2 hours ahead of us the next day…) we typically find ourselves just looking for a solid meal that doesn’t involve walking through too many casinos.  After checking out many of the restaurants in our immediate area, we decided that our favorite place to eat was the Grand Luxe Cafe, conveniently situated right at the bottom of our hotel elevator at the Palazzo.

 The Grand Luxe Cafe’s menu is practically a small novel, boasting page after page of offerings from Italian, Asian, Mexican, and American cuisine.  Matt’s go-to dinner was the Avocado-Chipotle Burger which, according to the menu, is a “chop house burger topped with fresh avocado, fire-roasted poblano peppers, melted cheese, chipotle mayonnaise and cilantro.”  Yum!

With this description in mind, we set out to make our own version of this delicious dinner.  Judging by the look on Matt’s face as he bit into his burger tonight, I think we succeeded!

Burgers with Pepper Jack, Chipotle Mayo, Roasted Poblanos, Guacamole and Cilantro

Chipotle Mayo, Cilantro & Guacamole

You will need…
1 Poblano Chile Pepper
1/4 Cup Cilantro Leaves
1/4 Cup Guacamole
4 Slices Pepper Jack Cheese
2 Hamburger Buns, cut in half lengthwise and lightly toasted

For the Chipotle Mayonnaise…
1/3 Cup Mayonnaise
Juice from 1/2 Lime
1 Chipotle Pepper plus 1 Teaspoon Adobo Sauce (from a small can of Chipotles en Adobo)
Salt and Pepper, to taste

Poblano Peppers

For the burger patties…
3/4 – 1 pound Ground Chuck
1 teaspoon Salt
1/2 teaspoon Pepper
Olive Oil Spray for the Grill

Directions:

Heat your grill to medium-high heat.  Once hot, place the whole poblano pepper on the grill grates and allow it to roast for approximately 12 minutes, turning occasionally.  When the poblano skin is charred and starting to peel remove it from heat, place it in a glass bowl, and cover with a kitchen towel.  Allow to sit for 10-15 minutes.  (This will loosen up the poblano skin and allow it to cool enough so that you can handle it.)

Transfer the poblano to a cutting board and peel off the outer skin with your fingers.  Cut the stem off and squeeze the seeds out.  Slice the pepper into 1/2″ squares and set aside.

Combine the chipotle mayonnaise ingredients in a small food processor and blend until the pepper is broken down into small pieces.  Transfer the chipotle mayonnaise into a bowl and set aside.

To make your burger patties, place the ground chuck in a shallow bowl and spread out slightly.  Add the salt and pepper evenly over the surface of the meat, then carefully mix the meat with your hands.  The key to a good burger is not to over-mix or over-compress the ground beef so mix gently!  🙂  Split the meat mixture in half and form each section into a very loose ball by transferring the meat back and forth between your hands.

Place both burger “balls” on a plate and press down gently to flatten them ever so slightly… your finished patty should be about 3/4″ thick and 4-5 inches in diameter.  Form a small indent (about 1/4″ deep) in the center of each patty.

Place the burgers, indent side up, on a preheated, oiled grill over direct high heat.  Close the lid and allow to cook for 2 1/2 minutes, then flip the burgers and allow to cook for 2 minutes.  Add the slices of pepper jack cheese to each burger and allow to cook (lid closed) for another minute.

While the burgers are grilling, spread some of the chipotle mayonnaise on the bottom of your hamburger bun and spread some guacamole on the top of the bun.  Place the cooked burgers onto the bun and top with roasted poblano peppers and cilantro.

We enjoyed our burgers with a side of Alexia Sweet Potato Chipotle Fries and a Dill-Cucumber Salad.  This was a pretty spicy meal so the cucumber had a very nice cooling effect.

Ready to eat!

Simple Grilled Zucchini

We’ve had a busy week!  It was Matt’s birthday yesterday so we’ve been going out to dinner a lot and haven’t cooked anything elaborate lately.  Despite our lack of exciting culinary exploits, I still wanted to share a recipe so here’s a very simple one for tonight: Grilled Zucchini.

Simple Grilled Zucchini

You will need…
2 small Zucchinis (or 1 large one)
Olive Oil
Salt and Pepper, to taste
Garlic Powder and/or Trader Joe’s 21 Seasoning Salute (optional)

Directions:
Slice the zucchinis in half lengthwise.  Pour a small amount of olive oil onto the cut side of the zucchini and season with salt and pepper.  You can add extra seasonings like garlic powder or Trader Joe’s 21 Seasoning Salute at this point as well.

Place the zucchini halves skin-side down over direct medium-high heat on a preheated grill.  Grill for approximately 5 minutes and then flip the zucchinis over so that they are face-down on the grill.  Grill for another 5-7 minutes (longer for a thicker zucchini) or until they are tender.  Remove from the grill and enjoy!

Sausage, Pepper and Onion Sandwiches

Last night we bought an 8 pack of sandwich buns since we needed rolls for our yummy salmon burgers.  We knew that we’d have lots of rolls left over so we planned another sandwich-centric meal for tonight with some of my favorite grilled ingredients: sausage, peppers, and onions!  It was still 70 degrees at dinnertime so we built a fire in our fire pit and spent the evening sitting out on the patio.

Sausage, Pepper and Onion Sandwiches

You will need…
1 Red Pepper, cut into thin strips
1 Yellow onion, cut into thin strips
Olive Oil
2 Sausages (Matt had Kielbasa, I had Hot Italian Sausage)
4 Sandwich Buns, sliced in half lengthwise

Directions:
Place the red pepper and yellow onion on a bowl together and drizzle with olive oil.  Toss to coat.  Transfer the peppers and onions to a grill pan and place on a preheated grill.  Cook for approximately 10 minutes until the peppers and onions are tender.  When we cook peppers and onions (or any small veggies that benefit from a good “toss” as they grill) we use a stainless steel Grill Chef’s Pan with a removable handle.

Uncooked Peppers and Onions in the Chef's Grill Pan

While the veggies cook, place the two sausages on the grill.  If you have the ability to control the heat on the sausage side of the grill, increase it to high heat (but leave the veggies at medium).  Cook the sausages over high heat for approx. 6 minutes per side (or longer if you’re using medium heat).

Sausage, Peppers and Onions Grilling

If desired, lightly toast the buns on the grill by placing them cut face down over medium heat.  Keep an eye on them so they don’t burn!

In order to fit the sausages neatly on our round sandwich buns, we sliced the cooked sausages in half and then sliced each piece lengthwise.  Place the sausage on the buns and top with grilled pepper and onion mixture.  Enjoy your completed sandwich while lounging outside by a fire pit if at all possible… it makes it taste even better!