Southwestern Veggie Wraps

Matt and I eat lunch together every day. We enjoy the mid-day break to recap our mornings and recharge for the afternoon. In pre-COVID (and pre-Baby!) days we used to splurge and go out to lunch one or two times a week, but since March we have made our own lunches every day. They’re not always healthy – Annie’s Shells and White Cheddar Macaroni and Cheese makes an appearance at least a few times a month! – but sometimes we’re really good and prepare healthy lunches in advance that will last us through the work week.

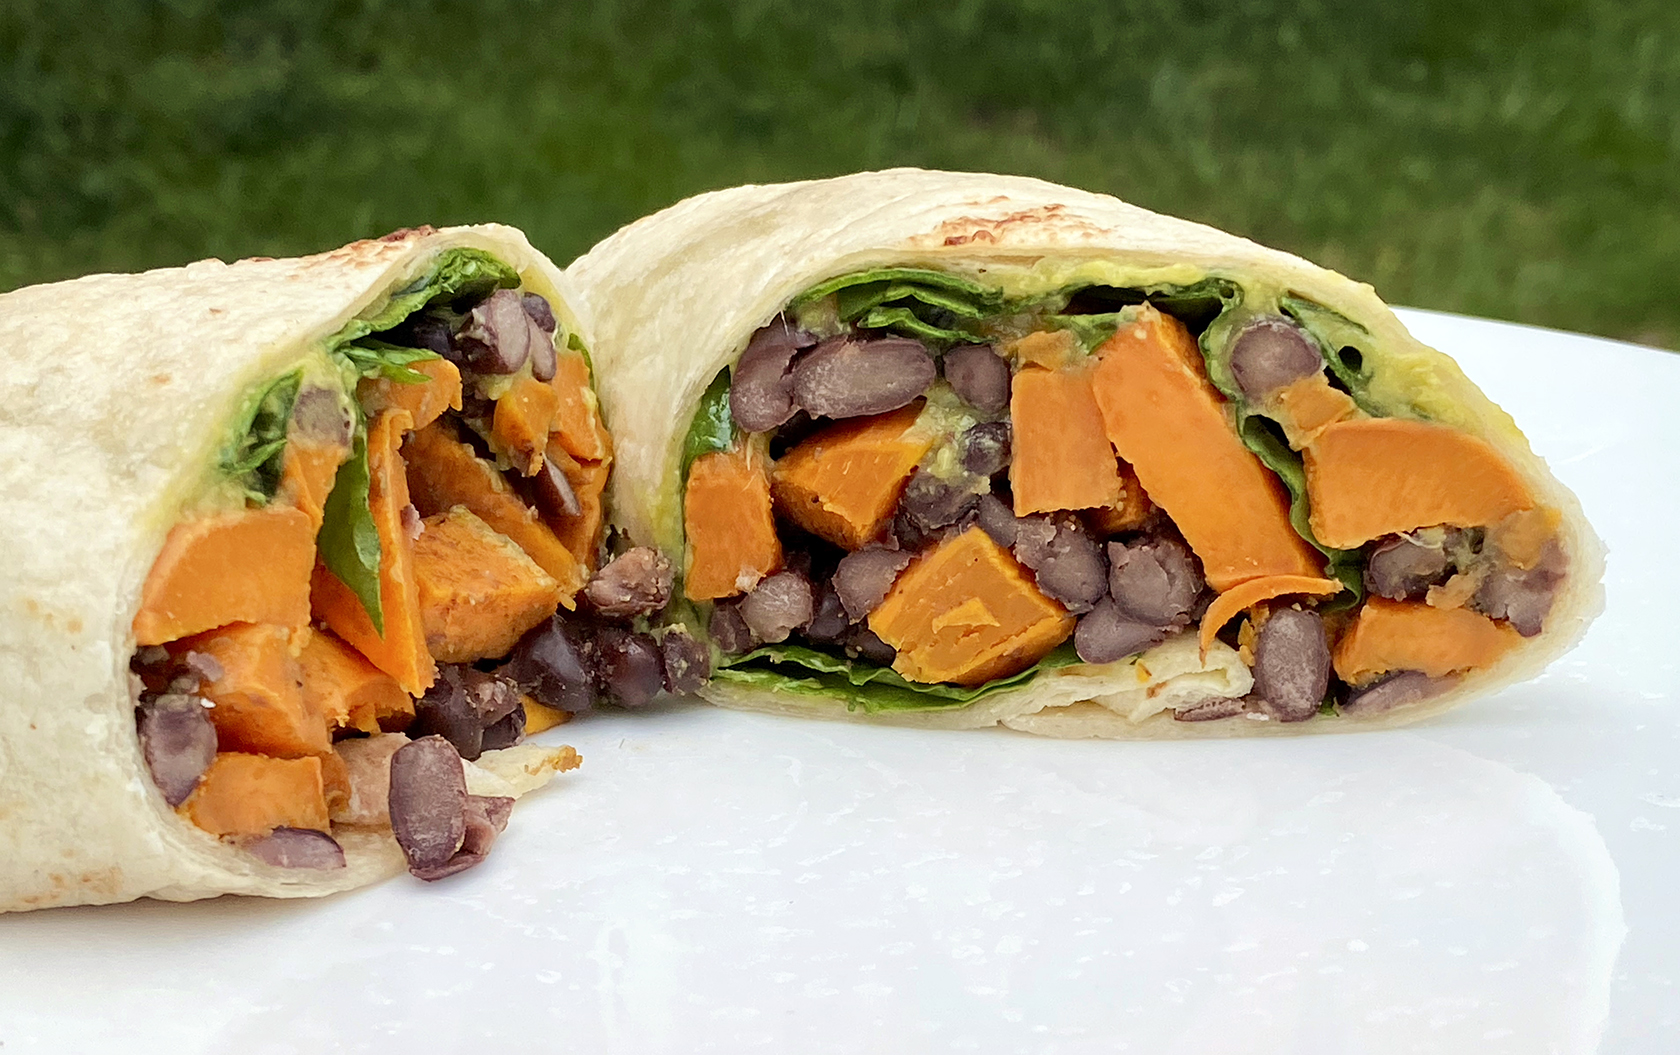
Take, for example, these southwestern veggie wraps. They require a little up front work to peel and roast sweet potatoes and simmer beans with seasonings, but once that prep is done we get to enjoy several days’ worth of delicious lunches that come together in minutes.

I roasted four sweet potatoes and simmered my beans yesterday afternoon so we’ll be having these wraps for lunch TODAY. My stomach is growling. Lunch time can’t come soon enough!!!

Southwestern Veggie Wraps

Makes 6-8 wraps; recipe adapted from Oh My Veggies

You will need…

Roasted Sweet Potatoes
3-4 Sweet Potatoes, peeled and cut into 3/4 inch chunks
2 tablespoons Olive Oil
2 teaspoons Cumin
Salt and Pepper

Smoky Black Beans
2 15 oz. cans Black Beans, not drained
2 tablespoons Olive Oil
2 cloves Garlic, minced
1/2 cup Water
1 teaspoon Ground Coriander
1 teaspoon Cumin
1/2 teaspoons Smoked Paprika
1/2 teaspoon Kosher Salt

Wraps
Guacamole
Large “Burrito-Sized” Tortillas
Baby Spinach
Roasted Sweet Potatoes
Smoky Black Beans

Directions

Preheat oven to 425°F.  Place the sweet potato chunks on a large rimmed baking sheet. Toss with cumin and a few grinds of salt and pepper, then drizzle with olive oil and continue to toss (I use my hands) until the potatoes are evenly coated. Spread the potatoes in an even layer on the baking sheet. Roast for 25 minutes, stirring partway through, until potatoes are crisp on the outside and soft on the inside.  Allow to cool, then transfer to a container and refrigerate until ready to eat.

To make the smoky black beans, combine the beans and their liquid with the oil, garlic, water and seasonings in a small saucepan. Simmer for 20-25 minutes, stirring occasionally. Drain (but do not rinse!) the beans, then transfer to a container. Refrigerate until ready to eat.

To assemble the wraps, start by portioning out the sweet potatoes and beans you’ll be using into a microwave-safe bowl. Reheat for 2-3 minutes in the microwave until warm. Next, place a tortilla on a large plate, cover with a damp paper towel, and microwave for 30 seconds to soften tortilla. Remove paper towel, then spread a generous spoonful (or two, or three!) of guacamole on the tortilla. Top with a handful of spinach leaves and the sweet potato-bean mixture. Wrap up the tortilla and enjoy!

Curried Butternut Squash and Lentil Stew

September has flown by!! This month was marked by several “blog-worthy” events, including a race, two vacations and a major room makeover. If only I could find the time to actually write these posts!! For tonight, however, I have an easy entry to share because I made it last fall and have been saving the photos since then. 😆

1203 Curried Butternut Squash Stew

This fantastic one-pot stew dish features curry-roasted morsels of butternut squash, flavorful red lentils, a hearty helping of kale and crumbled Italian sausage.  Sounds like a perfect fall dish, right?!? The curry-coated butternut squash smells amazing when it’s in the oven and the lentils, kale and squash cook down to form a thick, tasty mixture that completely makes you forget that you’re eating healthy food. Well, except for the sausage… but you can also use ground turkey (shown in my photos here from last year) or opt to leave the meat out altogether if you prefer a vegetarian dish.

1216 Curried Butternut Squash Stew

Curried Butternut Squash and Lentil Stew with Kale and Sausage

Serves 4-6; Slightly adapted from HealthyFoodForLiving.com.

Ingredients
For the curried squash…
4 cups cubed Butternut Squash
2 Tablespoons Extra Virgin Olive Oil
Salt and Pepper, to taste
2 teaspoons Madras Curry Powder
2 teaspoons Garam Masala

For the stew…
1 teaspoon Extra Virgin Olive Oil
OPTIONAL: 1 lb. Ground Italian Sausage or Ground Turkey
1 Yellow Onion, finely chopped
3-4 Garlic Cloves, minced
3 teaspoons Madras Curry Powder
1 teaspoon Garam Masala
3 cups Chicken Broth (or Vegetable Broth, if going the vegetarian route)
3/4-1 cup Red Lentils
Curried Squash from above
1 bunch Kale, washed, stems, removed, and roughly chopped
Salt and Pepper, to taste
Naan flatbread

Directions
Preheat the oven to 425°F. Toss the cubed squash in olive oil and then add several grinds of salt and pepper plus the curry powder and garam masala. Stir well to coat the squash evenly. Spread the squash out in a single layer on a large rimmed baking sheet and roast in the oven for 30-35 minutes, stirring halfway through. The squash cubes are ready when they are just starting to brown on the edges. Remove the squash from the oven and set aside.

Heat the olive oil in a dutch oven over medium-high heat. Add in the (optional) crumbled sausage or turkey and saute until cooked through. Transfer the cooked meat to a plate. Add the chopped onion to the leftover oil in the pot (drain off a bit if the meat was very fatty) and saute the onions until soft, about 5 minutes. Stir in the garlic, curry powder and garam masala and cook until fragrant, about 30 seconds.

Pour in the chicken broth and stir in the lentils. Bring the mixture to a boil, then lower the heat and simmer for 10 minutes, stirring occasionally. Add the roasted butternut squash, sausage and chopped kale to the stew and stir to combine. Cook the stew for another 10-15 minutes or until the kale has wilted down. If you have a lot of kale covering the pot will speed up this process! Season with salt and pepper to taste.

1209 Curried Butternut Squash Stew

Serve a hearty portion of curried butternut squash stew with a few slices of naan. Enjoy!

BBQ Baby-Back Ribs

BBQ Ribs

Matt and I made these oven-roasted BBQ baby-back ribs for my family at the Hunting Camp last weekend. This was our first time making baby-backs and they were delicious! I’m pretty sure that my brother single-handedly ate an entire rack… (But it technically wasn’t single-handedly because he totally had to use two hands to really dig into these saucy, meaty ribs!!) 😉I’d recommend lots of napkins and maybe some wet wipes when serving these!

When researching recipes for this meal, we originally thought that it would be neat to cook the ribs entirely on the grill, but we were doubling the recipe and quickly realized that 6 full racks of ribs would never fit comfortably on a standard grill.  With this in mind, Matt opted to do most of the “slow and low” cooking on rimmed baking sheets in the oven and simply finished the ribs on the grill for that final grilled flavor.  This made for an easy afternoon with very little hands-on work required up until the final grilling and cutting steps.

RIBS!

BBQ Baby-Back Ribs (serves 6; adapted from Williams Sonoma Grill Master)

Ingredients:
4 chipotles in adobo, seeded & chopped
4 cloves garlic, minced
2 tablespoons tomato paste
2 tablespoons balsamic vinegar
2 tablespoons brown sugar
4 1/2 teaspoons sweet paprika
4 1/2 teaspoons cumin
4 1/2 teaspoons dried oregano
4 1/2 teaspoons dried thyme
1 teaspoons ground cloves
Coarse salt

3 slabs baby-back ribs (6lb.)
1 cup of your favorite store-bought barbecue sauce

Directions:
To make the rub, combine the chipotle chiles, garlic, tomato paste, balsamic vinegar, brown sugar, paprika, cumin, oregano, thyme, cloves and salt in a food processor. Pulse until a smooth paste forms. If the rub is too dry, add 1-2 tablespoons water and continue to pulse. The rub may be refrigerated in an airtight container for up to two days.

On the morning before you serve the ribs, begin by removing the silverskin (membrane) off of the bone-side of the ribs.  (See here for tips.) Use a sharp knife to carefully trim any large sections of fat from the meat, then use your hands to slather the ribs with the rub.  Coat both sides of each slab evenly, then place the ribs bone-side down on a rimmed baking sheet, cover tightly with plastic wrap, and refrigerate for 4-6 hours or as long as overnight.

Flipping the ribs during roasting

Approximately 3 hours before dinner, preheat the oven to 275°F and allow the ribs to sit out of the refrigerator for 15 minutes. Transfer one rack of ribs to a second rimmed baking sheet (also bone-side down), then pour approximately 1/2 cup of water around the outer edge of each baking sheet. Cover the pans tightly with foil and place them in the oven. Roast for one hour, then remove the foil and flip the ribs over.  Continue to roast uncovered for another 1 1/2 hours, flipping every 30 minutes. The ribs can be prepared to this point a day in advance, then covered and refrigerated.

Ribs on the BBQ

Prep a gas grill for direct grilling over medium-high heat. Brush the roasted ribs with half of the barbecue sauce. Grill the ribs, turning once, until heated through, about 5 minutes per side. Transfer to a cutting board and cut into 1-rib portions. Arrange the ribs on a platter and drizzle with the remaining 1/2 cup sauce. Serve and enjoy!

BBQ Baby Back Ribs close

Panzanella: A Blog-Worthy Salad

I made the same recipe two times this weekend and still found myself excited to serve up seconds on Sunday evening. That definitely makes this recipe for a Panzanella “bread salad” qualify as blog-worthy, don’t you think?? 😀

632 Panzanella Salad

According to Wikipedia, “Panzanella is a Tuscan salad of bread and tomatoes that’s popular in the summer. It includes chunks of soaked stale bread and tomatoes, sometimes also onions and basil, dressed with olive oil and vinegar.” According to my extended family, Panzanella is a tasty excuse to call toasted Italian bread soaked in dijon vinaigrette a “salad” and feel good about eating it. Just kidding… sort of. This bread salad is delicious, colorful, and easy to make and I have a feeling that we’re going to get many more requests for it at future family dinners!

When I bring Panzanella to a dinner party I do almost all of the work in advance. The vinaigrette can be made 1-2 days ahead of time and refrigerated in an airtight container, the veggies can be chopped and tossed together a few hours in advance, and the bread can be toasted 1-2 hours before dinner and stored in a ziploc bag. Making the salad then becomes a simple matter of tossing together the vinaigrette, veggies and bread about 20 minutes before dinner.

637 Panzanella Salad

Panzanella (from Ina Garten; serves 8-10)

Vinaigrette Ingredients
1/2 cup Extra Virgin Olive Oil
3 tablespoons Champagne Vinegar
1-2 teaspoons Minced Garlic
1/2 teaspoon Dijon Mustard
1/2 teaspoon Salt
1/4 teaspoon Ground Black Pepper

Salad Ingredients
1 Red Bell Pepper, seeded and cut into 1″ pieces
1 Yellow Bell Pepper, seeded and cut into 1″ pieces
1 Hothouse Cucumber, halved lengthwise, seeds removed and cut into 1/2″ slices
1/2 Red Onion, halved and cut into thin slices
3-4 Plum or Campari-sized Tomatoes, cut into 1″ pieces
3 tablespoons Capers, drained
20 Basil Leaves, sliced into 1/2″ strips
1 large Loaf of French or Italian Bread, cut into 1″ pieces
Olive Oil
Salt

Directions:
To make the vinaigrette, whisk all ingredients together in a bowl. Alternatively, combine all ingredients in a ball jar and shake vigorously. The vinaigrette can now be easily refrigerated or transported until it’s time to combine the salad.

Combine the peppers, cucumber, onion, tomatoes, capers and basil together in a large bowl.

Heat 1-2 tablespoons of olive oil in large saute pan over medium heat. Add half the bread and approximately 1/2 teaspoon salt. Cook the bread cubes, stirring and flipping occasionally, until the bread begins to toast and turn golden brown. Transfer the toasted bread to a plate to cool and repeat the cooking process with the remaining bread cubes.

To assemble the salad, combine the vinaigrette, vegetables, and toasted bread in a large serving bowl. Season with salt and pepper to taste. For best flavor, allow the finished salad to sit for approximately 20 minutes before serving… that will give the vinaigrette time to soak into the bread. 😀 Enjoy!

630 Panzanella Salad

Grilled Paella with Chicken, Shrimp and Sausage

What’s better than serving a one-pot meal to dinner guests? Serving a grilled one-pot meal that’s made entirely outside while your guests relax and drink craft beer on the patio! That’s pretty much how Matt and I spent the Sunday of Memorial Day weekend when we hosted my mom’s birthday dinner. We made grilled Paella with chicken, shrimp and sausage and it was definitely a hit. My mom actually asked for seconds (or maybe that was thirds?) during dinner… that NEVER happens!! 🙂

Dinner Tonight- Paella on the Grill!

This paella looks really fancy, but in reality it’s not too complicated. The entire dish is assembled in a shallow paella pan (like these on Amazon) which is placed directly on a grill, giving you the combination of direct and indirect heat that you would otherwise need both a stovetop and oven to achieve. You do need a few special ingredients like saffron, smoked paprika and Spanish (dry) chorizo, but once you have those on hand the other elements of the dish are very easy to find and prep.

Here are a few pictures from the first time we made Paella a few weeks ago.  For Sunday’s family dinner, we increased the recipe by half and it easily served 6 hungry guests.

Sauting the Tomato Mixture

Sear the chicken thighs and chorizo, then cook the tomato and aromatics over direct heat.

Toasting the Rice

Stir the rice into the tomato mixture to toast it before adding saffron and broth.

Adding the chorizo back into the rice

Add back in the browned chorizo sausage…

Nestle the chicken into the rice

…and “nestle” the chicken thighs into the rice, being careful not to stir the rice mixture.

Adding the shrimp to the pan

To finish the dish, top with shrimp, peas, and peppers and cook until the shrimp are just opaque.

Chicken, Shrimp and Sausage Paella (serves 4; from Williams Sonoma Grill Master)

You will need…
1/4 teaspoon Saffron Threads
4 Bone-In, Skin-On Chicken Thighs
Salt and Pepper
4 tablespoons Extra Virgin Olive Oil
7-10 oz. Spanish Chorizo Sausage, sliced (we used Goya Chorizo)
3 Tomatoes, finely chopped
1 Yellow Onion, finely chopped
4-5 cloves Garlic, minced
1 tablespoon Fresh Thyme, chopped
1/2 teaspoon Smoked Paprika
1 cup uncooked short-grain Paella Rice, such as Calasparra
4 cups Low Sodium Chicken Broth
7 oz. jarred Roasted Red Peppers, drained and cut into strips
1/2 cup Frozen Peas
1 lb. 21-25 ct Shrimp, peeled and deveined
Fresh Parsley, chopped, for garnish
4-6 Lemon Wedges, for garnish

Directions:
Place the saffron threads in a small bowl with 2 ounces of hot water and set aside. Liberally salt and pepper both sides of the chicken thighs. Preheat a 15-inch Paella pan on the grill over high heat, then add the oil and place the chicken thighs in the pan skin-side down. Sear the thighs, turning once, until browned on both sides, about 5 minutes per side. Transfer the chicken to a platter and add the sliced chorizo to the pan. Saute the chorizo until it starts to brown, about 2-3 minutes, then transfer the chorizo to the platter with the chicken.

Add the tomatoes, onion, garlic, thyme and paprika to the pan and cook, stirring often, for 5 minutes. Add in the rice and stir for 2-3 minutes until slightly toasted. Add the saffron thread mixture and 2 cups of chicken broth and bring to a boil. Reduce the heat to medium, close the grill, and cook for 10 minutes.

Open the grill and add the reserved chicken thighs and chorizo back in into the rice mixture. Important: do not stir the rice! Use tongs to nestle the chicken thighs into the rice. Add an additional 1 cup of chicken broth, then close the grill again and cook for another 20 minutes.

Open the grill and again, resist the urge to stir! Distribute the shrimp, peas and red peppers over the top of the rice mixture and pour in approximately 1/2 to 1 cup more chicken broth (go with more if the rice looks dry). Close the grill and cook for another 5-7 minutes or just until the shrimp are cooked through.

Remove the paella pan from the grill and garnish with parsley. Arrange the lemon wedges over the dish and serve directly from the pan. Enjoy!!

Grilled Paella

Peanut Butter Brownie Bites

Still don’t know what you’re going to bring to that holiday party this weekend?  Try these super simple and delicious bite-sized peanut butter brownie bites!  They’re made using a regular boxed brownie mix (because being homemade doesn’t mean that it has to be labor intensive) and then topped with melted peanut butter and chocolate chips.  Yum!!

Peanut Butter Brownie Bites r

Matt and I made these for a party last weekend and they were a hit.  We actually overheard someone exclaim “Ooh! These brownie things are REALLY good!” and, since no one really knew who brought what to the potluck Matt and I just exchanged a happy glance from across the room, acknowledging our boxed brownie mix success.  We will definitely make these again!

Overhead Peanut Butter Brownie Bites

Peanut Butter Brownie Bites
(makes 30 bites; recipe adapted slightly from Family Friendly Frugality)

You will need…
1 boxed Brownie Mix (we used Betty Crocker Supreme Triple Chunk!)
Brownie Mix Ingredients (in our case, 1/4 c Water, 1/3 c Vegetable Oil, & 1 Egg)
3/4 cup Creamy Peanut Butter
Mini Chocolate and Peanut Butter Chips

Directions:
Preheat oven to 325°F and lightly grease a 24-ct mini-muffin pan.  Mix up the brownie batter according to the mix’s instructions, then spoon batter into the muffin pan until each cup is about 3/4 full.  Bake for approximately 14 minutes, just until the centers of the brownie bites have set.  A toothpick inserted into the center of a bite should come out slightly coated in batter.  Remove from the oven and allow the bites to cool for 15 minutes.  Carefully extract the brownie bites from the muffin pan and repeat the above process to finish baking the rest of your batter.

Line up your cooled brownie bites on a large tray or cutting board and gently press the center of each bite down to create a well.  Microwave the peanut butter for 30-60 seconds until melted, then spoon a small amount in the center of each bite.  Top with chocolate and peanut butter chips and, if desired, an extra drizzle of peanut butter.  Enjoy!

Peanut Butter Brownie Bites l

Italian White Bean Hummus

If you’ve ever eaten at an Italian restaurant I’m sure that you’ve enjoyed a nice piece of crusty bread dipped in olive oil.  But have you ever had the pleasure of tasting white bean hummus served with that olive oil?  I was recently at a restaurant where they stirred herby, creamy white bean hummus into the oil and I absolutely loved it.  I liked it so much, in fact, that as soon as the meal was over I decided that I was going to make my own white bean hummus at home so I could eat it by the spoonful!

To be honest, I didn’t actually intend to eat this hummus by the spoonful, but as soon as I blended together the rosemary, beans, garlic and lemon juice I couldn’t help but lick the spoon 2 or 3 or …7? times!  It was just SO delicious!  The rosemary is fragrant, the lemon is bright, the garlic is strong (as it should be!) and the white beans are blended into a smooth, creamy consistency perfect for dipping.

Italian White Bean Hummus with Rosemary, Garlic and Lemon.  Delicious and so easy to make!!


Italian White Bean Hummus
(Recipe from Racheal Ray)

You will need…
1 – 15oz. can Cannellini Beans, drained and rinsed
3 sprigs Rosemary, leaves removed from the stem and roughly chopped
Juice of 1 Lemon
3 cloves Garlic, minced
2 tablespoons Olive Oil (approximately)
Salt, to taste
3 tablespoons Tahini

Directions:
Add all ingredients to the bowl of a blender or food processor.  Blend together until smooth, adding more olive oil as you go if needed.  I used a Vitamix and found that blending on low between speed settings 2-4 while using the tamper to push the ingredients into the blades worked well.  Once the hummus has reached a creamy consistency use a spatula to scrape the dip into a bowl.  (Don’t leave any hummus behind… you’re going to want to eat every last drop!)  Serve with crackers, crusty Italian bread, or just a spoon.  🙂

Italian White Bean Hummus 2-

Roasted Corn Salsa

Last night I made my third batch of Roasted Corn Salsa in less than a month which can only mean two things…  One, this salsa is awesome and two, it’s high time it makes an appearance on the blog!!

Roasted Corn Relish 1

This bright, flavorful salsa features grilled corn, roasted peppers, fresh tomatoes, cilantro, and lime juice.  It pairs perfectly with grilled fish and grilled avocado (<– my new favorite way to eat avocados).  We’ve also tried the salsa on shrimp tacos and, although Matt thinks it’s a bit too lime-y for eating straight, I personally really enjoy eating it with tortilla chips.

Last night’s batch of salsa is being refrigerated until we have Matt’s parents over for dinner tomorrow night.  Making it ahead of time will save me prep time on Saturday and the extra hours in the fridge will allow the salsa flavors to fully combine.  I’ll post pictures of the final meal (grilled salmon!) next week.

Roasted Corn Relish 2

Roasted Corn Salsa  (adapted from MyRecipes.com; makes 6-8 servings) 

You will need…
Cooking Spray
4 ears Corn, husked
4 Anaheim Peppers or 4 Cubanelle Peppers (for less heat), or a combination of the 2 types
1 cup diced Tomatoes (from approx. 2-3 Roma Tomatoes)
6 tablespoons freshly squeezed Lime Juice (from approx. 3-4 limes)
1/4 cup chopped Cilantro
1/2 teaspoon Salt
1/4 teaspoon Ground Pepper

Directions:

Lightly coat the grates of a grill* set to medium heat with cooking spray.   Place the corn and peppers directly on the grill.  Allow the corn and peppers to cook, turning occasionally, until the corn kernels start to brown slightly and the peppers become soft and dark splotches start to form on the green skins.  Transfer the roasted corn to a plate to cool.  Place the roasted peppers in a large bowl and cover for 10-15 minutes.

Cut each corn ear in half, then place the flat end down on a cutting board and slice the kernels off of the cobs.  When the peppers are cool enough to handle, peel and discard the skins and remove the stems, seeds, and membranes.  Slice the peppers into 1/4″ pieces.

Combine the corn, peppers, tomatoes, lime juice, cilantro, salt and pepper in a large bowl.  Serve immediately or cover tightly and refrigerate up to 3 days to allow the flavors to intensify before serving.

Serving suggestions:

  • Serve over grilled salmon or another grilled fish (salmon recipe coming soon!)
  • Spoon over grilled avocado (slice avocado lengthwise & remove pit; brush grill with oil and place avocado halves directly on grates for 2-3 minutes until grill marks appear)
  • Serve as a fresh, citrus-y salsa with tortilla chips

Roasted Corn Relish 3

*If you don’t have a grill, use boiled corn on the cob or thawed frozen corn kernels.  The peppers can be roasted in an oven… here are some basic instructions on how to do this from Ina Garten.

Cassoulet with Smoked Sausage and White Beans

How do you prepare for a snow day?  Do you rush to the supermarket for bread, milk and eggs?  Or maybe turn up the heat so the house feels warm and toasty when you come in from shoveling?  In our house we try to take advantage of being snowed in by planning a big, slow-cooked meal that we normally wouldn’t have time to put together on a regular weeknight.

Flashback to Thursday, February 13th… A huge storm was dumping more than a foot of snow on our already snow-covered region, the local kids were all enjoying yet another snow day, and our office was closed.  Knowing that we’d have lots of time to cook, Matt and I decided to try a new stew recipe… something that required a little prep up front and that would be guaranteed to fill the house with the delicious aroma of slow-cooking meat and herbs as it simmered in the crockpot all afternoon.  I found the perfect candidate on MyRecipes.com… smoked sausage cassoulet!

616 Cassoulet

Cassoulet is a classic french dish that features slow-cooked white beans and meat.  White traditional versions of cassoulet call for duck confit, our snow day version of cassoulet kept things simple.  All of the ingredients were readily available at our local grocery store (on the eve of a snow storm, no less!) and, after being sauteed and slow-cooked all afternoon, they came together to make a delightfully hearty stew with smoky kielbasa, richly flavored white beans, and pork that was so tender you could cut it with a spoon.  Top that off with some freshly grated parmesan and chopped parsley and we had the ultimate culinary reward for all of the shoveling we did on Thursday… and it was a LOT of shoveling: about 14 inches of heavy, wet snow!

February 13 Snow Collage

Cassoulet with Smoked Sausage, Pork and White Beans (adapted from MyRecipes.com; serves 5)

You will need…
2-3 slices Bacon, uncooked, cut into approx. 1″ x 1/2″ pieces
12 oz. Smoked Sausage,* halved lengthwise and cut into 1/4″ slices
2 cups Chopped Onion
1/2 teaspoon Dried Rosemary
1 teaspoon Dried Thyme
3 cloves Garlic, minced
2 – 14.5 oz. cans Diced Tomatoes, drained
1/2 teaspoon Ground Black Pepper
1/2 teaspoon Salt
2 – 15 oz. cans Great Northern Beans, drained and divided
1 lb. Pork Tenderloin, trimmed and cut into 1/2″ cubes
Grated Parmesan Cheese, for garnish
Fresh Parsley, for garnish

*Choose a good quality smoked sausage as this will have a major impact on the overall flavor of the dish.  The first time we made this recipe we used Johnsonville Smoked Pork Kielbasa with great results.  The second time we also added in some spicy Andouille sausage (leftover from Jambalaya) and that added even more flavor.

621 Cassoulet

Directions:
Preheat a heavy-bottomed skillet over medium-high heat.  Cook the chopped bacon bits, stirring occasionally, until crispy.  Use a slotted spoon to transfer the cooked bacon to a bowl and set aside.  Add the smoked sausage to the bacon fat and saute until just starting to brown.  Use a slotted spoon to transfer the sausage to another bowl and set aside.  Add the onion, rosemary, thyme and garlic to the pan and saute until soft, approximately 4-5 minutes.  Add the bacon, tomatoes, salt and pepper to the pan, stir well, then bring to a boil.  Remove from heat.

Meanwhile, place 1 can’s worth of drained Great Northern Beans in a large bowl and mash with a potato masher until chunky.  (I found that doing this in a 3 qt pot worked well since the bottom of the pot is flat.)  Add in the remaining can of beans along with the browned sausage and pork and stir well.

Assemble your cassoulet in layers in a crockpot.  First, spread half of the bean mixture on the bottom of the crockpot.  Then, in layers, add half the tomato mixture, the remaining bean mixtue, and the remaining tomato mixture.  Cover and cook on LOW for 5 1/2 hours.  Stir the cassoulet before serving and top each individual bowl with grated Parmesan and parsley.  Enjoy!

597 Cassoulet

Do you have any go-to recipes that you love to make on snow days?
Tell me about them in the comments section!  🙂

Chicken and Shrimp Jambalaya

Happy Mardi Gras!  I was not raised observing Fat Tuesday, Ash Wednesday, or any of the other Lent traditions, but I’m certainly happy to use a holiday as an excuse to try a new recipe!

Chicken and Shrimp Jambalaya

I’ve been a huge fan of hearty one pot meals this winter so last weekend when we realized that Mardi Gras was just a few days away we decided that a flavorful Jambalaya would be the perfect recipe for Sunday night.   We consulted our trusty Cook’s Illustrated The New Best Recipe cook book and decided to make their version of a creole-style Jambalaya with shredded chicken thighs, andouille sausage, shrimp, tomatoes and rice.  The recipe came together fairly quickly (compared to some of our stews, at least!) and the resulting dish featured an impressive range of flavors from the smoky andouille and clam-juiced shrimp to the fresh parsley, and slow-cooked chicken.  Yum!

Chicken and Shrimp Jambalaya (from The New Best Recipe; serves 5-6)

You will need…
1 Yellow Onion, quartered
1 Celery Rib, cut into 2-3 inch pieces
1 Red Bell Pepper, quartered
5 Garlic Cloves, peeled
2 teaspoons Vegetable Oil
4 Bone-In, Skin-On Chicken Thighs
8 oz. Andouille Sausage, halved lengthwise and cut into 1/4″ pieces (buy a good brand of Andouille if possible; it should give this dish a lot of flavor!)
1 1/2 cups Long Grain White Rice (uncooked)
1 teaspoon Salt
1/2 teaspoon Fresh Thyme, minced (we used dried Thyme)
1/4 teaspoons Cayenne Pepper
1 – 14.5 oz. can Diced Tomatoes, drained with 1/4 cup of juice reserved
8 oz. Clam Juice
1 1/2 cups Chicken Broth
2 Bay Leaves
1 lb. Shrimp, peeled and deveined (we used frozen 30 ct. shrimp and thawed them beforehand)
2 tablespoons minced fresh Parsley

Directions:
Begin by transferring the onion, celery, red pepper and garlic into a food processor.  Pulse the vegetables briefly to finely chop them without pureeing them.  We have a miniature food processor so Matt did this in 4 steps (one per vegetable) and then combined all of the chopped veggies together on a plate.

Heat the vegetable oil in a large dutch oven over medium-high heat.  Use tongs to place the chicken thighs in the oil, skin-side down, and cook, undisturbed, for 5 minutes or until golden brown.  (Watch out, there’s a lot of splattering!)  Use the tongs to flip the thighs over and continue to cook for another 3 minutes, then transfer the thighs to a plate.  Reduce the heat to medium, add the chopped andouille, and brown for 3 minutes, stirring frequently.  (This step smells amazing, in my opinion.)  Transfer the browned andouille to a paper towel-lined plate.

Reduce the heat further to medium low, then add in the chopped vegetables.  Use a wooden spoon to scrape up any browned bits from the bottom of the pot and stir the veggies until softened, about 4 minutes.  Add in the rice, salt, thyme, and cayenne and stir well for about a minute to coat the rice in the chicken fat.  Stir in the tomatoes, tomato juice, clam juice, chicken broth, bay leaves and andouille.  Remove the skin from the chicken thighs then use your tongs to place the chicken, skinned-side down, on top of the rice mixture.  Bring to a boil then reduce heat to low and simmer, covered, for 15 minutes.  After 15 minutes stir the mixture once and flip the chicken thighs over, then cover and simmer for another 10 minutes or until the chicken is cooked through.  Transfer the chicken to a plate.

Place the shrimp on top of the rice mixture then cover and cook for 5 minutes until the shrimp are pink and cooked through.  (Be careful not to overcook the shrimp.)  When the shrimp are fully cooked remove the pot from heat and discard the bay leaves.  As soon as the chicken thighs are cool enough to work with, shred the meat into thin strands with your fingers.  Gently stir the shredded chicken and minced parsley into the stew and serve immediately.

Jambalaya

728 Jambalaya

Do you have a favorite Mardi Gras-inspired dish or tradition?
Please tell me about it in the comments section!