Shanghai Noodles

Shanghai Noodles

When Matt and I were in college we were lucky enough to live 5 minutes away from a wonderful Chinese restaurant called Sang Kee Asian Bistro. Sang Kee specializes in noodle dishes and it quickly became our favorite restaurant. After college we moved away from Sang Kee but, as luck would have it, a brand new Sang Kee opened up right down the road from our house and we were able to satisfy our need for tasty Chinese noodle dishes once again.

Unfortunately the local Sang Kee didn’t do very well in its new location and it closed about a year ago. We had been going about our lives feeling rather noodle-deprived until last week when we realized that we should just try to make our own version of a Sang Kee dish! (Eureka!) We decided to make one of my favorites, Shanghai Noodles, and, after a quick web search to consult some recipes, came up with the following tasty dish. Enjoy!

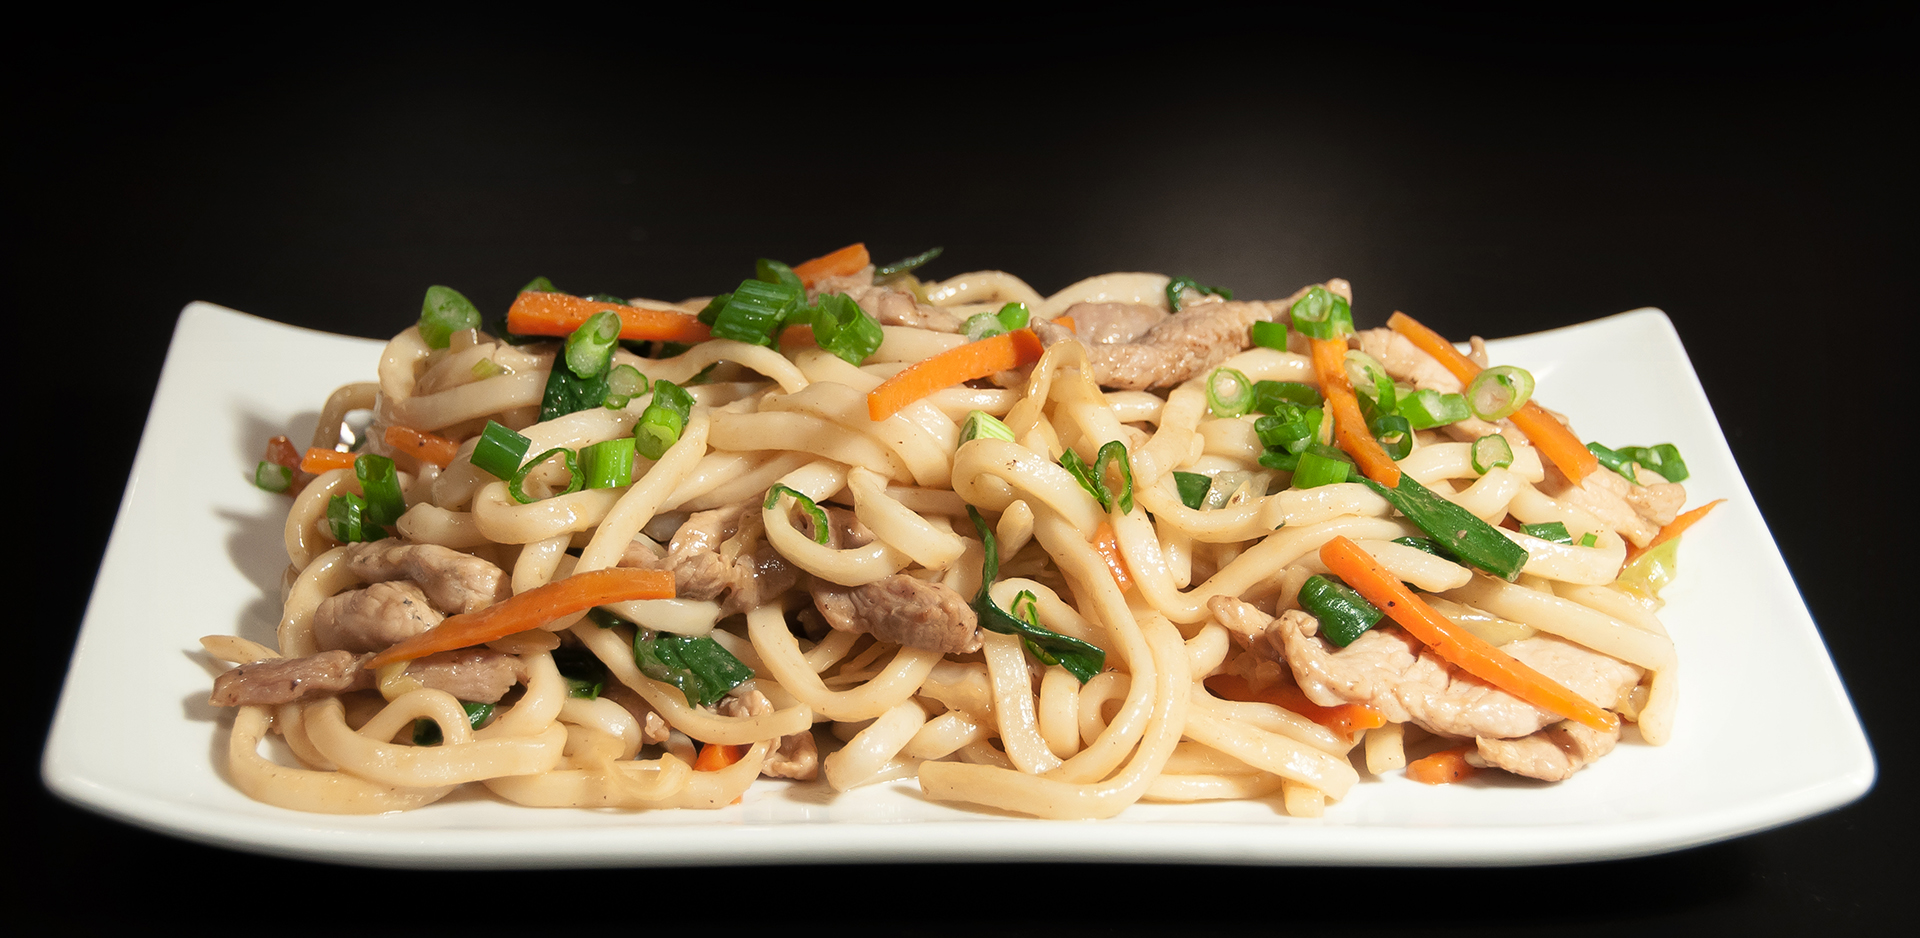
Shanghai Noodles (adapted from the recipe on Cooking With Alison)

You will need…
1-2 tablespoons Peanut Oil
2 packed cups of Cabbage, cut into slices (approx. 2” long by 1/4″ thick)
2 Carrots, sliced into long, skinny sticks (approx. 2” long by 1/8” wide)
Splash of Dry Sherry
1 lb. Pork Tenderloin, sliced into thin strips (2-3” long by 1/2” wide by 1/8” thick)
1 bunch Green Onions, cut into 2 inch pieces (plus some thinly sliced as a garnish)
3 tablespoons Dark Soy Sauce
2-3 “pinches” of Ground White Pepper
1 lb. freshly cooked and drained Udon Noodles (these are fat, white noodles, see below*)
1 1/2 teaspoons Sesame Oil

Stir-frying the Pork and Veggies

Directions:
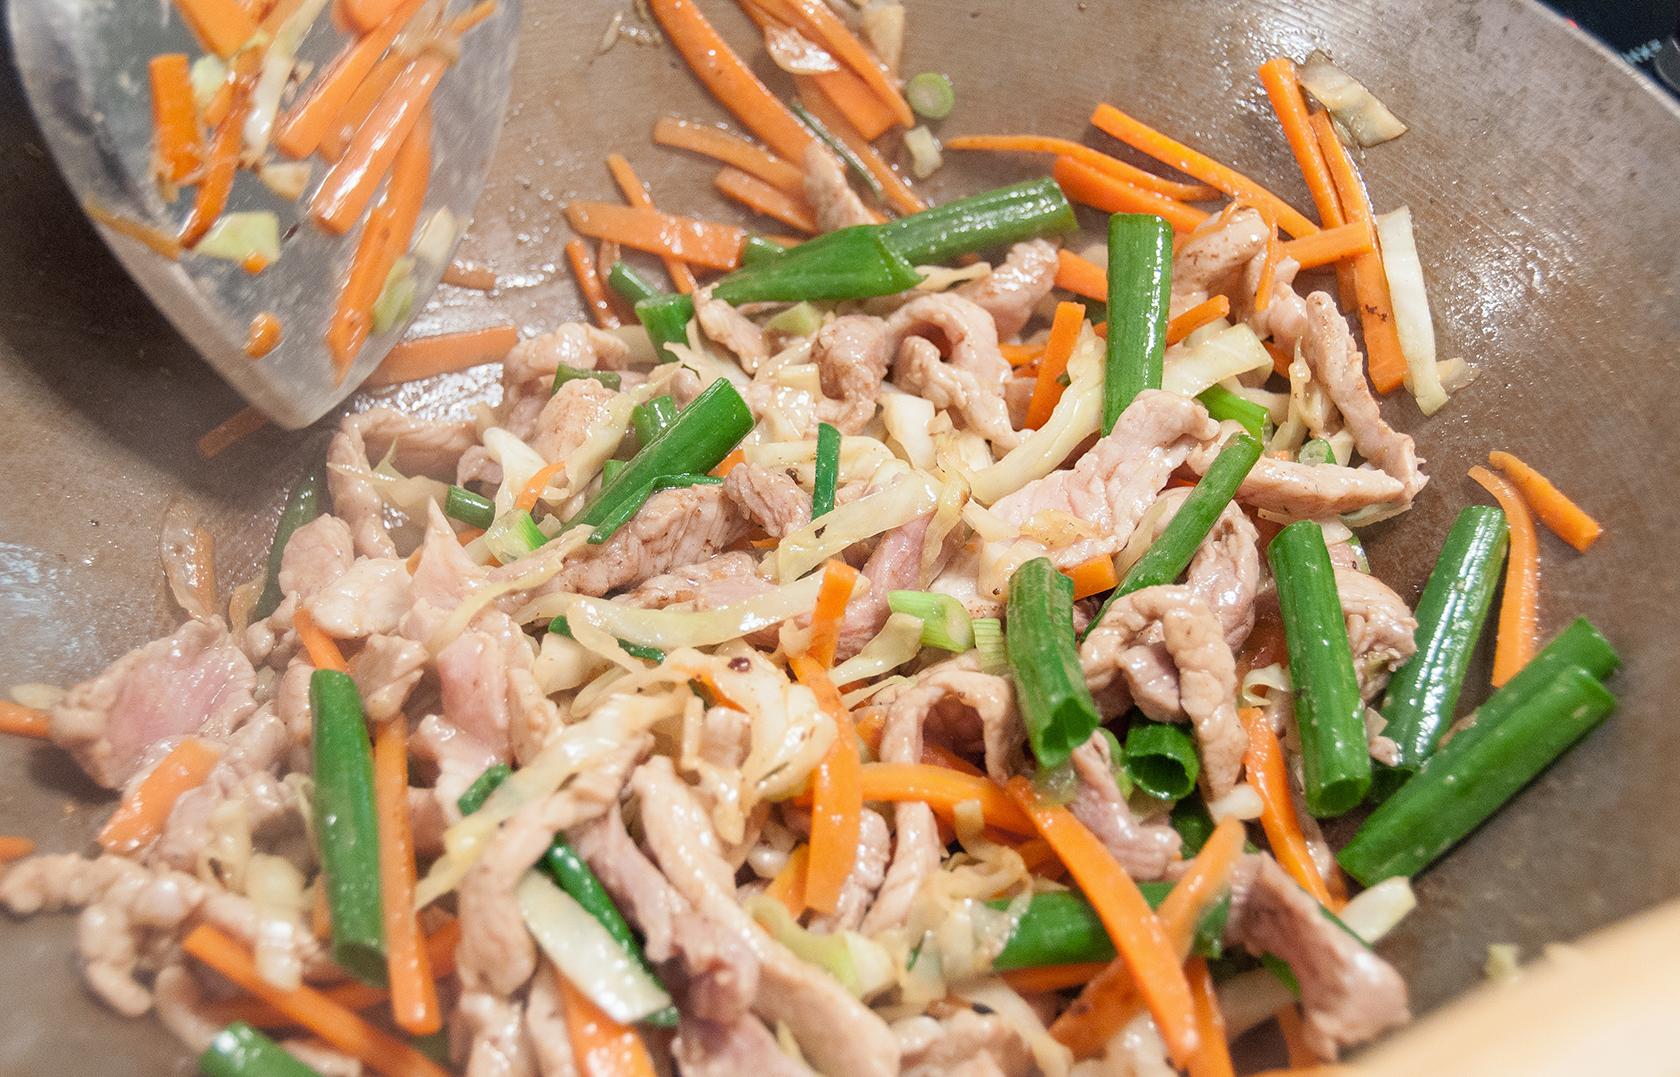
Before beginning, make sure that all of your ingredients are prepped as described above. Heat up a wok over medium-high heat and coat with peanut oil. Add the cabbage and carrots and stir fry for 2 minutes, then stir in the sherry and add the sliced pork. Continue to stir constantly for 1-2 minutes until the pork is just cooked through then add the green onions and stir. Add the soy sauce, white pepper and noodles and stir well to combine. Remove from heat and stir in the sesame oil. If desired, garnish the finished dish with thinly sliced green onions.

Shanghai Noodles 2

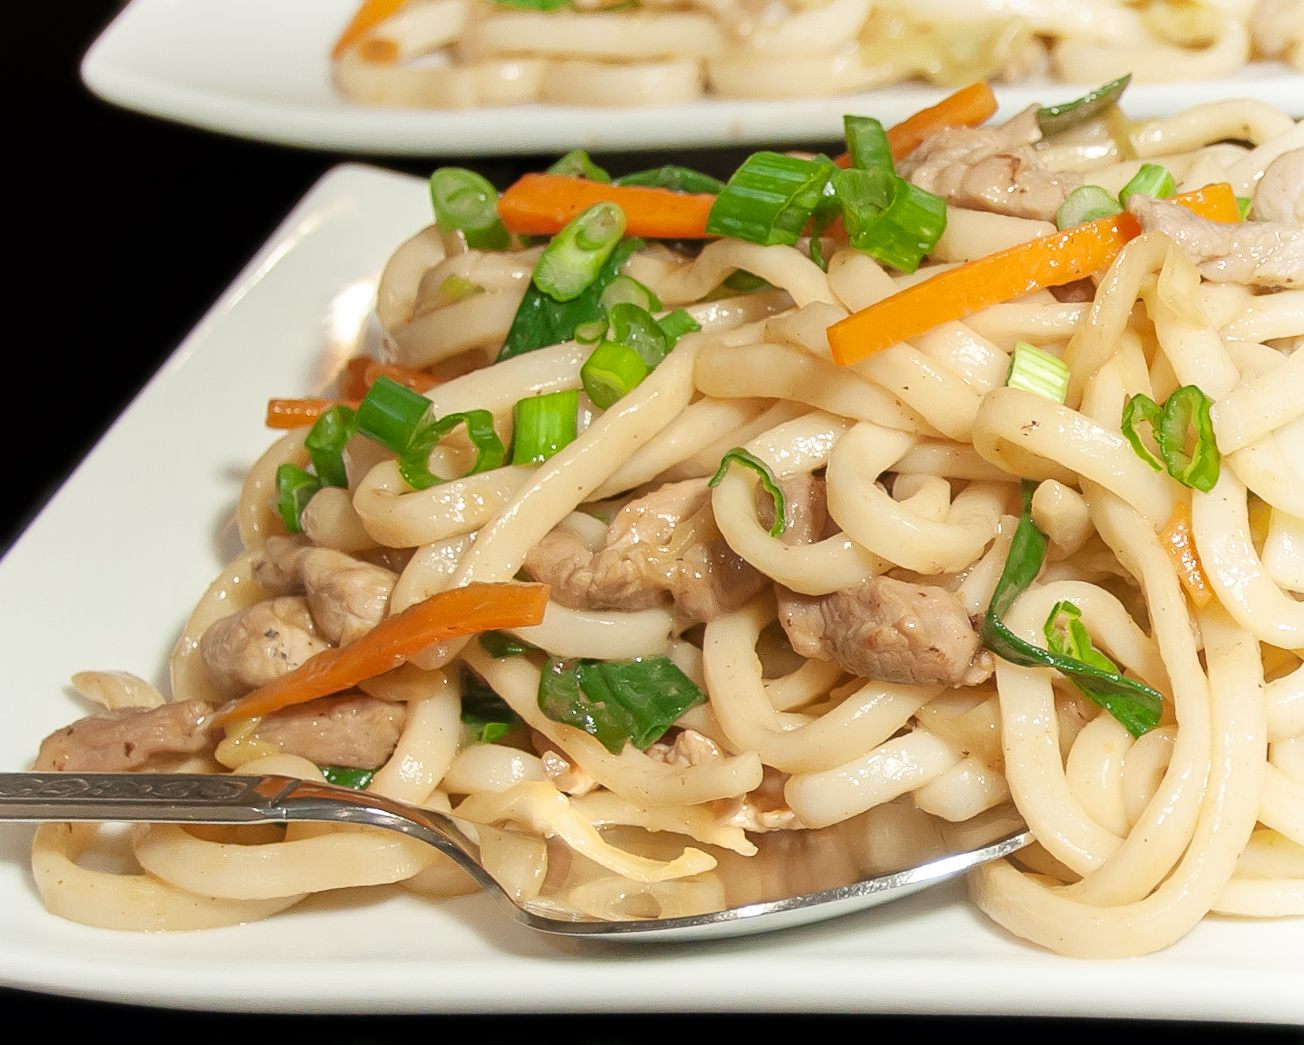
*A note on Udon Noodles – Dry/uncooked Udons are sold in larger grocery stores, but I’ve found that they are much thinner than the noodles that Sang Kee serves. Therefore, we resorted to buying 4 packages of Japanese-style Udon soups that each included a vacuum-pack of flexible, fat Udon noodles and a dried soup flavoring packet. We discarded the flavoring packets and, after combining the 4 packs of noodles together and boiling them for 2-3 minutes in a pot of water, found them to be a good substitute for the Sang Kee noodles. I’m sure there must be an easier way than this but we haven’t found it yet!

Shanghai Noodles 1

Inspirations for St. Patrick’s Day Dinner

St. Patrick’s Day is just 5 days away! This year the holiday conveniently falls on a Sunday which means that we’ll have all weekend to plan a fun Irish meal. (Hopefully it won’t take all weekend to do that, though!)

Over the past year I have featured two Irish dishes on my blog that would both make delicious St. Patrick’s Day dinners so I thought I would share them! Click on the photos to visit the appropriate recipe/blog entry.

Shepherd’s Pie

Shepherd's Pie

This layered dish of vegetables, meat and creamy mashed potatoes is really easy to make. Use ground lamb for a true shepherd’s pie, but also feel free to substitute in ground beef to make the very similar cottage pie variation. View the recipe here.

Bangers and Mash

Bangers and Mash

This dish is one of my all-time favorites. It features sausages (bangers) that have been cooked in a flavorful gravy/onion sauce and smothered with buttery potatoes (mash). The dish is then broiled until the potatoes are golden brown. Yum! This was our St. Patrick’s Day dinner last year and it might be dinner again this year if we don’t find something similarly delicious to make. You can view the recipe here.

Rotisserie Chicken Burritos

Pan-fried burritos stuffed with rotisserie chicken, beans, salsa, and cheese… does it get any better that that?  Not in my book!

We used to make these delicious burritos before TheLittleGSP.com existed (in fact, recipes like this inspired me to create a blog so I’d have a place to share them!), but after starting the blog we found ourselves constantly looking for new and exciting recipes to try and we somehow left this one behind.  Well, we’ve corrected that now.  We made these burritos two nights ago for dinner and gobbled up the leftovers today for lunch and I can now confidently say that this recipe is as tasty and satisfying as any of the recipes you’ll find in this blog.  It’s also incredibly easy and uses readily available ingredients… perfect!

Rotisserie Chicken Burrito

Rotisserie Chicken Burritos (from MyRecipes.com)

You will need…
1/4 cup Water
2 tablespoons Lime Juice
1/4 teaspoon Cumin
1/4 teaspoon Ground Black Pepper
1/2 teaspoon Chile Powder
1/8 teaspoon Red Pepper Flakes
2 Split Rotisserie Chicken Breasts, meat pulled from the bone and shredded
1/4 cup Green Onions, finely chopped
1/2 cup Salsa
1-15oz can Black Beans, drained
1/4 cup chopped Cilantro
1-2 tablespoons Olive Oil
4 “Burrito-sized” Flour Tortillas
1/2 cup Shredded Monterey Jack Cheese (or Mexican Blend)

Pan-Frying the Burritos

Directions:
In a small sauce pan, combine the first 6 ingredients (water thru red pepper flakes) and bring to a boil.  Remove from heat, then add in the chicken and green onions and stir well to coat.  Set aside.  Meanwhile, stir together the salsa, beans, and cilantro in a microwaveable bowl and heat on high in a microwave for 1-2 minutes (just to warm it up slightly, especially if the salsa has been in the fridge).

Pour about 1 tablespoon of olive oil into a skillet and allow it to heat up over medium heat.  Assemble your burritos two at a time by layering the bean/salsa mixture, chicken, and cheese in a narrow strip along the center of the tortillas.  Fold the edges of each tortilla in towards the center and place them side by side in the skillet, seam side “up.”  Use a small pot lid to press down slightly on the tortillas while you pan-fry them for approximately three minutes, then carefully flip them over and, using the lid once again, continue to cook the burritos for another 3 minutes or until the tortillas are golden brown and the cheese is thoroughly melted.  Enjoy with salsa, sour cream and guacamole!

Rotisserie Chicken Burrito (cut)

Oven-Roasted BBQ Spare Ribs

Matt and I are eagerly awaiting the arrival of spring.  Until then, we’re attempting to brighten the last few days of winter with summery meals like tacos with lime-jalapeño slaw and pasta tossed with garlic and fresh veggies.  Last weekend’s summer-inspired food was a new one for us:  oven-roasted pork spare ribs with homemade barbecue sauce!

BBQ Pork Spare Ribs

Spare ribs are a thicker, meatier (and, in my opinion, more cartilage-filled) cut than the ‘baby back ribs’ that you’re likely to see in restaurants.  Spare ribs are an inexpensive cut (just $2.99/lb at Acme), so they were a good starting point for our first rib-roasting experience.  Nevertheless we agreed that next time we make ribs we’ll opt for the pricier and more tender baby backs.

From start to finish this recipe took about 6 hours but most of that time was hands-off oven-roasting.  The most time consuming part was making the barbecue sauce but if you don’t have time to do that you could easily use bottled sauce instead.  When you serve the ribs, make sure to have plenty of napkins on hand… these are juicy, saucy, and delicious!

Oven-Roasted Pork Spare Ribs (from The New Best Recipe)

Ingredients for the Dry Rub:Dry Rubbed Pork Spare Ribs
1/8 cup Paprika
1 tablespoon Chile Powder
1 tablespoon Cumin
1 tablespoon Brown Sugar
1 tablespoon Salt
1 1/2 teaspoons Dried Oregano
1 1/2 teaspoons Sugar
1 1/2 teaspoons Ground Black Pepper
1 1/2 teaspoons Ground White Pepper
1/2 teaspoon Cayenne Pepper

Ingredients for the Ribs:
1 rack Pork Spare Ribs (approx. 3-4 lbs.)
Dry Rub (above)
1 1/2 cups Barbecue Sauce (homemade or bottled)

Directions:
Mix the dry rub ingredients together in a bowl.  Place the rack of ribs on a large rimmed baking sheet and, using your hands, spread the dry rub over the entire surface of the ribs (top and bottom).  We found the rub to be a little overwhelming so next time we make this I’ll probably only use about 3/4 of the rub.  Position the rubbed ribs meaty side up and allow to sit at room temperature for 1.5 hours.  (If desired, you could also cover and refrigerate the rack for up to 24 hours which will produce a very strong rub flavor.)

Roasted Pork Spare Ribs

After the ribs have rested, cover the baking sheet tightly with foil and place in a preheated 300°F oven on the middle rack.  Allow to roast for 1 hour, then remove the foil and continue roasting for another hour.  Remove the ribs from the oven and liberally apply about half of the barbecue sauce over the top (meaty side) of the ribs with a brush.  Return the ribs to the oven for another 1 1/2 hours.

When the ribs are done roasting, remove them from the oven and wrap the ribs (without the pan) completely in foil.  Place the foil-wrapped ribs in a paper bag and fold/crimp the top of the bag shut.  Allow the ribs to rest at room temperature in the bag for 1 hour.

After resting, unwrap the ribs and cut them between the bones with a sharp knife.  Serve with the remaining barbecue sauce and enjoy!

BBQ Pork Spare Ribs

Quick and Easy Barbecue Sauce

Last weekend I made oven-roasted pork spareribs and, since I time to kill during the 4 1/2 hours that the ribs were cooking, I also made a batch of homemade barbecue sauce.  This sauce is “quick and easy” because it uses ketchup as the tomato base rather than whole canned tomatoes which would take hours to break down into sauce.

Homemade BBQ Sauce

Quick and Easy Barbecue Sauce (from The New Best Recipe)
Makes about 2 cups of delicious, tangy sauce!

You will need…
1 Yellow Onion, peeled and quartered
1/4 cup Water
1 cup Ketchup
2 tablespoons Apple Cider Vinegar
2 tablespoons Worcestershire Sauce
2 tablespoons Dijon Mustard
5 tablespoons Molasses
1 teaspoon Hot Pepper Sauce (I used Cholula)
1/4 teaspoon Ground Black Pepper
1 1/2 teaspoons Liquid Smoke
2 tablespoons Olive Oil
1-2 Cloves Garlic, minced
1 teaspoon Chili Powder
1/4 teaspoon Cayenne Pepper

Directions:
Place the onion and water in a food processor and blend for about 30 seconds until the mixture looks like a slushy.  Use a mesh strainer to strain the mixture into a bowl or measuring cup until you have 1/2 cup of onion juice.  Discard the solids.

Mix the onion juice and the next 8 ingredients (vinegar thru liquid smoke) together in a bowl.  Heat the oil in a saucepan over medium heat until it is shimmering, then add in the garlic, chili powder and cayenne pepper.  Allow to cook for 30 seconds, then stir in the ketchup mixture.  Bring to a boil and then reduce heat and simmer the sauce for 25 minutes, stirring occasionally.  Allow the sauce to cool to room temperature before using.

Pork Spare Ribs with Homemade BBQ Sauce

Smoky Beef Chili

Slow-cooked stew… the perfect winter weeknight meal! Last week after a long day at work and a cold drive home we opened our back door and were greeted by the wonderful smell of simmering Smoky Beef Chili in the crock pot. This chili was easy to make — we actually threw the ingredients together at lunchtime and let them simmer all afternoon — and the resulting dinner was delicious!

Smoky Beef Chili

This Smoky Beef Chili recipe comes from Williams Sonoma’s The New Slow Cooker, a cookbook that my mom got me for Christmas. The chili features tender chunks of beef (so tender that you can cut them with a spoon!), smoky chipotle-induced heat and a fresh corn salsa that contrasts nicely with the intense flavors of the stew. Depending on how much beef stock you opt to add, the chili is either a nice soup consistency (with more stock) or a thick stew that tastes great over rice.

Smoky Beef Chili (from The New Slow Cooker)

Ingredients for the Stew:
4 lbs. Boneless Beef Chuck, trimmed of fat and cut into 3/4″ cubes
Salt and Pepper
1/4 cup Olive Oil
2 Large Yellow Onions, coarsely chopped
2 Chipotle Chiles in Adobo Sauce, finely chopped
2 tablespoons Chipotle Chile Powder
2 teaspoons Ground Cumin
1 teaspoon Dried Mexican Oregano
1/2 teaspoon Red Pepper Flakes
1 cup Tomato Paste
2-3 cups Beef Stock, divided

Ingredients for the Corn Salsa Garnish:
2 tablespoons Olive Oil
1 tablespoon low-sodium Soy Sauce
Juice of 1 Lime
2 teaspoons Sherry (or Sherry Vinegar)
1 teaspoon minced fresh Ginger
1/8 teaspoon Sugar
2-3 drops Hot Sauce (we used Cholula)
2 cups Corn Kernels (if frozen, rinse under water to thaw)
2 cups Cherry Tomatoes, halved
4 Green Onions, thinly sliced

Directions:
Season the beef with salt and pepper. Add half of the oil to a large skillet over medium-heat heat. Add half of the beef and brown evenly (approx. 5 minutes), then set the browned beef aside on a plate and repeat with the remaining meat.

If the skillet is dry, add more of the olive oil or, if the skillet has a lot of fat in it, drain most of the fat away. Bring back to medium heat and saute the onions for about 6 minutes until softened. Add the garlic and cook for another minute, then stir in the next 6 ingredients (chipotles thru tomato paste) and cook for 2 minutes. Add 1 cup of the beef stock and stir well to remove any browned bits from the bottom of the pan. Transfer the mixture to a slow cooker.

Add 1 teaspoon salt along with some ground pepper, and 1-2 cups of stock (depending on how soupy you want the chili to be) to the slow cooker and stir in the browned beef and any accumulated juices. Cover the slow cooker and cook on low for 5 hours.

Before serving the stew make the corn salsa. Start by whisking together the Lime Vinaigrette ingredients (olive oil thru hot sauce) in a small bowl. Combine the remaining ingredients in a large bowl and stir in the vinaigrette. Serve the salsa on top of a steaming bowl of Smoky Beef Chili and enjoy!

Smoky Beef Chili

Pozole Rojo

Back in November Matt and I were pleasantly surprised when we made Pozole Verde, a Mexican-style pork stew with cilantro, tomatillos and jalapeños.  The Verde recipe appeared as a riff on the chili-based Pozole Rojo in our The New Best Recipe cookbook so we immediately vowed to make the Rojo as soon as we got the chance.  Well, that chance came yesterday afternoon and the resulting “red” stew with pork, hominy and ancho chilis was wonderful!

This hearty stew is warm, flavorful, and perfect for a cold winter evening.  It’s fairly healthy and you can top it with a wide variety of bright, crisp garnishes including cilantro, avocado, radishes, onion, and, Matt’s favorite, quesco fresco.  Yum!

Pozole Rojo 1

Pozole Rojo (Pork and Hominy Stew with Ancho Chilis)
Serves 8-10; from Cook’s Illustrated – The New Best Recipe

Pozole Ingredients…
1 bone-in Pork Picnic Roast or Shoulder Roast, approx. 4-5 lbs.
Salt and Pepper
2 tablespoons Canola Oil
2 White Onions, coarsely chopped
5 cloves Garlic, minced
6 cups Low-Sodium Chicken Broth
1 15oz. can Diced Tomatoes
1 teaspoon dried Mexican Oregano
3 dried Ancho Chilis (2 oz.), stems and seeds removed
1 1/2 cups Boiling Water
3-15 oz. cans Hominy, drained and rinsed

Garnishes…
1/4 cup Pureed Ancho Chilis (prepared with stew)
1/2 White Onion, finely chopped
1 Avocado, sliced
Cilantro, coarsely chopped
6 Radishes, thinly sliced
1 Lime, sliced into wedges
Mexican Oregano
Quesco Fresco, crumbled
8-10 Corn Tortillas, warmed and sliced into strips
Tortilla Chips

Pozole Rojo with Queso Fresco, Cilantro, and Pureed Ancho Chilis

Directions:
Trim excess fat off of the pork roast and cut along the muscle into several large pieces (approx. 8-9 pieces for a 4 lb. roast). Reserve the bones. Season the pork generously with salt and pepper. Heat the oil in a large (8 qt.) oven-proof dutch oven over medium heat. Add the  onions and 1/2 teaspoon salt. Cook, stirring frequently, for approximately 4 minutes until the onions have softened and released moisture. Stir in the garlic and cook for 30 seconds.

Add the pork and bones to the onion mixture and stir frequently for approximately 8 minutes until the outside of the meat is no longer pink. Add the chicken broth, diced tomatoes, oregano and another 1/2 teaspoon salt and increase the heat to high. Bring the mixture to a simmer on the stove, then cover and cook in a preheated 300°F oven for 2 hours.

Pozole Rojo in the pot

Meanwhile, soak the ancho chilis in 1 1/2 cups of boiling water for 20 minutes.  (I microwaved the water in a pyrex measuring cup and soaked the chilis in the cup — no need to keep the water boiling for 20 minutes.)  Transfer the chilis and soaking liquid to a blender and puree.  Pour the blended chilis through a strainer; you should end up with about one cup of puree.

After 2 hours, remove the pork mixture from the oven and return to the stove. Remove the pork and bones and place on a plate to cool. Stir the rinsed hominy and 3/4 cup of the pureed chilis into the broth mixture and bring to a simmer. Cook, covered, for 30 minutes to allow the flavors to meld.

Once the pork is cool, shred the pork with your fingers (or with two forks). Pull any remaining meat off of the bones and discard the bones. Stir the shredded meat into the stew and simmer for approximately 10 minutes until the meat is hot. Serve in a large bowl with a liberal helping of the garnishes on top.

Pozole Rojo with Queso Fresco, Cilantro, and Pureed Ancho Chilis

White Pizza with Sausage, Spinach and Ricotta

Crumbled Sausage, Spinach and Ricotta Cheese… yes! When Matt suggested that we try these toppings on our latest batch of Trader Joe’s pizza crust I enthusiastically agreed and, after enjoying the end result last night, I don’t know why we never tried this delicious combination before!

White Pizza with Sausage, Spinach and Ricotta_c

For Christmas Matt gave me My Pizza by Jim Lahey and, although I haven’t actually made any of the recipes yet (I’m holding out for a pizza stone and peel first!), the cooking method that we used for this recipe was definitely inspired by the book. I usually cook pizza at 425°F but, after reading Jim Lahey’s chapter on cooking dough, we decided to try something radically different and instead broiled the pizzas in a preheated 500°F oven. The resulting pies had a whole new level of caramelization and wonderful crispiness that I’ve never before experienced in a home-cooked pizza. Yum!

White Pizza with Sausage, Spinach and Ricotta

You will need…
2 Sweet Italian Sausages
Olive Oil
2-3 cloves Garlic, minced
2-3 handfuls Baby Spinach
1 package fresh Pizza Dough (as usual, I used Trader Joe’s dough)
Flour, for dusting pizza dough
Approx. 1/4 cup coarsely chopped Yellow Onion (optional)
12 oz. Ricotta Cheese
3-4 cups Shredded Part Skim Mozzarella Cheese
Freshly Grated Parmesan Cheese

Ready to go in the oven!

Ready to go in the oven!

Directions:
Preheat your oven to 500°F. Remove the sausage from the casings and press into the bottom of a preheated skillet over medium-high heat. Allow it to cook undisturbed for 2-3 minutes and then use a metal spatula to stir the sausage and separate it into crumbled bits. When the sausage is completely cooked through (and, ideally, getting a little crispy on the edges!), transfer to a paper towel lined plate and set aside.

Return the skillet to the stove over medium heat and, if needed, add about a tablespoon of olive oil (there might already be enough fat in the skillet from the sausages). Add the minced garlic and allow it to cook in the oil until it is fragrant and just turning golden brown. Reduce heat to medium-low and add the spinach. Use tongs to toss and stir the spinach until it is wilted then remove from heat.

On a flour-dusted surface, halve the pizza dough and stretch each piece into a generous individual-sized pie. (Mine usually each end up being about 6” by 10” which fits well on my rectangular pan.) Place the crusts on a non-stick or lightly oiled pan (or use a pizza stone, if you have one!).

White Pizza broiling in the oven.

White Pizza broiling in the oven.

Spread about half of the ricotta cheese onto the two pizza crusts with the back of a spoon, leaving a 1” margin around the edges. Sprinkle on some chopped onions if you want (Matt didn’t want any but I tried them and they were great!) and top with the shredded Mozzarella. Next, evenly distribute the cooked sausage over the pizzas and add the wilted spinach and garlic. Drop the remaining ricotta onto the pizza in spoonfuls and finish off the pizzas with freshly grated Parmesan.

Just before putting the pizzas in the preheated oven, switch the oven to “Broil” and cook the pizzas on the top rack for approximately 10 minutes. Check on the pizzas frequently (it’s OK to open the door) to make sure that they are not burning. The pizzas are done when the cheese is turning golden brown and the crust is just starting to brown on the edges.

White Pizza with Sausage, Spinach and Ricotta 2_c

Spaghetti Squash with Italian Sausage

Shortly after Thanksgiving I bought a big yellow spaghetti squash at the grocery store with absolutely no plan or recipe in mind. Luckily squash keeps well so I had a few weeks to figure out what to do with it. By Christmas I decided that it needed to get eaten so I searched around online and found this beautiful, simple and delicious baked spaghetti squash recipe from Todd at White On Rice Couple.

This dish is basically a fun twist on spaghetti and meatballs that uses squash and sausage instead of pasta and ground beef. The result is a tasty one-skillet dish that allowed me feel like I was eating a relatively healthy meal… it’s mostly squash, after all! 🙂 Add some freshly grated cheese and oregano and you can’t go wrong!

Sausage and Spaghetti Squash

Before you read my version of the recipe, I strongly recommend that you check out the original recipe at WhiteOnRiceCouple.com. Todd’s photos are amazing!!

Spaghetti Squash with Italian Sausage, Parmesan and Oregano

You will need…
1 Spaghetti Squash, halved lengthwise with seeds removed
Olive Oil
5-6 Shallots, thickly sliced
3 cloves Garlic, crushed
3/4 lb. Italian Sausage, uncooked
1 cup Grated Parmigiana Reggiano cheese
1 tablespoon finely chopped fresh Oregano
Salt and Pepper to taste

Directions:
Drizzle approximately 1 tablespoon of olive oil onto a large baking sheet. Place the squash halves face-down on the olive oil and bake in a preheated 375° oven for about 45 minutes until the squash flesh easily separates into strands. Allow the squash to cool slightly, then use two forks to separate all of the flesh into spaghetti-like strands.

Making the Sausage Balls

While the squash cools slice open the casing on one end of a sausage and use your fingers to pinch about an inch of the sausage meat out of the casing. This will give you a small sausage “ball.” Repeat this process with the rest of the sausage and discard the casing.

Add a tablespoon of olive oil to a large skillet over medium heat. Add the shallots and garlic and saute until soft, about 30 seconds, then carefully add the sausage in a single layer. Allow the sausage balls to cook, undisturbed, until the bottoms are browned and then continue cooking, stirring occasionally, until the sausage is cooked through. Add the squash into the sausage mixture and stir well to combine. When the squash is reheated remove the skillet from heat and toss in the grated Parmigiana Reggiano, oregano, and salt and pepper to taste. Garnish with a spring of oregano and some extra grated cheese and enjoy!

Sausage with Spaghetti Squash

Buffalo Chicken Sausage Quesadillas

This is my first post in more than 10 days.  I think that’s the longest I’ve gone since starting my blog but hey, sometimes life gets in the way of blogging!  🙂  Luckily I had lots of good things going on at the beginning of the year which means that I’m just now getting around to posting about some of the foods and activities that we’ve enjoyed in 2013 thus far.  First up: Buffalo Chicken Sausage Quesadillas!

Buffalo Chicken Sausage Quesadillas

The quesadillas were super-easy to make and they were cheesy, crispy and had just the right amount of heat thanks to the Frank’s Red Hot Buffalo Wings Sauce that we found at the grocery store.  To temper the heat and acheive that classic “buffalo” experience, we dipped the quesadillas in low-fat blue cheese dressing and had a few celery sticks on hand when we wanted some crunch.  For the filling we used a pound of Maiale’s buffalo chicken sausage that we had been saving in the freezer from the Farmer’s Market last summer, but if you don’t have access to actual “buffalo” sausage you could easily substitute regular sausage or even shredded chicken in — just use some of the Frank’s Red Hot inside of the quesadilla to get that extra kick!

Buffalo Chicken Sausage Quesadillas (makes 4 large quesadillas)

You will need…
1 pound Buffalo Chicken Sausage, fully cooked and chopped into small pieces
Peanut Oil, for coating pan between quesadillas
4 large “burrito” sized Flour Tortillas (12-13″ diameter)
Approx. 2 cups shredded Monterey Jack Cheese (or Colby/Monterey mix)
1/2 cup Frank’s Red Hot Buffalo Wings Sauce, for dipping
1/2 cup Low-Fat Blue Cheese Dressing, for dipping
4-5 stalks Celery, cut into 4″ sticks

Assembling the Quesadillas on the stove

Directions:
Heat a large heavy-bottomed skillet over medium heat.  Pour a small amount of peanut oil into the bottom of the pan (just enough to thinly coat it) and allow it to heat up.  Carefully place one tortilla in the bottom of the pan and evenly spread about a quarter of the shredded cheese over the entire tortilla.  When the cheese starts to melt arrange a quarter of the chopped sausage onto one half of the tortilla.

When the cheese has melted completely use a spatula to carefully flip the cheese-only half of the tortilla over top of the sausage.  Press down lightly on the top of the quesadilla to help hold everything together.  At this point the quesadilla is basically done but you may want to flip the finished quesadilla over in the pan until both sides are golden brown and crispy.  Remove the finished quesadilla from the pan and repeat the entire process (starting with the thin layer of oil) for your other 3 tortillas.

Cut the quesadillas into wedges and serve with buffalo sauce, blue cheese dip, celery, and a cold beer.  Enjoy!

Cheesy and delicious!