Chicken Lo Mein

This past weekend was our first free weekend since before our wedding! No DockDogs events, no traveling, no commitments… just time to ourselves! We celebrated by sleeping in both days, going out to lunch together (because we slept through breakfast) and watching hours of the British Open and Tour de France. I also did a lot of running on our brand new treadmill and Matt started a construction project that involved cutting open our bedroom wall in multiple spots… more on those events in a future post!

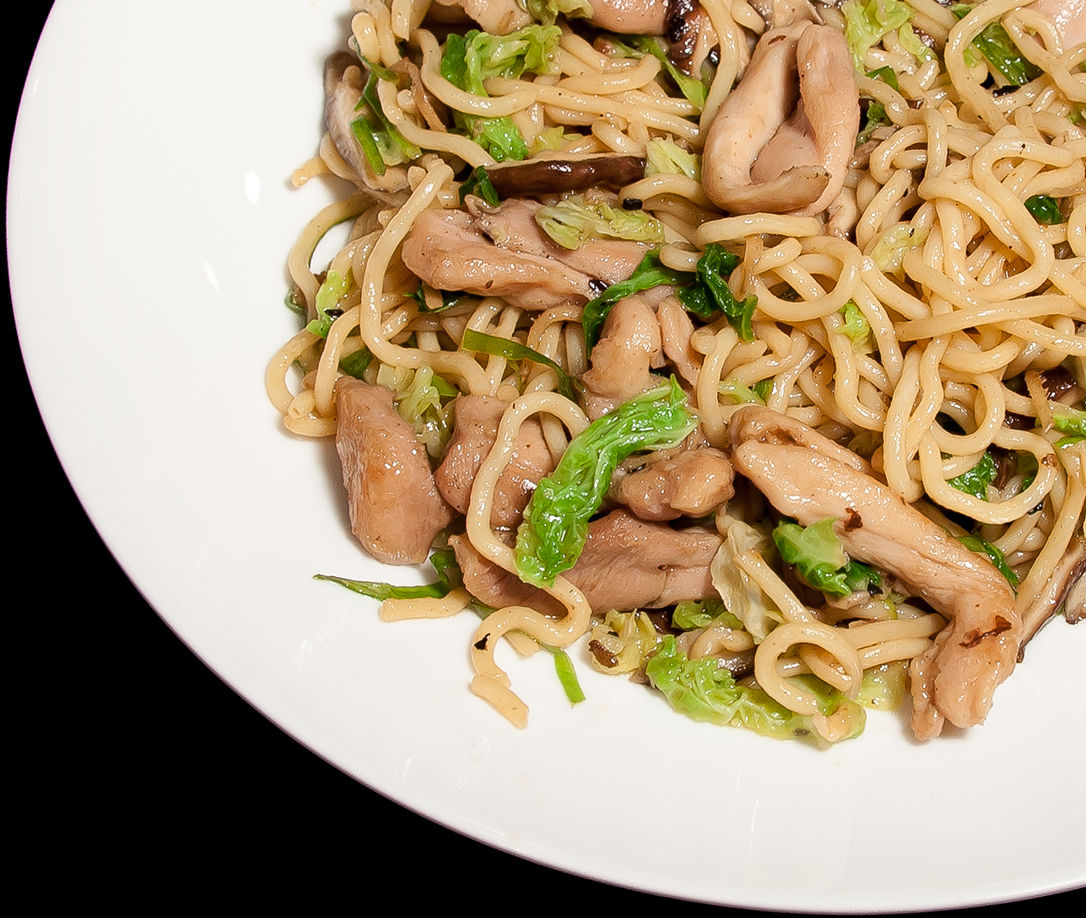
For dinner on Saturday we made a new recipe from our trusty cookbook, Stir Frying to the Sky’s Edge. I know I’ve said this before but this cookbook is AWESOME! In addition to savory recipes like Kung Pao Chicken and Hot Pepper Beef, this book is also full of helpful cooking techniques, information about ingredients and a whole tutorial on how to select and care for your wok. We have always been amazed by how great the recipes from this book turn out and Saturday’s dinner of Chicken Lo Mein was no exception. Without further ado, here’s the recipe!

Chicken Lo Mein

Chicken Lo Mein with Ginger Mushrooms (from Stir Frying to the Sky’s Edge by Grace Young)

You will need…
12 oz. fresh thick Egg Noodles*
2 teaspoons Sesame Oil
12 oz. boneless, skinless Chicken Thighs, cut into 1/4″ thick bite-sized slices
1 tablespoon Ginger, finely shredded (cut into tiny matchstick-like pieces)
1 teaspoon plus 1 tablespoon Rice Wine or Dry Sherry, divided
1 teaspoon Cornstarch
1 teaspoon plus 1 tablespoon Soy Sauce, divided
1 teaspoon Salt, divided
1/4 teaspoon Ground White Pepper
2 tablespoons Peanut Oil, divided
1/4 teaspoon Red Pepper Flakes
3 cups Napa Cabbage, thinly sliced
4 oz. Shiitake Mushrooms, stems removed and caps thinly sliced
1/2 cup Scallions, finely shredded (try using a Negi cutter to shred the scallion into even threads)
*We couldn’t find egg noodles so we used a package of Kame Stir-Fry Hokkien Noodles that we simply microwaved to heat up.

Directions:
Cook or heat up your noodles until al dente according to the package instructions. If using fresh noodles that you have to cook in boiling water, drain the cooked noodles and rinse several times with cold water. Place the cooked noodles in a bowl and stir in the sesame oil. Set aside.

Combine the chicken, ginger, 1 teaspoon rice wine, cornstarch, 1 teaspoon soy sauce, 1/4 teaspoon salt and the white pepper in a small bowl. In another small bowl combine the remaining 1 tablespoon rice wine and 1 tablespoon soy sauce.

Heat a wok over high heat. Pour in 1 tablespoon of the peanut oil and add the red pepper flakes. Stir fry for 10 seconds then push the flakes to the sides of the wok and add the chicken mixture. Spread the chicken evenly on the bottom of the wok and allow to cook, undisturbed, for 1 minute, then stir fry the chicken for another 30 seconds or until it starts to brown. Add in the cabbage and mushrooms and stir fry for 1 minute or until the cabbage wilts. Transfer the wok contents to a plate.

Pour the remaining tablespoon of peanut oil into the wok then add in the noodles and stir fry for 15 seconds. Stir in the rice wine/soy sauce mixture and add the scallions, chicken mixture, and remaining 3/4 teaspoon salt. Stir fry for 1 to 2 minutes or until the chicken is cooked through. Serve and enjoy!

Chicken Lo Mein Close Up

Chicken Lo Mein Dinner

DockDogs Eastern Regional Championships 2013

Less than 72 hours after returning home from our St. Lucia honeymoon Matt and I packed up the Subaru and set out with Bailey to the WISP Resort in western Maryland for the 2013 DockDogs Eastern Regional Championships!  If you’ve been following my blog for a while you may remember that last year at the 2012 Regional Championships Bailey earned an invitation to Worlds by placing 4th in the Elite Big Air division.  Bailey didn’t do quite as well this year but we still had a blast!!

Bailey the Little GSP!

Bailey’s best Big Air jump of the weekend was 21’2″ and she grabbed 5’10” in Extreme Vertical.  I think that’s pretty good considering that she hadn’t jumped off a dock since last November!  🙂  Here’s a sequence of one of her Extreme Vertical jumps:

Bailey EV PhotosOne of my favorite things about DockDogs events is that Matt and I get to spend quality time snuggling with Bailey.  She is not allowed in our bed at home, but when we travel to pet-friendly hotels she sleeps with us and she makes herself very comfortable on our bed when we leave her alone in the room.  We have an ongoing battle where we try to shield the pillows with blankets (because, as much as I love Bailey, it’s not my goal to sleep on a pillow that’s been nuzzled by a dog dipped in DockDogs pool water!) but, try as we might, Bailey always burrows her way under the blankets and we return to find her nestled in a luxurious doggie pillow nest.  (It’s adorable.)  I’ll have to try to get a photo of Bailey on the bed next time, but for now here are some other photos from the weekend!

This next photo cracks me up… I always let Bailey watch the dog before her jump to get her excited but I didn’t realize that Matt was capturing the moment on camera!  The jumping dog is Mojo, a fellow Delmarva DockDogs club member, and yes, that’s Bailey’s little head peeking over the side of the pool!! (And me making a funny face… I was telling her to look!)

Bailey getting psyched up watching Mojo

Good times.  Well, that’s about it for the event recap.  Thanks for stopping by!

Bailey doesn't want to get out of the pool!

Vietnamese Banh Mi Steak Sandwiches

It’s hot out!!  We’re in the midst of a heat wave here in southeastern Pennsylvania and as of today the high humidity and 90°+ daytime temps are supposed to last until the weekend.  This unrelenting heat makes us feel like eating fresh, light meals like the Vietnamese Banh Mi steak sandwiches that we made a few nights ago.  The three primary elements of these sandwiches – cool pickled vegetables, grilled steak with an amazing citrus-y marinade, and a spicy Siracha mayo – offer the perfect amount of crunch, flavor, and heat, and the end result is an absolutely delicious steak sandwich with a definite Asian flair.  YUM!

Banh Mi Sandwich Close Up

If you’re planning on making this recipe, leave at least 30 minutes to marinade the steak and allow the matchstick-sliced carrots and daikon radishes to pickle.  We had trouble finding a daikon radish (we should have just gone to the produce market rather than a big grocery store!) so we used standard red radishes.  To slice our carrots into nice, uniform matchsticks we used a kinpira (aka julienne cutter).  The round red radishes were harder to slice with the handheld kinpira so we ended up using the matchstick blade on our mandoline which worked well.

Vietnamese Banh Mi Steak Sandwich

For the Steak…  (Marinade recipe from NYT’s Diner’s Journal)
1/2 cup Fish Sauce
1 tablespoon packed Lime Zest
1/3 cup Lime Juice (from 3 limes)
2 tablespoons Dark Brown Sugar
2 cloves Garlic, minced
1 Jalapeño Pepper, minced (seeds and veins removed)
1 1/2 – 2 lbs. Flank Steak (you’ll have some extra steak left over; we ate it another night for dinner)

For the Do Chua Pickled Carrots and Radishes… (Recipe from A Lovin’ Forkful)
1/2 cup Water
1/4 cup Rice Vinegar
1 tablespoon Sugar
1/4 teaspoons Salt
1/8 teaspoon Red Pepper Flakes
1/2 cup Matchstick-sliced Carrots
1/2 cup Matchstick-sliced Daikon Radish (we couldn’t find daikon on short notice so used regular radishes)

For the Sriracha Mayo… (also from A Lovin’ Forkful)
4 tablespoons Mayonnaise
1 1/2 teaspoons Sriracha
(Just use roughly an 8:1 ratio… adjust to taste!)

Other Ingredients…
1 English Cucumber, thinly sliced
2 Soft Baguettes or Sandwich Rolls, sliced in half lengthwise
Cilantro, to garnish

Banh Mi close up

Directions:
The steak needs to marinade so start this part of recipe ahead of time.  To make the marinade, combine the first six ingredients (fish sauce thru jalapeño) in a bowl.  Place your flank steak in a large resealable bag and pour the marinade over and around the steak.  Seal the bag, turn it to coat the steak evenly, then allow the steak to marinade for at least 30 minutes (up to overnight) before cooking.

The pickled carrots and radishes also need some time to soak in their flavors so make these ahead of time, too.  Combine the pickling ingredients (water thru red pepper flakes) in a small saucepan and bring to a simmer, stirring occasionally.  Place the carrots and radishes in a bowl and pour the liquid over the vegetables.  Stir well to coat the veggies and arrange them so they are submerged in the liquid, then cover and refrigerate for at least 30 minutes or ideally overnight.

When you are ready to make your meal take the steak out of the fridge and allow it to warm up to room temperature.  Pat both sides of the steak dry with paper towels,  then grill the steak over direct high heat, flipping once, until it reaches your desired level of doneness.  (Our cut of steak took about 5 minutes per side for medium/medium-rare.)  Once cooked, cover the steak with foil and allow to rest for 10 minutes.  Just before serving, thinly slice the steak against the grain.

While the steak cooks and rests, prepare your sriracha mayo by combining the mayonnaise and sriracha sauce.  Also, if desired, slightly toast the inside faces of the sliced baguettes on the grill.

To build your Vietnamese Banh Mi Steak Sandwiches, start by spreading a liberal amount of the sriracha mayo on the bottom face of each toasted baguette.  Layer the thinly sliced cucumbers on top of the mayo and then arrange a generous amount of the steak over the cucumbers.  Use tongs to transfer the drained carrots and radishes over the steak (don’t soak your sandwich with extra pickling liquid) and finish off your sandwich with a garnish of cilantro and the top half of the baguette.  Serve with a cold, light beer and enjoy!

Banh Mi Sandwich

Our St. Lucia Honeymoon

Matt and I enjoyed a fantastic 10 days on the beautiful island of St. Lucia for our honeymoon.  We spent the first week at Crystals, a boutique bed and breakfast on top of a mountain in the rain forest.  Our cottage, “Papaya,” featured a shaded porch, a private pool, a bright red sundeck and oh yeah… drop dead gorgeous views of St. Lucia’s iconic Piton mountains!!

233 The view from our private sundeck at Crystals

Here’s a shot turned around 180° looking back at the Papaya cottage.  Can you see Matt relaxing in the shade?

046 Our cottage at Crystals

While were at Crystals we used our 4×4 rental car to brave the windy roads (Lucians drive on the left!) to do some sightseeing in the Soufriere area of the island.  We visited the botanical gardens, drove into the drive-in volcano, smelled the sulphur springs, relaxed on sugar beach (Anse des Pitons), hiked the Tet Paul nature trail in a rainstorm, and spent a day on a 42 foot yacht sailing along the coast.  Perfect!

We passed a scenic overlook every day on our way into Soufriere but it was rainy and/or overcast for most of the first week so we didn’t bother stopping to take photos.  Lucky for us, on our last day at Crystals the sky cleared and the sun came out so we finally stopped and got our photo opp.  This photo shows Soufriere, nestled in a volcanic valley in the shadow of Gros Piton and Petit Piton. Beautiful, isn’t it?

250 Soufriere, St Lucia

After our time at Crystals we left Soufriere and drove 40 minutes north to Anse Cochon for our last three days.  We stayed at Ti Kaye, a cliffside resort with amazing views of the Caribbean Sea everywhere we looked.  Ti Kaye had a restaurant on site so we returned our rental car and settled in for a very relaxing finale to our honeymoon.

337 Anse Cochon, St. Lucia

We had our own private cottage at Ti Kaye with an outdoor shower and a large sun porch with — you guessed it! — beautiful views.  We spent a lot of time lounging at the pool and beach, ate wonderful meals at the Kai Manje restaurant, indulged in a luxurious “honeymooners” couples massage at the Kai Koko spa, and – during what was possibly my favorite 3 1/2 hours of the trip – enjoyed an epic 13-bottle wine tasting session with Cleus the Sommelier in the Ti Kave wine cellar.

After our 10 days were over we headed back to reality.  It was sad to leave St. Lucia but also nice to come home to Bailey and officially start our married lives together!  🙂

If you’re interested, you can view a Flickr album of my favorite photos from St. Lucia here: Annie’s Honeymoon Picks.  If you’re really interested in seeing lots and lots of photos, you can view our complete honeymoon photo album here: The Entire Honeymoon Album.  Thanks for stopping by!

180 Matt and Annie in front of Gros Piton

July Update: A new streak begins and the garden keeps on growing!

Matt and I are home after spending 10 days in beautiful St. Lucia and a few days in Western Maryland for the DockDogs Regional Championships.  I’ll post honeymoon photos and the dockdogs recap soon, but in the meantime I have some updates!

After 205 consecutive days my mile-a-day streak ended the day before our honeymoon began (June 13th).  I initially thought I would keep on streaking while in St. Lucia but for the first week we were staying in the rainforest on top of a mountain at the end of a precariously washed out dirt road so running a mile a day wasn’t really feasible.  Oh well!  🙂 As of July 1st I have started a new streak.  We’ll see if I can beat 205 days… I’ll reach that goal on January 21, 2014.

In other news, we had record rainfall in June and as a result my vegetable garden has been growing like crazy!  Check out this photo that I took today… a comparison shot from my May 10th gardening post is below.

Garden 7-3-13

Garden (5-10-13)

Quite a difference, right?  When we got home from St. Lucia I was shocked to see how much the parsley, thyme and tomatoes had grown and I was overwhelmed by the enormous zucchini plants!!  (I think my basil was overwhelmed too… it’s now living in the shadow of those large-leafed behemoths!)  Here are some other photos of my garden and back yard flowers from today.

While I was wandering around with my camera this afternoon I was surprised to spot a white-tailed deer in the front yard.  It is quite common for us to see deer in our area (usually in other peoples’ yards or dashing across the road!) but it is very, VERY rare to see a deer in our yard because Bailey has made it her life mission to stalk and chase any and all wildlife that comes within her invisible fence boundary.

I guess the neighborhood deer herd realized that Bailey was not at home for most of June and as a result they are now making themselves comfortable in the front yard.  Luckily Bailey was on her game this afternoon and as soon as this deer made a move Bailey (who must have been stalking it from a different angle as I snapped away with the camera) came blasting over, chased it away, and then proceeded to roll and rub in the deer’s scent for a good 30 seconds.  Good dog, Bailey (even if you do smell now…)

Well, that’s it for tonight’s update.  Happy 4th of July and have a great holiday weekend!!

Related Posts:
• Streaking, Reflections, and Other December Challenges (December 3, 2012)
• Streaking, Day 100 (March 1, 2013)
• Let the 2013 Gardening Season Begin! (May 12, 2013)
• Waiting for Red Tomatoes (July 4, 2012)

We’re Married!

Just a quick update to say WE DID IT!!  Matt and I got married on Saturday afternoon surrounded by our family and friends.  The sun was shining, the wine was flowing, and fun was had by all.  Here’s a sneak peek from our lovely wedding photographer, Melissa Hassey:

Wedding Photo Sneak Peek - Annie and Matt

Now it’s time for our honeymoon in St. Lucia… woohoo!  🙂

Grilled Shrimp Salad with Mediterranean Lemon Dressing

Matt and I are getting married in 2 days! All of our wedding prep is pretty much done and now we’re just relaxing and waiting for the weekend to get here. (Oh, and also checking the weather about a million times a day… Tropical Storm Andrea better hurry up and get out of here in time for our outdoor ceremony on Saturday afternoon!) 🙂

We’ve been going out to eat a lot lately but we did make one planned meal this week using a new cookbook that my mom got us as a wedding present. The book is entitled Salad for Dinner so, as you might guess, our meal was a nice and hearty entree salad! This was a fresh, summery meal that was perfect for the warm weather we had earlier this week. Doesn’t it look yummy?

Grilled Shrimp Salad with Lemon Mediterranean Dressing

Grilled Shrimp Salad with Mediterranean Lemon Dressing (from Salad for Dinner)

For the Mediterranean Lemon Dressing…
1 tablespoon Tahini (ground sesame seed paste)
2 cloves Garlic, pressed through a garlic press
1/2 teaspoon Salt
1/4 cup freshly squeezed Lemon Juice
1/3 cup Extra Virgin Olive Oil

For the salad…
1 lb. large Shrimp, peeled and deveined
2 tablespoons Olive Oil
1-2 cloves Garlic, pressed through a garlic press
8 oz. Mini Bell Peppers
8 cups Baby Spinach
1 pint Cherry Tomatoes, sliced in half
2-3 Persian Cucumbers, sliced into 1/4″ rounds
1/4 – 1/2 Red Onion, very thinly sliced
Feta Cheese, crumbled
Fresh Oregano Leaves
Lemon Wedges
Pita Bread Crisps*

Directions:
Combine all of the dressing ingredients in a jar. Close the lid and shake vigorously to combine. (You could also use a bowl and whisk the ingredients together if you don’t feel like shaking.) Refrigerate the dressing until you are ready to use it.

Mix together the shrimp, garlic and olive oil in a large bowl. Cover and refrigerate for at least 1 hour. After the shrimp has marinaded, remove from the fridge and stir in the mini bell peppers. Grill the shrimp and bell peppers over medium-high heat. When the shrimp turn pink (3-5 minutes), remove them from the grill and set aside. Continue cooking the bell peppers until they are soft and blackened in spots.

In a large salad bowl, combine the spinach, tomatoes, cucumbers and onion. Dress with the Mediterranean Dressing and mix well. (I used about half of what the recipe made.) Toss in the warm shrimp and bell peppers. Serve the salad in shallow bowls with pita crisps and garnish with feta, oregano, and lemon.

Grilled Shrimp Salad

Grilled Shrimp and Bell Pepper Salad Close Up

*To make pita bread crisps, slice pita bread into 1 – 1 1/2″ strips. Place on a cookie sheet, brush lightly with olive oil and season with salt. Bake in a preheated 425°F oven for approx. 10 minutes, turning once, until golden brown.

No-Bake Coconut Cream Pie

Hello!  I’ve been pretty bad about posting lately but I have a good excuse… Matt and I are getting married in 11 days!  That means that I’ve been busy making wedding things (place cards, welcome bags, menus, programs, burlap table runners…the list goes on) and doing pre-wedding activities like wine-tasting at our venue, Grace Winery, taking first-dance dance lessons (we’re doing the rumba!), writing our ceremony and going to dress fittings.  Whew!

But, enough about the wedding… this post is about PIE!  Easy, no-bake coconut cream pie, to be exact.  🙂  This is our second foray into the world of no-bake pies (see our Peanut Butter Cream Pie for the first) and it further solidified our love of these super-simple desserts.  We used store bought pie crusts, pudding mix, and cool whip and the whole recipe only took about 20 minutes of “active” time.  Perfect!

Coconut Cream Pie

Easy No-Bake Coconut Cream Pie (from Kraft.com; doubled to make 2 pies)

You will need…
4 – 3.4 oz. packages of JELL-O Vanilla Instant Pudding
4 cups Cold 1% Milk
1 – 16 oz. container Cool Whip Topping, divided
2 cups Sweetened Coconut Flakes, divided
2 store bought Graham Cracker Pie Crusts

Directions:
Beat pudding mixes and milk together in a large bowl of a stand mixer for 2 minutes.  Mix in about half of the cool whip (approx. 2 cups) and 1 ½ cups of the coconut.  Pour the mixture into the two pie crusts and refrigerate for at least 4 hours or until the pudding is set.  Store the remaining Cool Whip in the refrigerator (not the freezer) so that it will be spreadable later.

While the pudding sets, spread the remaining coconut out onto a baking sheet and toast in a preheated 350°F oven for 10-15 minutes.  Check on the coconut frequently and stir it to keep from burning on the edges.  The coconut is done when it turns golden brown.

Take the two pies and the Cool Whip out of the fridge and top each pie with the remaining Cool Whip.  Sprinkle the toasted coconut over top and enjoy!

Coconut Cream Pie

Coconut Cream Pie Slice

Let the 2013 Gardening Season Begin!

My mail-ordered tomatoes and pepper plants arrived from Burpee on Thursday afternoon which means that my 2013 vegetable season has officially begun! Matt and I planted everything and, barring any stray digging from Bailey, now we can just sit back and watch our garden grow.

Once again I’m using hanging galvanized steel buckets to house my upside down tomatoes. The tops of each bucket have parsley, thyme and rosemary growing in them. I was really happy with how these dual tomato-herb buckets worked out last year and I can’t wait to see how they do this year!

Garden (5-10-13)

Between the hanging buckets, fenced-in garden, and pots on the patio, I now have Zucchini, Tomatoes, Parsley, Thyme, Rosemary, Strawberries, Garlic, Jalapeno Peppers, Poblano Peppers, Basil, Mint, Oregano and Beans growing in my garden.

We also have several flowers planted in the yard and in pots including Tulips, Zinnias, Canna Lilies, Gladiolus, Painted Daisies, Ranunculus, Dahlias, Gerber Daisies, Superbells, and Marigolds. I love all of the bright reds, oranges, yellows, and pinks of the plants that have flowered so far, don’t you?

Happy Gardening Season!!

Related Posts:

Happy Birthday, Bailey!

Happy Birthday, Bailey!

It’s Bailey’s 6th birthday today! I think a photo montage of my four-legged best friend is in order, don’t you?

Here are some of Bailey’s most memorable moments since her fifth birthday:

Happy Birthday, Bailey!