Cassoulet with Smoked Sausage and White Beans

How do you prepare for a snow day?  Do you rush to the supermarket for bread, milk and eggs?  Or maybe turn up the heat so the house feels warm and toasty when you come in from shoveling?  In our house we try to take advantage of being snowed in by planning a big, slow-cooked meal that we normally wouldn’t have time to put together on a regular weeknight.

Flashback to Thursday, February 13th… A huge storm was dumping more than a foot of snow on our already snow-covered region, the local kids were all enjoying yet another snow day, and our office was closed.  Knowing that we’d have lots of time to cook, Matt and I decided to try a new stew recipe… something that required a little prep up front and that would be guaranteed to fill the house with the delicious aroma of slow-cooking meat and herbs as it simmered in the crockpot all afternoon.  I found the perfect candidate on MyRecipes.com… smoked sausage cassoulet!

616 Cassoulet

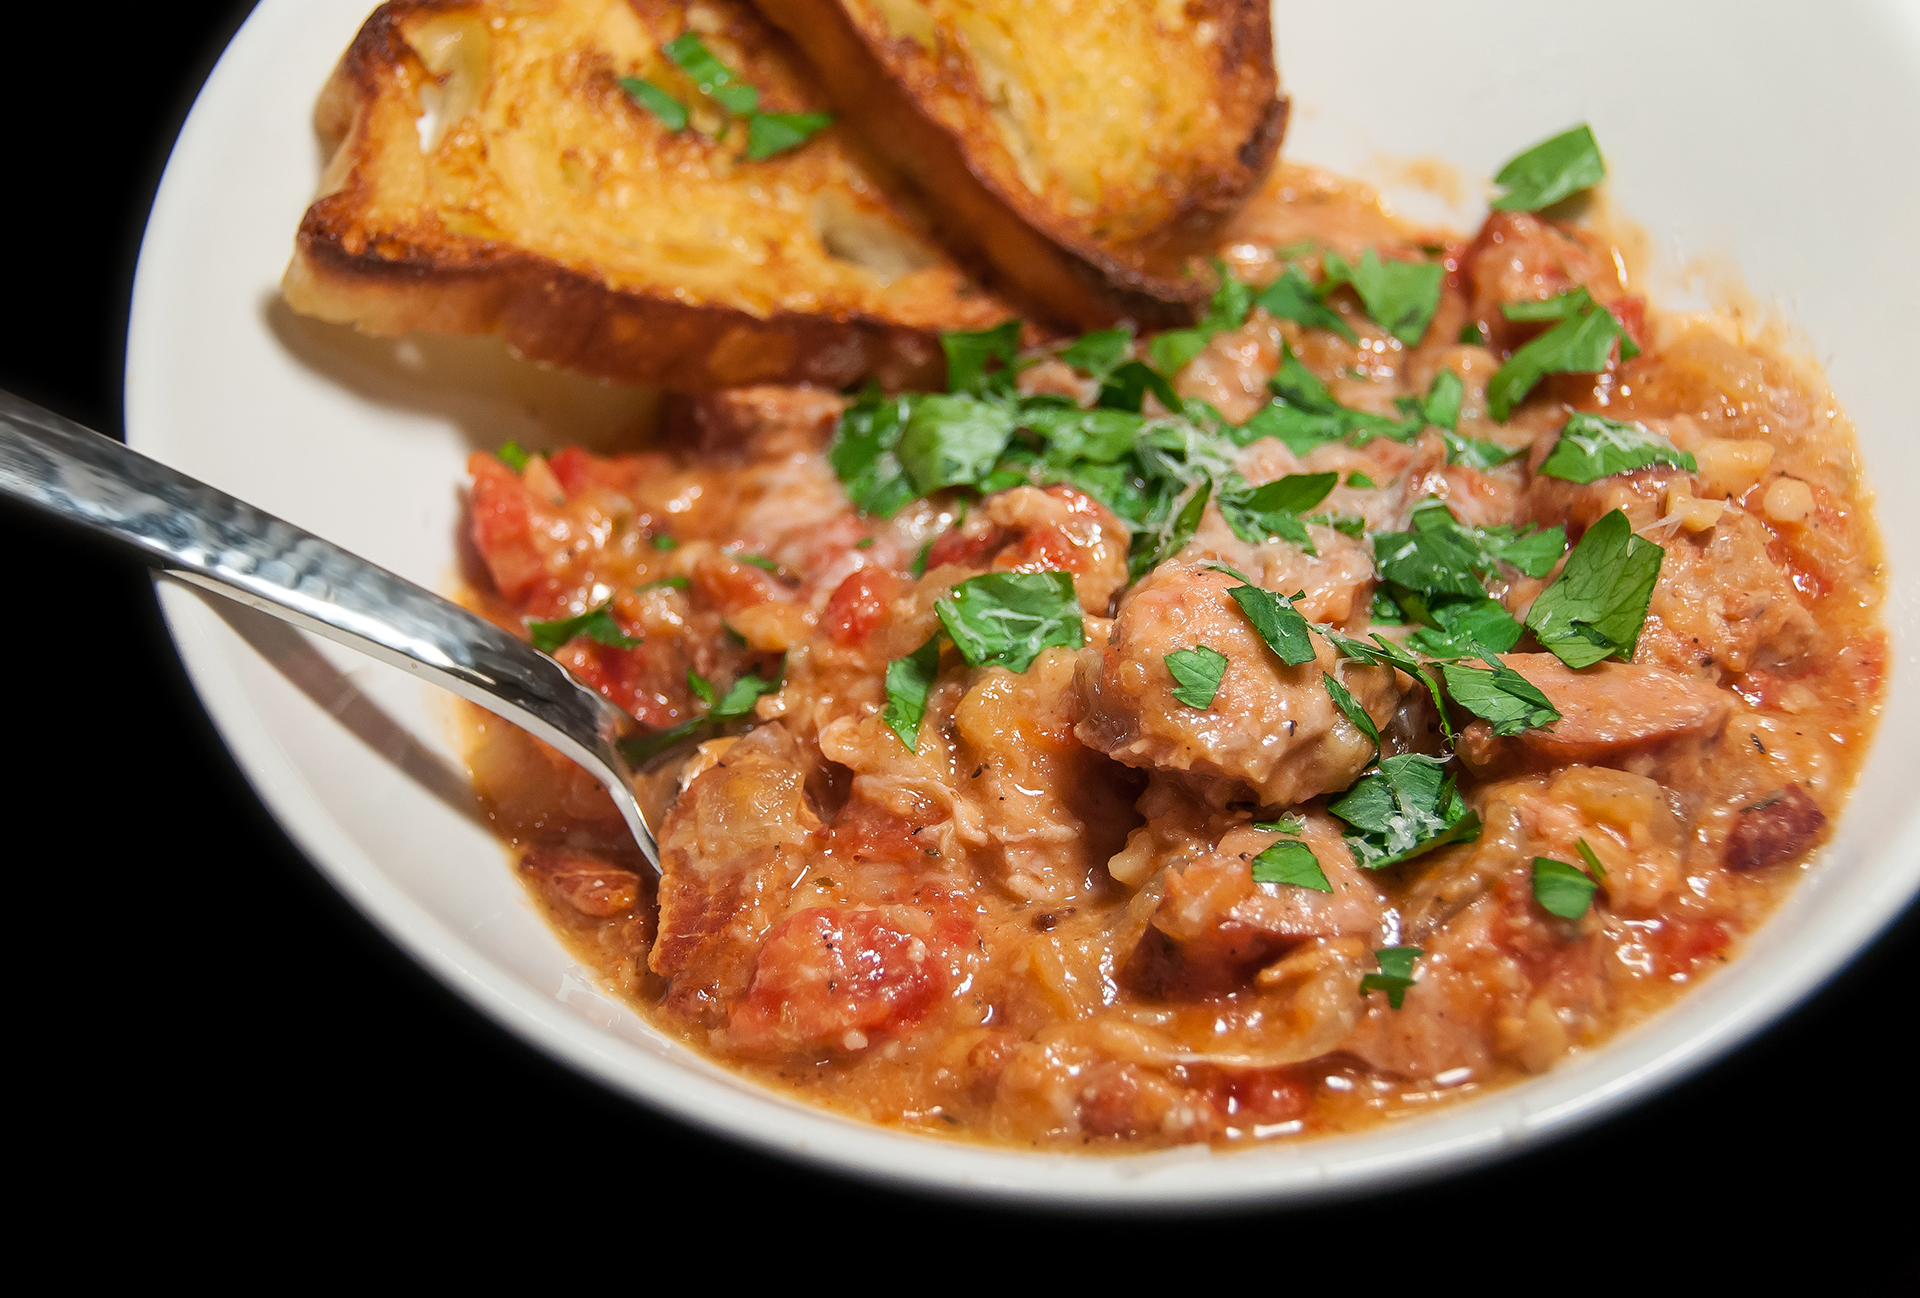
Cassoulet is a classic french dish that features slow-cooked white beans and meat.  White traditional versions of cassoulet call for duck confit, our snow day version of cassoulet kept things simple.  All of the ingredients were readily available at our local grocery store (on the eve of a snow storm, no less!) and, after being sauteed and slow-cooked all afternoon, they came together to make a delightfully hearty stew with smoky kielbasa, richly flavored white beans, and pork that was so tender you could cut it with a spoon.  Top that off with some freshly grated parmesan and chopped parsley and we had the ultimate culinary reward for all of the shoveling we did on Thursday… and it was a LOT of shoveling: about 14 inches of heavy, wet snow!

February 13 Snow Collage

Cassoulet with Smoked Sausage, Pork and White Beans (adapted from MyRecipes.com; serves 5)

You will need…
2-3 slices Bacon, uncooked, cut into approx. 1″ x 1/2″ pieces
12 oz. Smoked Sausage,* halved lengthwise and cut into 1/4″ slices
2 cups Chopped Onion
1/2 teaspoon Dried Rosemary
1 teaspoon Dried Thyme
3 cloves Garlic, minced
2 – 14.5 oz. cans Diced Tomatoes, drained
1/2 teaspoon Ground Black Pepper
1/2 teaspoon Salt
2 – 15 oz. cans Great Northern Beans, drained and divided
1 lb. Pork Tenderloin, trimmed and cut into 1/2″ cubes
Grated Parmesan Cheese, for garnish
Fresh Parsley, for garnish

*Choose a good quality smoked sausage as this will have a major impact on the overall flavor of the dish.  The first time we made this recipe we used Johnsonville Smoked Pork Kielbasa with great results.  The second time we also added in some spicy Andouille sausage (leftover from Jambalaya) and that added even more flavor.

621 Cassoulet

Directions:
Preheat a heavy-bottomed skillet over medium-high heat.  Cook the chopped bacon bits, stirring occasionally, until crispy.  Use a slotted spoon to transfer the cooked bacon to a bowl and set aside.  Add the smoked sausage to the bacon fat and saute until just starting to brown.  Use a slotted spoon to transfer the sausage to another bowl and set aside.  Add the onion, rosemary, thyme and garlic to the pan and saute until soft, approximately 4-5 minutes.  Add the bacon, tomatoes, salt and pepper to the pan, stir well, then bring to a boil.  Remove from heat.

Meanwhile, place 1 can’s worth of drained Great Northern Beans in a large bowl and mash with a potato masher until chunky.  (I found that doing this in a 3 qt pot worked well since the bottom of the pot is flat.)  Add in the remaining can of beans along with the browned sausage and pork and stir well.

Assemble your cassoulet in layers in a crockpot.  First, spread half of the bean mixture on the bottom of the crockpot.  Then, in layers, add half the tomato mixture, the remaining bean mixtue, and the remaining tomato mixture.  Cover and cook on LOW for 5 1/2 hours.  Stir the cassoulet before serving and top each individual bowl with grated Parmesan and parsley.  Enjoy!

597 Cassoulet

Do you have any go-to recipes that you love to make on snow days?
Tell me about them in the comments section!  🙂

Chicken and Shrimp Jambalaya

Happy Mardi Gras!  I was not raised observing Fat Tuesday, Ash Wednesday, or any of the other Lent traditions, but I’m certainly happy to use a holiday as an excuse to try a new recipe!

Chicken and Shrimp Jambalaya

I’ve been a huge fan of hearty one pot meals this winter so last weekend when we realized that Mardi Gras was just a few days away we decided that a flavorful Jambalaya would be the perfect recipe for Sunday night.   We consulted our trusty Cook’s Illustrated The New Best Recipe cook book and decided to make their version of a creole-style Jambalaya with shredded chicken thighs, andouille sausage, shrimp, tomatoes and rice.  The recipe came together fairly quickly (compared to some of our stews, at least!) and the resulting dish featured an impressive range of flavors from the smoky andouille and clam-juiced shrimp to the fresh parsley, and slow-cooked chicken.  Yum!

Chicken and Shrimp Jambalaya (from The New Best Recipe; serves 5-6)

You will need…
1 Yellow Onion, quartered
1 Celery Rib, cut into 2-3 inch pieces
1 Red Bell Pepper, quartered
5 Garlic Cloves, peeled
2 teaspoons Vegetable Oil
4 Bone-In, Skin-On Chicken Thighs
8 oz. Andouille Sausage, halved lengthwise and cut into 1/4″ pieces (buy a good brand of Andouille if possible; it should give this dish a lot of flavor!)
1 1/2 cups Long Grain White Rice (uncooked)
1 teaspoon Salt
1/2 teaspoon Fresh Thyme, minced (we used dried Thyme)
1/4 teaspoons Cayenne Pepper
1 – 14.5 oz. can Diced Tomatoes, drained with 1/4 cup of juice reserved
8 oz. Clam Juice
1 1/2 cups Chicken Broth
2 Bay Leaves
1 lb. Shrimp, peeled and deveined (we used frozen 30 ct. shrimp and thawed them beforehand)
2 tablespoons minced fresh Parsley

Directions:
Begin by transferring the onion, celery, red pepper and garlic into a food processor.  Pulse the vegetables briefly to finely chop them without pureeing them.  We have a miniature food processor so Matt did this in 4 steps (one per vegetable) and then combined all of the chopped veggies together on a plate.

Heat the vegetable oil in a large dutch oven over medium-high heat.  Use tongs to place the chicken thighs in the oil, skin-side down, and cook, undisturbed, for 5 minutes or until golden brown.  (Watch out, there’s a lot of splattering!)  Use the tongs to flip the thighs over and continue to cook for another 3 minutes, then transfer the thighs to a plate.  Reduce the heat to medium, add the chopped andouille, and brown for 3 minutes, stirring frequently.  (This step smells amazing, in my opinion.)  Transfer the browned andouille to a paper towel-lined plate.

Reduce the heat further to medium low, then add in the chopped vegetables.  Use a wooden spoon to scrape up any browned bits from the bottom of the pot and stir the veggies until softened, about 4 minutes.  Add in the rice, salt, thyme, and cayenne and stir well for about a minute to coat the rice in the chicken fat.  Stir in the tomatoes, tomato juice, clam juice, chicken broth, bay leaves and andouille.  Remove the skin from the chicken thighs then use your tongs to place the chicken, skinned-side down, on top of the rice mixture.  Bring to a boil then reduce heat to low and simmer, covered, for 15 minutes.  After 15 minutes stir the mixture once and flip the chicken thighs over, then cover and simmer for another 10 minutes or until the chicken is cooked through.  Transfer the chicken to a plate.

Place the shrimp on top of the rice mixture then cover and cook for 5 minutes until the shrimp are pink and cooked through.  (Be careful not to overcook the shrimp.)  When the shrimp are fully cooked remove the pot from heat and discard the bay leaves.  As soon as the chicken thighs are cool enough to work with, shred the meat into thin strands with your fingers.  Gently stir the shredded chicken and minced parsley into the stew and serve immediately.

Jambalaya

728 Jambalaya

Do you have a favorite Mardi Gras-inspired dish or tradition?
Please tell me about it in the comments section!

Easy Shrimp Scampi with Linguine

Every once in a while a recipe comes along that is so delicious and so easy to make that I know that I must blog about it the moment the meal is done.  Recipes that made it onto this blog the night of their consumption include my Mexican Pizza, Trader Joe’s style Eggplant Parm, and our Las Vegas-inspired Guacamole-Chiptole Burgers…  I just couldn’t wait until the next day to share them!  Well, after tonight’s dinner a new recipe is joining that elite list: Ina Garten’s 25-minute Shrimp Scampi with Linguine.  Doesn’t it look fantastic??

700 Shrimp Scampi

The concept is simple:  Sauté garlic in melted butter and stir in a pound of shrimp until just cooked through.  Then mix in freshly squeezed lemon juice, lemon zest, and fresh chopped parsley.  Toss with a generous portion of linguine, serve with crusty garlic bread and Voila! the perfect simple-yet-sophisticated weeknight meal is born.

683 Shrimp Scampi in the Pan

The Food Network advertises this Shrimp Scampi as the perfect “Make-It-Together” meal for Valentine’s Day, but it’s totally possible to throw it together on any old weeknight like we did.    Oh, and you’ll even have time to blog about it afterwards if you want!  🙂

705 Shrimp Scampi

Shrimp Scampi with Linguine (from the Food Network’s Ina Garten; serves 3)

You will need…678 The Good Stuff... Garlic, Parsley & Lemon
Olive Oil
1 tablespoon plus 1 1/2 teaspoons Salt
1 pound Linguine
3 tablespoons Butter
4-5 cloves Garlic, minced
1 lb. Shrimp (we used ‘large’ shrimp, about 31/lb.), peeled and deveined
1/4 teaspoons Ground Black Pepper
1/3 cup chopped Parsley
Zest from 1/2 large Lemon
1/4 cup Lemon Juice (approx. 1/2 large Lemon)
1/2 Lemon, sliced into 1/8″ half-rounds
1/4 teaspoon Crushed Red Pepper Flakes
Crusty Garlic Bread Crisps, Optional (drizzle olive oil on garlic bread slices and broil for 5 minutes)

Directions:
Bring a large pot of water to a boil then add in about a tablespoon of olive oil, 1 tablespoon of the salt and the linguine.  Cook pasta according to package instructions.  Meanwhile, melt the butter and 2 1/2 tablespoons olive oil in a large heavy-bottomed pan over medium-low heat.  Add the minced garlic and saute for one minute or until the smallest garlic bits are just starting to brown.  Add the shrimp, remaining 1 1/2 teaspoons salt, and black pepper and saute for about 5 minutes until the shrimp have just turned pink.  Remove the pan from heat and stir in the parsley, zest, lemon juice, lemon slices and crushed red pepper.

Drain the cooked pasta, then return to the pasta pot and gently stir in the shrimp mixture.  (I’d recommend using a spatula to scoop every last bit of flavorful garlic and parsley out of the shrimp pan!).  We served our shrimp scampi with crusty, crispy garlic bread.  Enjoy!

693 Shrimp Scampi686 Shrimp Scampi

White Bean Chili with Sausage and Chicken

It has been bitterly cold here in southeastern PA.  We haven’t seen above-freezing temperatures in a week and the 14 inches of snow that fell last Tuesday still look fresh and powdery… no melting whatsoever!  I’m not complaining, though.  I’ll take extreme winter weather with lots of snow and cold over a mediocre, unexciting winter any year!

The cold weather means that Matt and I have been making soups, stews, and chilis almost every week.  Right now we have a beef chili simmering on the stove that’s made with “real” dried beans that we had to soak overnight… first time I’ve ever done that!  Tonight’s chili still has another hour or so to cook before it will be ready so I thought I’d use that time to post about another stew that we made a few weeks ago… white bean chili with hot sausage, chicken, bacon, and five types of peppers… yum!!

White Bean Chili with Sausage, Bacon and Chicken

This white bean chili comes together really quickly… just under an hour from start to finish.  That’s much faster than tonight’s beef chili which has been simmering for nearly 7 hours! (Can you tell that I am impatiently waiting for it to be done?  I’m starving!!)  Getting back to the white bean chili, I found that the “white” cannellini beans and navy beans were a nice change from the basic kidney beans and black beans that my chilis usually include and I definitely liked the combination of bell peppers, jalapeño, green chiles, and chipotles en adobo.  Oh, and of course I thoroughly enjoyed the bacon and hot sausage… how could you not like that winning combination?  🙂

White Bean Chili with Sausage and Chicken (adapted from this recipe at Food52)

Chili Ingredients:
Olive Oil
5 slices Bacon, chopped
1 lb. Chicken Breast, cut into 1″ cubes
1 lb. Hot Italian Sausage, ground (or removed from casing)
2 Yellow Onions, diced
1 Green Bell Pepper, diced
1 Red Bell Pepper, diced
1 Jalapeño Pepper, minced
2 – 4 oz. cans Diced Green Chiles
2 Chipotles en Adobo, minced
3 cloves Garlic, minced
1 teaspoon Black Pepper
1 teaspoon Ground Coriander
3 tablespoons Cumin
1 1/2 tablespoons Chili Powder
3 tablespoons Mexican Oregano
3 tablespoons All-Purpose Flour
6 cups Chicken Stock
1 – 15 oz. can Cannellinni Beans, partially drained
1 – 15 oz. can Navy Beans, partially drained

Garnishes:
Your choice of Sour Cream, Grated Cheddar Cheese, Fresh Cilantro, Lime Wedges, Avocado, and/or Tortilla Strips

White Bean Chili In Process

Directions:
Heat a large (7-8 qt) stock pot over medium-high heat.  Add a few tablespoons of olive oil and brown the chopped bacon until it is just starting to get crispy.  Add in the chicken and sausage.  Brown the meat, stirring frequently, for approx. 12 minutes until the chicken is cooked through and the sausage is well crumbled.

Stir in the next seven ingredients (onion thru garlic) and saute until the onions are tender, about 5 minutes.  Add the spices (black pepper thru Mexican oregano), stir well, and continue to cook for another 3 minutes.  Sprinkle the flour over the mixture, stir, and cook for 3 more minutes.  Next, add the chicken stock 1 cup at a time, stirring and scraping the browned bits off of bottom of the pot between each cup.  Bring the chili to a boil then add the beans and stir well to combine.  Reduce the heat and simmer the chili for 20 minutes, stirring occasionally.

Serve the white bean chili in large bowls and top with your choice of garnish.  We enjoyed our chili with sour cream, cheddar cheese, and cilantro and it was delicious!

White Bean Chili 4

Here are some of the other Chilis and Stews that we’ve been making lately.  Enjoy and stay warm!
•  Pozole Verde
•  Pork and Green Chile Stew
•  Butternut Squash and Turkey Chili

Pork and Green Chile Stew

Hello there, blog world!  It’s been a while since I’ve posted but that’s because Matt and I have been in Las Vegas!  We were there all of last week and just got home late last night.  Being home after a long work trip is definitely nice but I do have to admit that I’m already missing Nevada’s weather.  Every afternoon the temps climbed into the mid-sixties and the sky was always perfectly clear and sunny.  Here in Pennsylvania, on the other hand, we’re about to get hit with another “Polar Vortex.”  Once that icy blast of cold air arrives tomorrow it’s going to stay below freezing for four days straight.  Brrr!

Pennsylvania’s winter weather does have its benefits, however.  Take for instance winter comfort food.  I’ll bet a hearty slow-cooked stew tastes WAY better in 20° Pennsylvania than it would in 60° Las Vegas, right? 😉  I could actually really go for a nice stew tonight for dinner.  We don’t have the ingredients on hand though so I’ll satisfy my craving by posting about this Pork and Green Chile Stew that I made last month.  Doesn’t it look yummy?

Pork and Green Chile Stew close up

I found this Slow Cooker Pork and Green Chile Stew recipe at Skinny Taste.  It was extremely easy to make – just cube and brown the pork and simmer all of the ingredients together in a crock pot for 4-5 hours – and the cooked pork was tender and moist.  Matt and I garnished our plates with cilantro, avocado and sour cream and these Mexican flavors added a really nice, bright finishing touch to the stew.  For anyone looking for a good Polar Vortex meal, I highly recommend this!

Pork and Green Chile Stew

Slow-Cooked Pork and Green Chile Stew (Recipe from Skinny Taste)

Stew Ingredients…
2 lbs. Pork Loin roast, trimmed of fat and cut into 2″ cubes
Salt and Pepper
Olive Oil
2 tablespoons All-Purpose Flour (or use a gluten-free flour for G-Free preparation)
1 medium Yellow Onion, diced
2 – 4 oz. cans Diced Green Chiles, drained
1-2 Jalapeño Peppers, diced with seeds and stems removed
1 – 10 oz. can Ro*Tel Tomatoes & Diced Green Chiles (not drained)
1/2 cup Low Sodium Chicken Broth
1 tablespoon Cumin
1/2 teaspoon Garlic Powder

Other Ingredients/Garnishes…
Cooked White or Brown Rice
Sour Cream (omit for Lactose-Free)
Sliced Avocado
Chopped Cilantro

Directions:
Season the cubed pork liberally with salt and pepper.  Heat olive oil in a large non-stick skillet over medium-high heat and add the cubed pork.  Cook the pork for approximately 4 minutes or until browned on all sides.  Gradually stir in the flour and allow the pork to continue browning for another 30 seconds to 1 minute.

Transfer the browned pork to a crock pot.  Add in the remaining stew ingredients (onion thru garlic powder) and stir gently to combine.  Cover and cook on high power for 4-5 hours or on low power for 8 hours.  When done, stir the mixture and, if needed, add salt and pepper to taste.  Serve the stew over rice and garnish with sour cream, avocado and cilantro.

Pork and Green Chile Stew

Candied Walnuts and Pecans

Merry Christmas!  Matt and I started off the holiday with a lunch party for work last Friday and then kept the fun going with dinner at my family’s house on Sunday, Christmas Eve dinner at our house, and Christmas Day dinner with Matt’s family.  At some point in the future I will post about the dinner that Matt and I made on Christmas Eve (standing rib roast with yorkshire puddings… YUM!) but for now I want to focus on some sweeter holiday treats that make great gifts for friends and family.  Here they are…

Candied Pecans

Oh yes, those are candied nuts!  Sugary, salty pecans with just a hint of cayenne, to be precise.  Don’t they look delicious?!? I found the recipe over at Smitten Kitchen and after a quick trip to Target for some walnuts and pecans we were ready to start cooking.  These candied nuts are really easy to make, by the way.  We simply coated the nuts with egg white, stirred in the sugars and spices, and baked them in the oven for 30 minutes.  After the nuts cooled completely I packaged them in jelly jars with a red bow and they were ready for gifting!

Candied Nuts

Candied Walnuts and Pecans (from Smitten Kitchen)

You will need…
2/3 cup White Granulated Sugar
1/3 cup Dark Brown Sugar
1 1/2 teaspoons Salt
1 teaspoon Cinnamon
1/4 teaspoon Cayenne Pepper (or hot smoked paprika)
1 Egg White
1 tablespoon Water
1 lb. Walnuts or Pecans (or any other type of nut you want to candy)

Directions:
Combine the sugars, salt, cinnamon and cayenne in a bowl and stir well.  Place the egg white and water in a separate large bowl and beat with a fork for approximately 30 seconds until the mixture is frothy.  Add the nuts to the egg white mixture and stir to coat evenly, then sprinkle on the sugar mixture and stir well until combined.

Candied Pecans before baking

Spread the nuts out in a single layer on a baking sheet lined with parchment paper.  Bake the nuts in a preheated 300°F oven for 30 minutes, stirring occasionally.  When the nuts are done baking separate them (we transferred them to another piece of parchment paper on the counter) and allow them to cool completely.  Store in an airtight container until you are ready to eat them (or gift them!).  I found that one pound of nuts filled approximately 4 1/2 ten-ounce Ball quilted jelly jars.

Candied Pecans

Magic Mint Chocolate Bark

Peppermint Bark was one of the first recipes that Matt and I ever made together.  I remember the experience clearly… we were home from college on winter break in my mom’s kitchen and we slaved away over a double-boiler for what seemed like hours until our dark chocolate and white chocolate mixtures reached the perfect level of melted-ness.  Then we layered the chocolates (making sure to give the dark chocolate time to set before adding the white) and topped our masterpiece with crushed candy canes.  The resulting bark was decadent and well worth our time, but it was not easy to make!

Fast forward to present day…  It’s now quite common for Matt and me to spend an hour or two in the kitchen making dinner on a weeknight so that peppermint bark no longer seems like such a daunting task.  Nevertheless, we still jump at the chance to make easy recipes every now and then.  That’s where this Magic Mint Chocolate Bark comes in.  This delicious, fancy-looking bark literally took about 6 minutes to make and no double boilers required!

Magic Mint Chocolate Bark

I first saw this recipe when Anne from UniHomeaker.com posted it a few weeks ago.  I immediately decided that we had to make this mint chocolate bark ASAP.  Check out Anne’s post on this chocolately treat… she used crushed pretzels in her bark and it looks delicious!

Magic Mint Chocolate Bark

** Magic Mint Chocolate Bark **

(recipe from the back of the Nestle Toll House Dark Chocolate and Mint Morsel bag)

You will need…
Two 10 oz. bags Nestle Toll House Dark Chocolate and Mint Morsels
1 handful Roasted, Salted Almonds, roughly chopped

Directions:
Line a jelly roll pan with parchment paper and pour all of the chocolate and mint morsels onto it.  Spread the morsels so they are all touching and arranged in a single layer.  Place the pan in a preheated 325°F oven for 2-3 minutes or until the morsels look wet and shiny.  Remove the pan from the oven and immediately swirl the chips together using the end of a butter knife.

Distribute the almonds evenly over the swirled chocolate.  To help the almonds sink into the bark, raise the pan about 3″ above the counter and drop it back onto the counter.  Repeat this process a few more times.  Refrigerate the bark for an hour or until completely cooled.  Break into pieces and store in an airtight container in the fridge.  Enjoy!

Magic Mint Chocolate Bark

Butternut Squash and Turkey Chili

It’s snowing out!  We were supposed to get a mere inch of snow today but it appears that the weather guys were WAY off… there’s already over 4 inches of snow out there!!  Here’s the view outside and the radar map… the snow doesn’t show signs of stopping anytime soon!

December 8th Snow

Cold and snowy weather is the perfect time to enjoy a batch of warm, hearty stew.  I have this pork and green chile stew from Skinny Taste cooking in my crock pot right now and I want to share another yummy concoction that I made a few weeks ago: Butternut Squash and Turkey Chili.  The original, vegetarian version of this recipe came from Pami over at Omnomalicious.  I would have been happy with a meatless stew but Matt likes his meat so I took some liberties with the recipe and added in some ground turkey just for him. 🙂

281 Butternut Squash and Turkey Chili

This chili was seriously awesome.  The butternut squash was soft and just the tiniest bit sweet, and it blended really nicely with the black beans, peppers, and onions in a tex-mex-style broth that had just the right amount of kick.  YUM!  I will definitely be making this again soon!!

Butternut Squash and Turkey Chili (adapted from Omnomalicious)

You will need…
1 Butternut Squash, peeled and cut into 1″ pieces
1 Onion, diced
2 Red Bell Peppers, diced
1 Jalapeño Pepper, diced
4 cloves Garlic, minced
2 Chipotles in Adobo Sauce, minced
1 can Diced Tomatoes
2 cans Black Beans, drained
1 cup Chicken Broth
1 tablespoon Cumin
1 tablespoon Chile Powder
1 tablespoon Mexican Oregano
1 lb. ground Turkey, browned
Salt and Pepper, to taste

272 Butternut Turkey Chili before and after

Directions:
Oh yeah, did I mention that this stew is amazingly easy to make?  Simply combine all of the ingredients in a crock pot then cover and cook on high for 5-6 hours or until the squash has reached your desired consistency.  Season to taste and serve with a slice of freshly baked cornbread!

284 Butternut Squash and Turkey Chili

Apple and Sausage Stuffing… Slow Cooker Style!

Stuffing is quite possible my favorite dish at Thanksgiving.  There’s just something about the combination of sausage, apple, bread, and spices that I find absolutely irresistible!  Last year I volunteered to make this classic side dish for my family’s Thanksgiving dinner but there was one problem… we had no oven space! Between the very large turkey, candied yams, green bean casserole, and cornbread there was not an inch of oven space to spare.  Therefore, I decided to make my stuffing in a slow cooker and it turned out great!

Slow Cooker Stuffing

Before I get to the stuffing recipe I want to share a link to another recipe from last year’s Thanksgiving feast that’s been getting a lot of Pinterest love lately… my Candied Yams.  Although these sweet potatoes with brown sugar and marshmallows will take up space in your oven for about 25 minutes they are super easy to make and those soft browned marshmallows are so delicious!!  Here’s the recipe.

Candied Yams!

Slow-Cooker Apple and Sausage Stuffing (recipe from A Year of Slow Cooking)

You will need…
12 cups of crusty bread, cut into 1/2 inch cubes
8-12 oz. Italian Sausage, crumbled and browned
3 tablespoons Butter, melted
2 Granny Smith Apples, peeled and chopped
2 Yellow Onions, chopped
1 1/2 cups Celery, diced
1 1/2 teaspoons Dried Sage
1 bunch Parsley, leaves finely chopped
1 teaspoon Salt plus more, to taste
1/2 teaspoon Ground Black Pepper
3/4 cup Chicken Broth, divided

Some of the stuffing ingredients (there was a lot more bread than pictured!)

Some of the stuffing ingredients (there was a lot more bread than pictured!)

Directions:
Spread the cubed bread onto a few large cookie sheets and bake in a preheated 350° oven for 20 minutes, stirring occasionally, until golden brown.  If desired, do this a day in advance and store the bread cubes in an airtight container overnight.

3-4 hours before you are going to eat, stir the bread cubes, sausage, and melted butter together in a large slow cooker.  My slow cooker was too small so I borrowed my mom’s and split the ingredients into two batches.  Add in the apples, vegetables and seasonings and stir until well mixed.  Pour in 1/2 cup of the chicken broth and stir again.  Cover and cook on high for approx. 3 hours or until the bread is browned and the vegetables are tender.  If the stuffing is too dry, stir in the remaining 1/4 cup chicken broth before serving.  Enjoy!

Oh, and Happy Thanksgiving!!  🙂

299 Turkey 2012

Rotisserie Chicken Taquitos

Believe it or not, one of the most popular recipes on this blog is my take on Rotisserie Chicken Burritos.  I’m guessing it must be the combination of cheesy deliciousness and the ease of using precooked rotisserie chicken that makes the burritos so popular. (And did I mention the melted cheese? YUM!)  With that in mind, Matt and I set out to see what other easy weeknight meal we could make with rotisserie chicken.  These baked chicken and poblano chile taquitos are the satisfying result!

Rotisserie Chicken Taquitos

Taquitos are basically little burritos that are bite-sized and perfect for dipping.  Just like burritos, taquitos are created by wrapping a tortilla around tasty filling, but unlike burritos the taquitos are baked in the oven (or fried) to give them a nice crispy texture.  The firm outer shell of the tortilla helps each little taquito hold its shape as you dip it into your choice of salsa, sour cream or guacamole.

We made our taquitos rather plump which worked out well since they were our main dinner entree.  If you wanted to serve these as an appetizer you could make them a little thinner.  Also, we made up our filling as we went along and we’ll probably continue to tweak it when we make these in the future, so have fun and play around with your own combination of shredded meat, veggies, and seasonings.  Just don’t forget the cheese!  🙂

Homemade Taquitos Montage

Baked Rotisserie Chicken Taquitos with Poblano Chiles

You will need…
3 small Poblano Peppers
1/2 Yellow Onion, finely diced
1 clove Garlic, minced
1 large Rotisserie Chicken Breast, meat removed from bone and chopped
1 teaspoon Chile Powder
1/2 teaspoon Cumin
1/2 teaspoon Paprika
1/2 teaspoon Mexican Oregano
Salt and Pepper, to taste
Approx. 1 cup Shredded Mexican Blend Cheese
Handful Cilantro Leaves, roughly chopped
1/4 cup Peanut Oil
12-18 Small Corn Tortillas
Sour Cream and Salsa, for serving

Directions:
Place the poblano peppers on a rimmed baking sheet and broil on the top rack of an oven for 10-15 minutes, turning occasionally, until the pepper skin is blistered and starting to blackened.  Remove from the oven and transfer the peppers to a glass bowl.  Cover the bowl for 5-10 minutes with a dish towel to hold in the moisture.  Then, carefully peel the skin off of the poblanos (it should come off pretty easily), remove the seeds and finely chop.

Saute the diced onions and garlic in a non-stick pan over medium-high heat until translucent.  Add in the chopped poblanos, chicken and seasonings (chile powder through salt and pepper) and stir well.  Saute until ingredients are heated through then transfer to a large bowl.  Stir in the shredded cheese and cilantro to complete your taquito filling.

Heat the peanut oil in a small pan over medium heat.  Use tongs to place a tortilla in the oil.  The oil is hot enough when small bubbles appear around the outer edge of the tortilla.  (It’s too hot if the oil is bubbling wildly and/or causing the tortilla to lift up out of the oil.)  Allow the tortilla to heat in the oil for 20-30 seconds, then use the tongs to flip it over and cook for another 15 seconds.  Lift the tortilla out of the oil, allow the excess oil to drip off, then transfer to a cutting board.  Fill the tortilla with a small amount of the filling (approx. 2-3 tablespoons), roll it up, and place it seam-side down on a baking sheet.  Repeat this process with the remaining tortillas.

Bake the taquitos in a preheatead 350°F oven for 20-30 minutes or until the tops are golden brown.  Serve with sour cream and salsa.

Taquitos!