Chocolate-Dipped Coconut Cookie Sticks

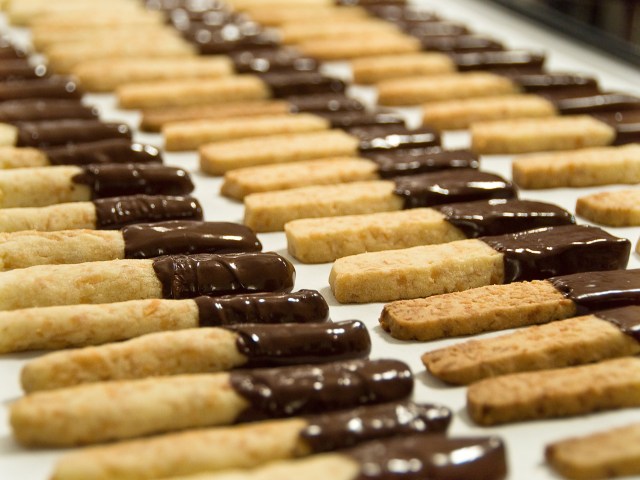
Merry Christmas Eve Eve!  🙂  Matt and I kicked off our holiday cooking last week by baking dozens of Chocolate-Dipped Coconut Cookie Sticks.  We chose coconut cookies because I have fond memories of making a similar cookie with my mom years ago so I thought it would be fun to recreate them this year.  I don’t have my mom’s original recipe so I used this recipe from Vesta Vamps and it was perfect!  The cookies turned out buttery, crisp and chocolatey and they looked great “wrapped” in mason jars with red bows.  We shared several jars with friends and family and still have a couple dozen left over for ourselves.

Chocolate-Dipped Coconut Sticks

Chocolate-Dipped Coconut Cookie Sticks (from Vesta Vamps)

You will need…
1 pound (4 sticks) Butter, at room temperature
1 1/3 cups Sugar
3/4 teaspoon Salt
3 Egg Yolks
2 teaspoons Vanilla
4 2/3 cups All-Purpose Flour
1 bag (approx. 5 1/2 cups) Sweeted Coconut Flakes
16 oz. Semisweet Chocolate, roughly chopped

Directions:
In a stand mixer beat together the butter, sugar and salt until light a fluffy, approximately 3-4 minutes.  Beat in the egg yolks, one at a time and add the vanilla.  Beat until smooth, then add in the flour in small increments and mix until combined.  Scoop the dough out of the bowl with your hands and form into two dough balls.

Row after row of cooling cookies

Meanwhile, empty the bag of coconut out onto a large rimmed cookie sheet and place in a preheated 350° oven.  Toast the coconut for 15-18 minutes until golden brown, stirring frequently.  Remove the toasted coconut from the oven and allow to cool.

Place one of the dough balls and half of the toasted coconut into the mixer bowl.  Mix until combined and then remove the dough from the bowl and divide in half.  Use your hands to form each dough half into rectangles that measure approximately 18 in. long by 5 in. wide and 1/2-3/4 in. tall.  Place the dough rectangles onto parchment paper and allow to chill in the refrigerator for at least 30 minutes.  Repeat this step with the second half of the dough; you should end up with 4 chilled rectangles.

Slicing the dough into sticks

Cut the chilled dough into cookie sticks that are approximately 1/2 inch wide.  Roll the dough slightly between your palms to create a round cookie (or leave it flat to create more of a biscotti-type shape) and place the dough sticks onto a non-stick cookie sheet.  Bake each batch of sticks in a preheated 350° oven for 12-14 minutes until golden brown.  Allow the cookies to cool on the tray for 5 minutes and then carefully transfer them to cooling racks until they cool completely.

Cooling cookies

Place the chopped chocolate in a double boiler bowl over simmering water and stir until it melts.  Dip the end of each cookie into the chocolate mixture, scrape any excess chocolate off on the side of the bowl, and place each of the cookies on parchment paper to cool.

This makes about 120 cookies and they are perfect to share with friends and family around the holidays!

These cookies make great gifts!

Peanut Butter Cream Pie

This Peanut Butter Cream Pie is the easiest pie we’ve ever made!  We wanted to bring a dessert to Matt’s parents’ house for the Fourth of July and, as luck would have it, Cooking Light sent me an email featuring easy no-bake summer desserts just as we were deciding what to make.  This pie took about 15 minutes to prepare and it was creamy, rich, and delicious.  Oh, and it’s somewhat healthy, too!  Cooking Light says that each piece has only 302 calories which is pretty good considering how decadent this pie tastes!  The original recipe can be found here.

Peanut Butter Cream Pie  (from Cooking Light)

You will need…
1 cup Confectioner’s Sugar
1 cup Reduced Fat Creamy Peanut Butter
1 – 8 oz. block Reduced Fat Cream Cheese, softened
1 – 14 oz. can Fat Free Sweetened Condensed Milk
12 oz. Low Fat Cool Whip, thawed
2 – 6 oz. pre-made Graham Cracker Pie Crusts
Hershey’s Chocolate Syrup

Directions:
Put the confectioner’s sugar, peanut butter, and cream cheese in the bowl of a stand mixture and mix on low speed until combined.  Add the condensed milk and beat on medium speed until well combined and creamy.  Fold in the cool whip and then divide the mixture between the two pie crusts.  Chill the pies in the freezer for at least 8 hours.  For the best pie texture, leave the pie in the freezer until serving (it won’t be completely frozen solid).  After cutting the pie, drizzle chocolate syrup on each slice.

Rainy Day Cupcakes

It has been raining all day (2.12″ worth of rain so far!) so I haven’t been able to do much in the yard besides watch the grass seed we planted last weekend wash away.  Oh well!  I decided to make the most of being stuck inside by tackling a cupcake recipe.

Baking is not my strong point and we’ve had more than one frosting recipe go awry, so I was delighted when these cupcakes turned out exactly right!  The frosting is light and fluffy and the cakes puffed up nicely in the oven.

As you’ll notice, most of my photos are rather dark.  Believe it or not, I was actually taking the photos by a big window at 4:00 in the afternoon but it’s so dark out that these look like night shots.  I think the dark shadows convey the mood of the day pretty well.  Oh, and I also listened to Johnny Cash the entire time I made these so he added a bit of moodiness as well.  🙂

Vanilla Cupcakes with Chocolate Buttercream Frosting  (from The Complete Magnolia Bakery Cookbook)

You will need:
For the cupcakes…
1 1/2 cups Self-Rising Flour
1 1/4 cups All-Purpose Flour
2 sticks Unsalted Butter, at room temperature
2 cups Sugar
4 Eggs, at room temperature
1 cup 2% Milk
1 teaspoon Vanilla Extract

For the frosting…
3 sticks Unsalted Butter, at room temperature
2 tablespoons 2% Milk
9 ounces Semisweet Chocolate
1 teaspoon Vanilla Extract
2 1/4 cups Confectioners’ Sugar

Directions:
Combine the two flours in a small bowl and combine the milk and vanilla extract in a measuring cup.  Set both mixtures aside.

In the mixing bowl of an electric mixer, beat the butter until it is smooth.  Add the sugar gradually and beat until fluffy, about 3 minutes.  Add the eggs, one at a time, beating well after each egg.  Add the flour mixture and the milk mixture in three parts, alternating between flour and milk and beating  between each flour-milk addition.  Do not overbeat.  Use a silicone spatula to scrape the batter off of the sides of the bowl and make sure that all of the ingredients are well mixed.

Spoon the batter into lined muffin tins and fill each cupcake liner approximately 3/4 full.  In my case, this yielded 20 cupcakes.  I only have one muffin pan so I did a batch of 12 first and then a batch of 8.  Place the muffin pan on the center rack of a preheated 350° oven and cook for approximately 23 minutes or until a toothpick inserted into the center of a cupcake comes out clean.  Cool the cupcakes completely before icing.

For the frosting, start by melting the chocolate in a double boiler over simmering water.  When the chocolate is completely melted and smooth, remove it from the heat and allow it to cool to lukewarm before adding it to your frosting mixture.

I finally got to use the double boiler that my brother got me for Christmas!

In the bowl of your electric mixer, beat the butter until creamy, approximately 3 minutes.  Add the milk and beat until smooth (watch out, it splatters!!).  Add the melted chocolate and beat for approximately 2 minutes.  Add the vanilla and beat for another 3 minutes.  Gradually add the sugar and beat on low speed until the frosting reaches your desired consistency.

My first successful frosting! (There have been many failures before this..!)

To frost my cupcakes, I transferred the frosting into a large resealable gallon bag and snipped about 3/4″ off of one of the corners.  I squeezed the frosting out onto each cupcake and then used a knife to spread the frosting evenly over the cake.

What do you do on a rainy Sunday when you can’t go outside?  Please share!  🙂